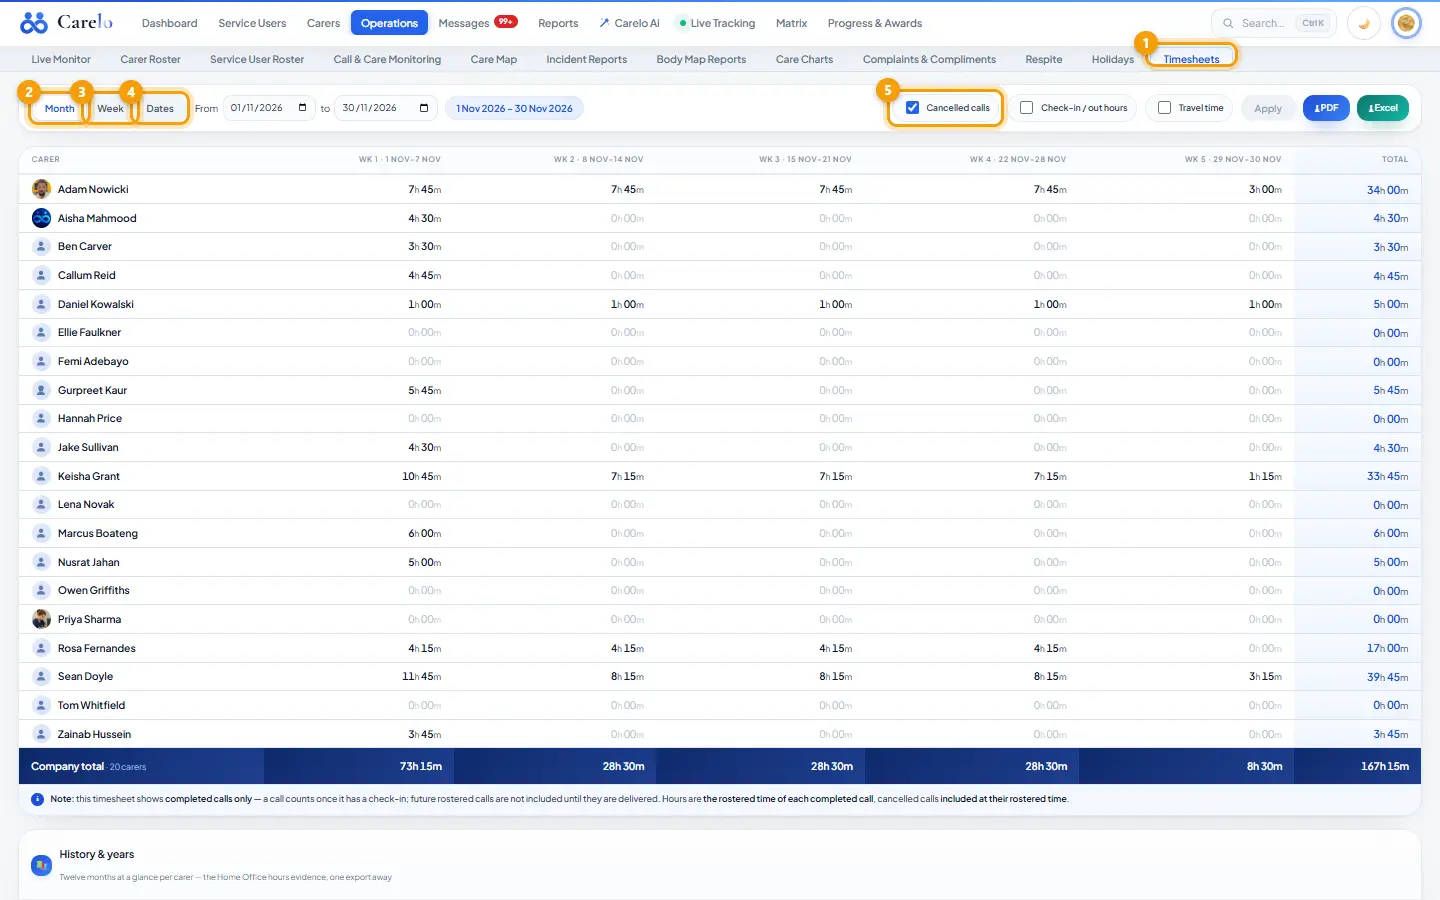
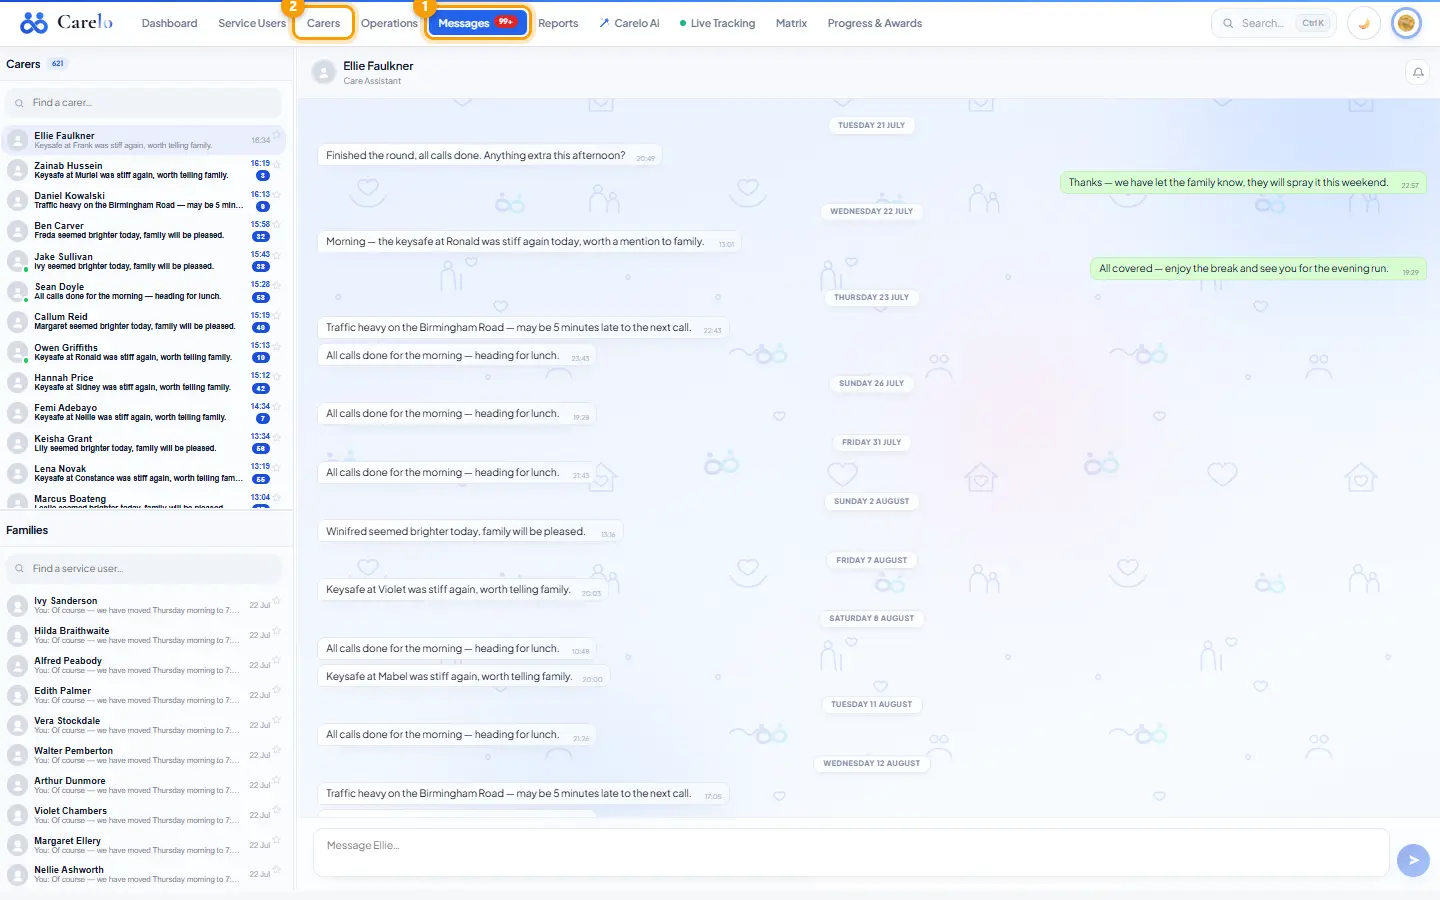
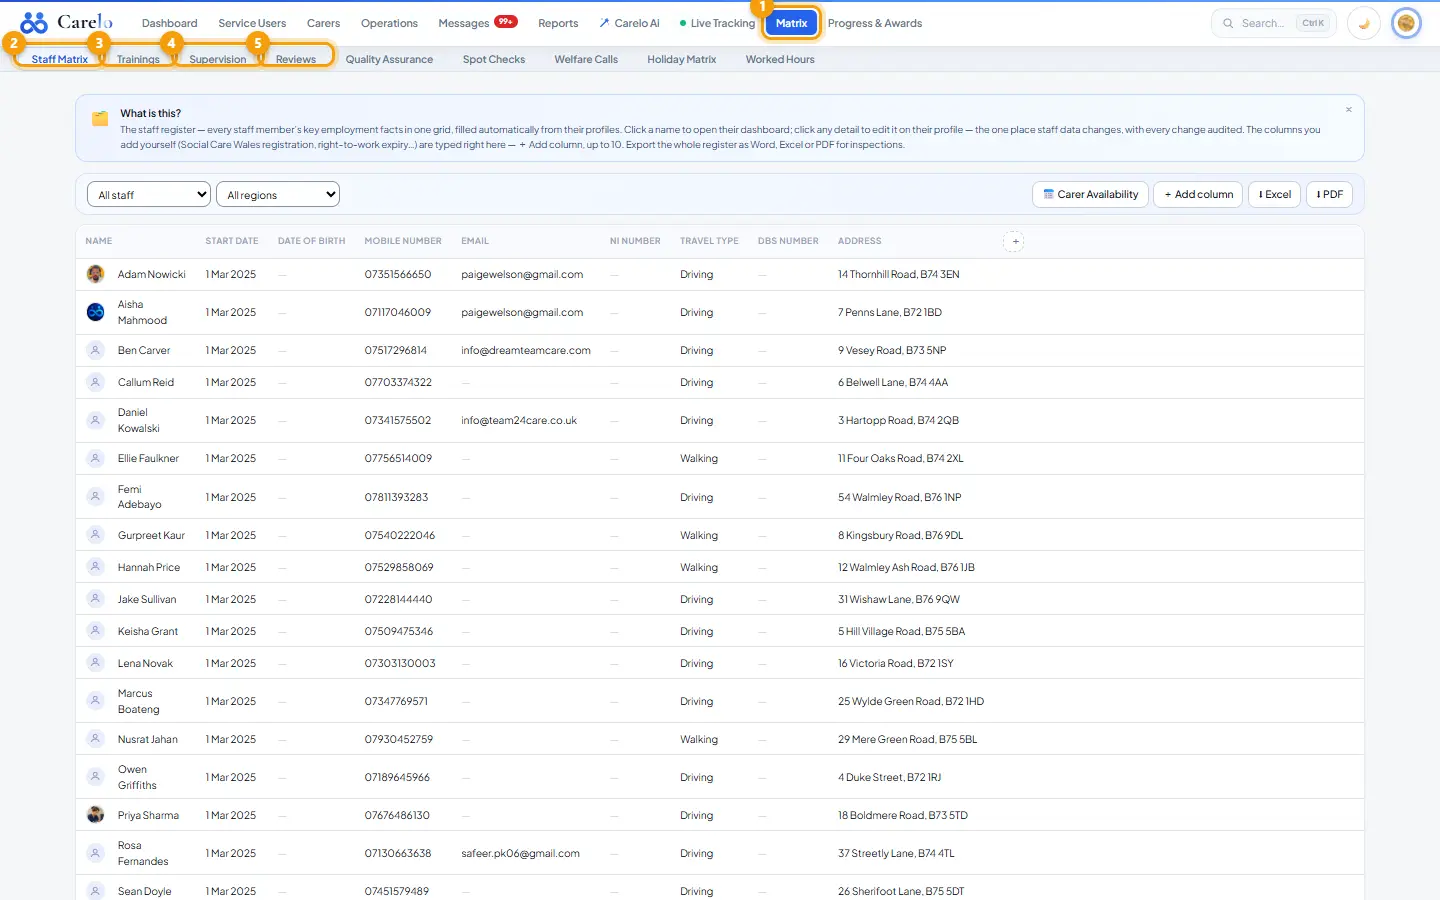
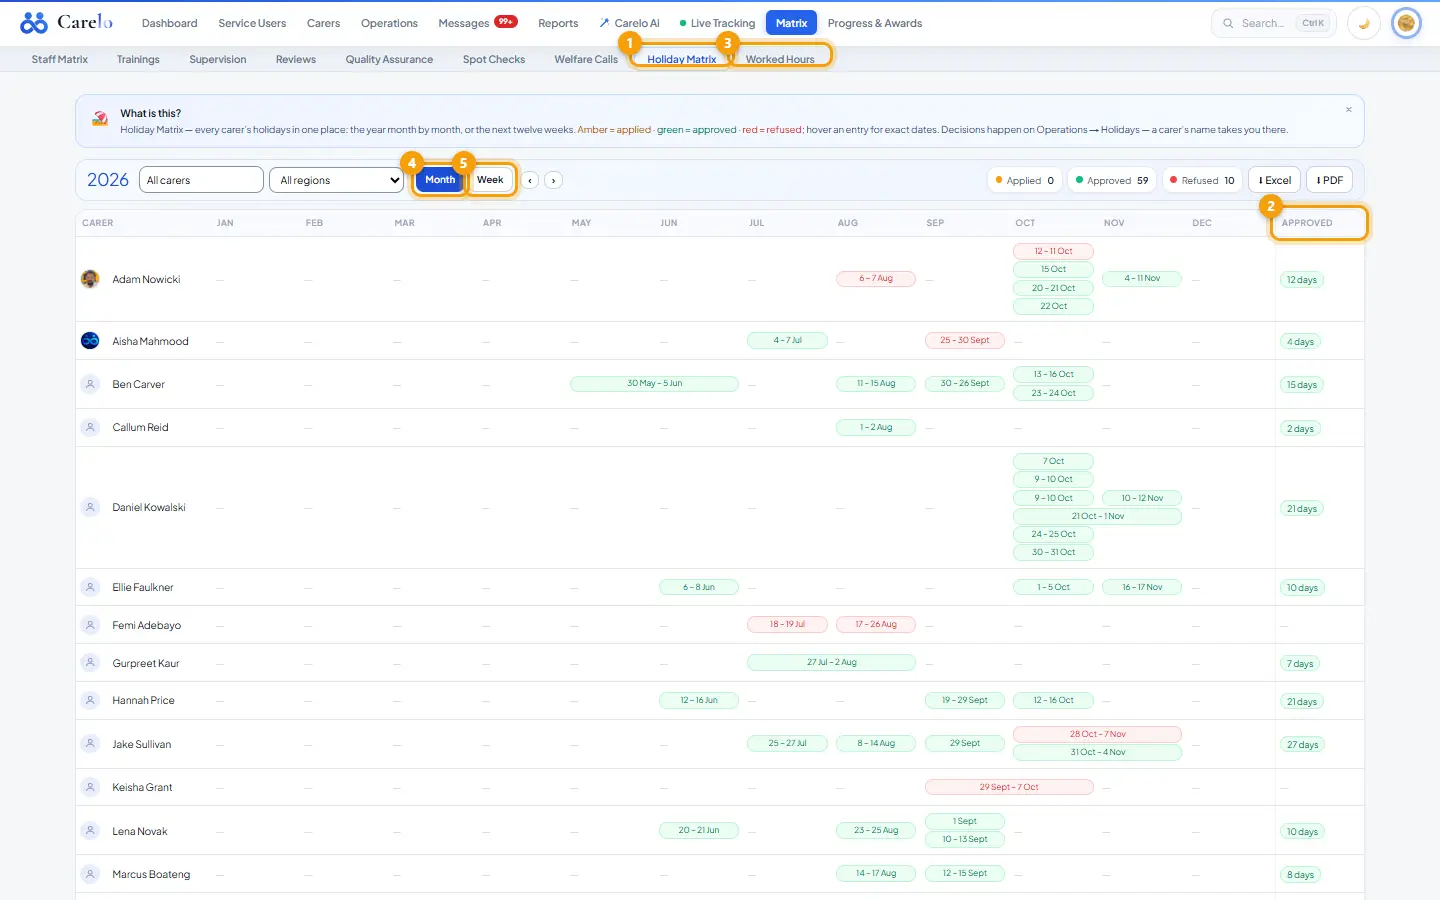
Every screen and every task in the Carelo office, step by step: service users, carers, the rota, compliance, reports, settings and billing. Written for owners, managers and coordinators.
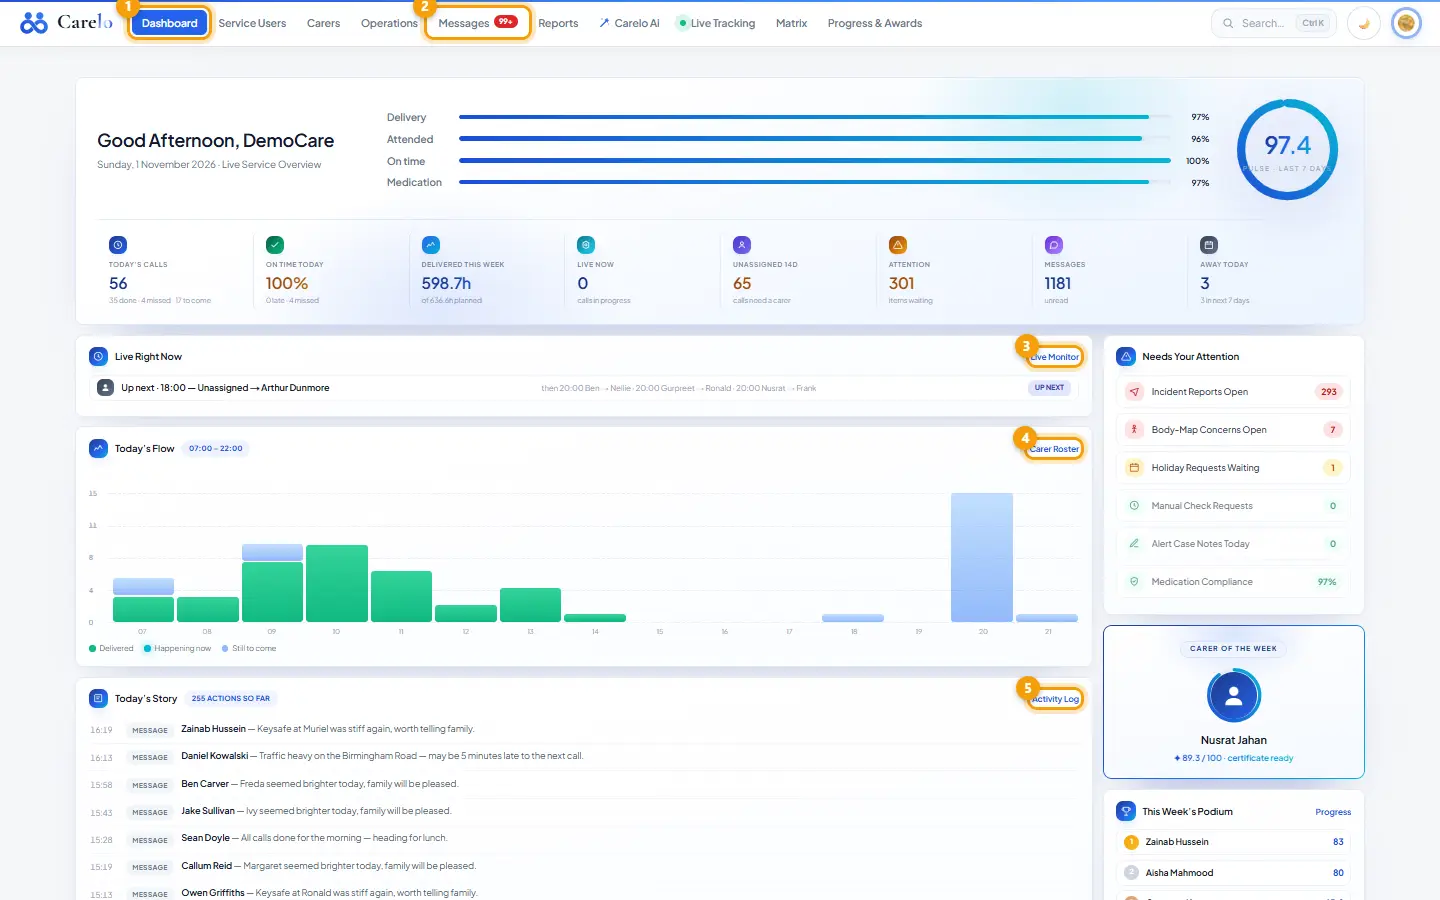
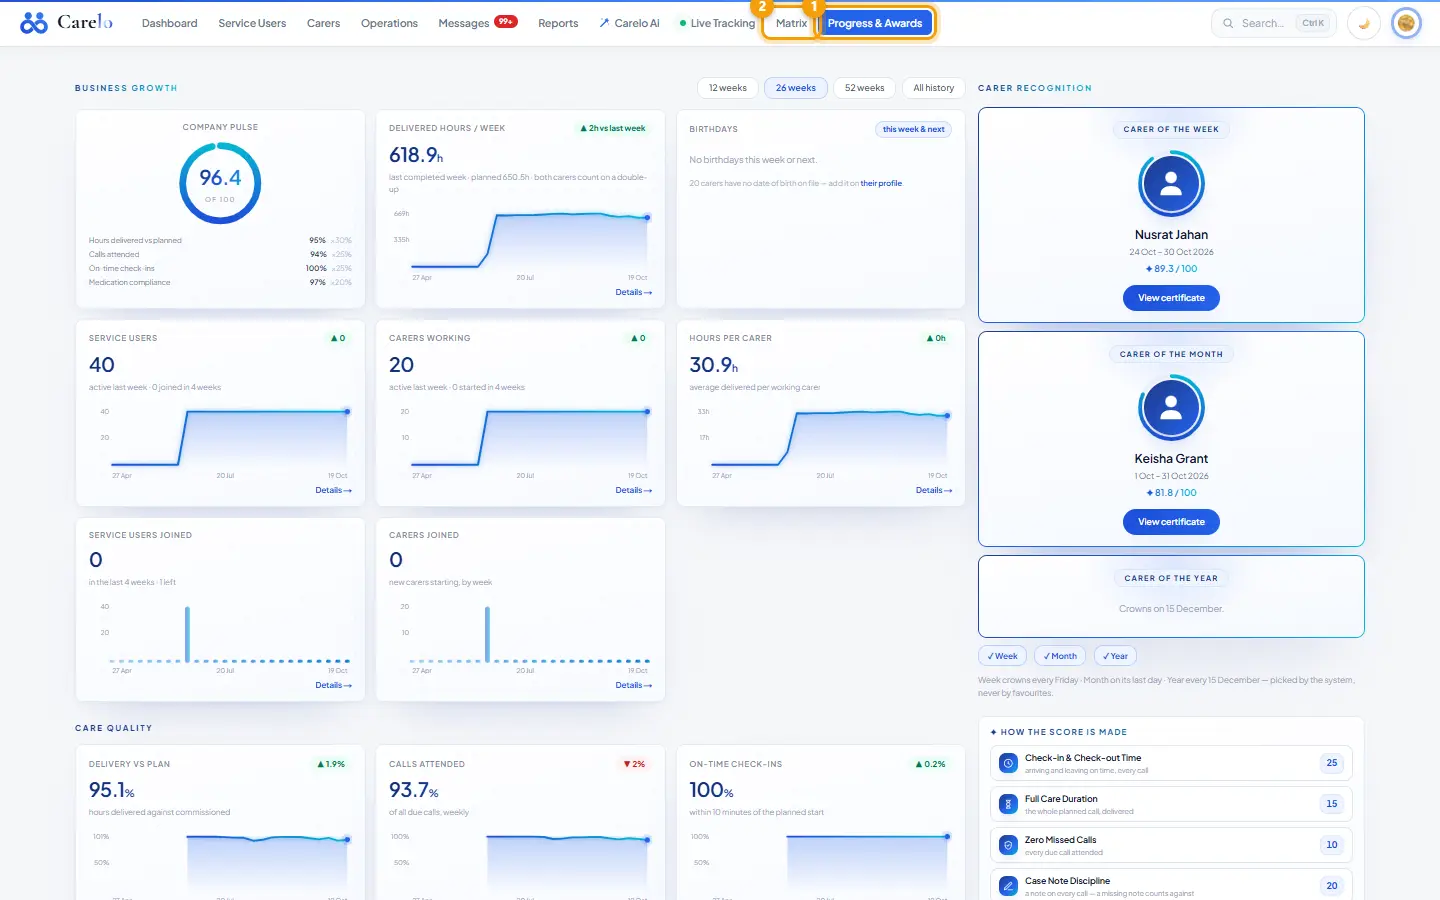
The Dashboard is the first page after sign-in: today's calls, who is live, what needs attention, and the week's picture, all computed inside the database so it opens fast for a company of any size. Every number is scoped to your branch and region access. Every tile and card is a link into the page that holds the record.
Where to find it
Main menu → Dashboard (or the Carelo logo, top left).
How to
Read the top row
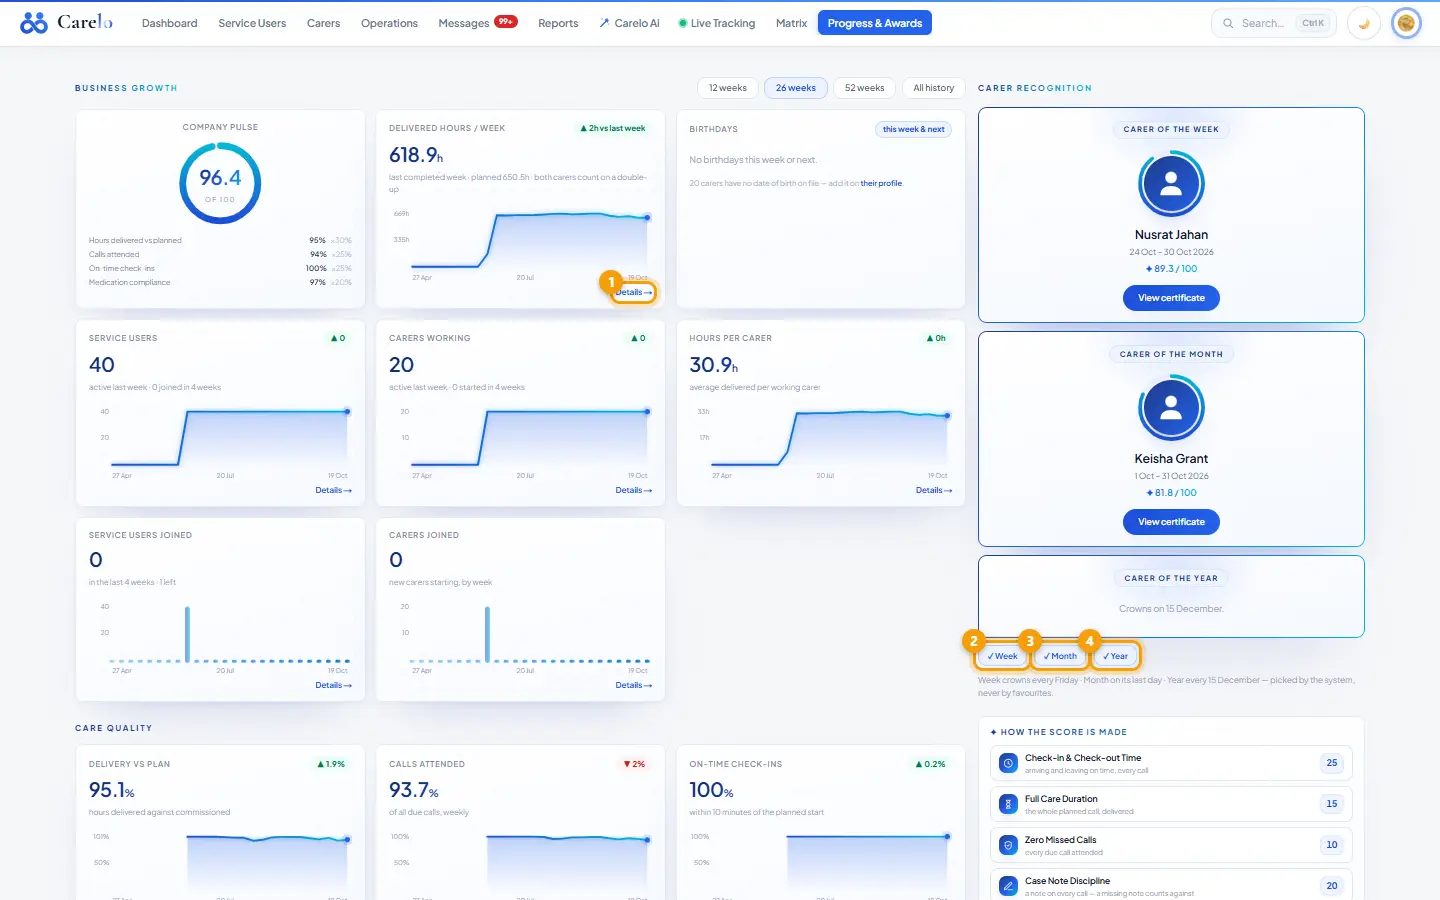
The greeting carries the Company Pulse dial (last 7 days): Delivery, Attended, On time and Medication weighted together. When check-ins are not being recorded, Delivery and Attended show "—" rather than a false zero. Clicking the dial opens Progress & Awards.
The eight tiles underneath:
Today's Calls — active calls, done, missed, still to come → Live Monitor.
On Time Today — on-time percentage of today's check-ins, with late and missed counts → Call & Care Monitoring.
Delivered This Week — delivered hours of planned hours → Timesheets.
Live Now — calls in progress → Live Monitor.
Unassigned 14d — calls with no carer in the next 14 days → Carer Roster.
Attention — open incidents + open body-map concerns + holiday requests waiting + manual check requests + alert case notes today → Incident Reports.
Messages — unread → Messages.
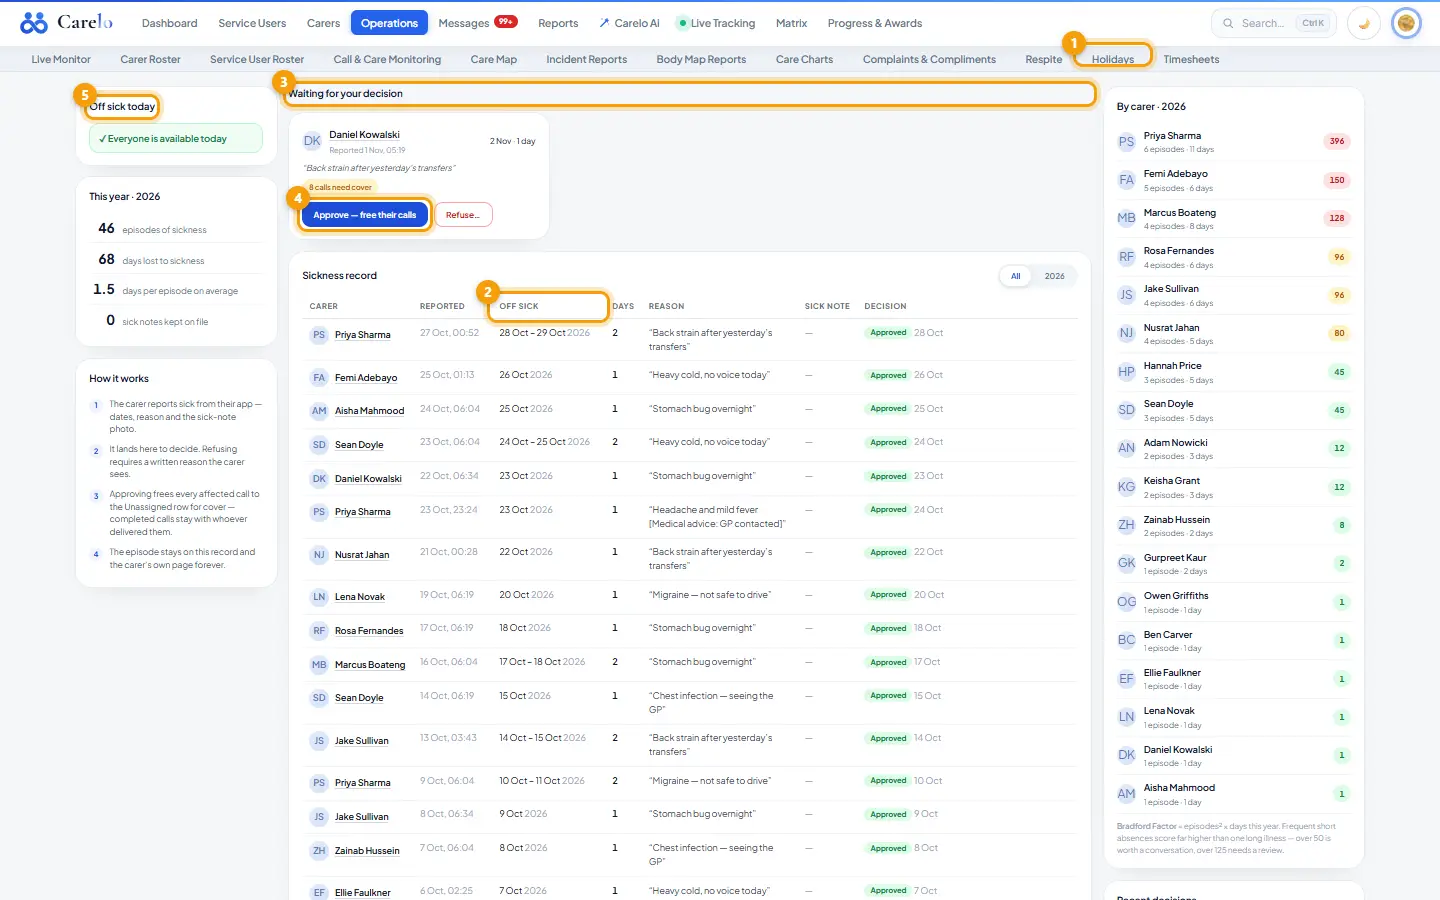
Away Today — carers on leave today and in the next 7 days → Holidays.
Work the cards
Live Right Now — late calls (planned time, nobody checked in yet), calls in progress, and what each carer does next. Link: Live Monitor.
Today's Flow — calls by hour, planned against delivered. Link: Carer Roster.
Today's Story — today's activity feed: check-ins, notes, MAR, incidents, messages, leave, rota changes. Cancellations are left out of the story (they are decisions, not events) and stay in the Activity Log report. Link: Activity Log.
Needs Your Attention — six rows: Incident Reports Open, Body-Map Concerns Open, Holiday Requests Waiting, Manual Check Requests, Alert Case Notes Today, Medication Compliance. Each row opens its desk.
This Week's Podium — the top three carer scores this week. Link: Progress.
Away Today — who is on leave. Link: Holidays.
Messages — latest conversations, family threads marked "(family)". Link: Open.
From carers — every hand-off a carer wrote in the last 7 days, standing instructions carers wrote before 18 Oct 2026, and Care Chart entries with an unreviewed problem. Office-written notes are not listed. Each row opens the service user's Diary, Requirements or Care Charts.
Read the lower sections
This week's picture — Delivered Hours, Calls Attended, Missed Calls.
Care quality — last completed week — four rings: On-Time Check-Ins, Medication Given, Calls Attended, Hours Delivered vs Plan. Today is left out: half its calls are not due yet.
People — Service Users, Carers, Body Map & Incidents (Handle).
Straight into the record — the four report families; Everywhere in one click — chips to every main page.
Rules worth knowing
Times are UK wall-clock; the dashboard never converts them.
"No data" is never shown as 0%: a ring or pulse part with nothing to judge reads "—".
A scoped login with no branch or region in scope sees an empty day.
Common questions
Why does Today's Story not show a cancelled call? Cancellations are kept out of the feed by design; the Activity Log report lists them in full.
Chapter 2
Service Users
Each person you support: profile, schedule, medication, care charts, plans, notes and family access.
Service Users — the list, the overview and adding a person
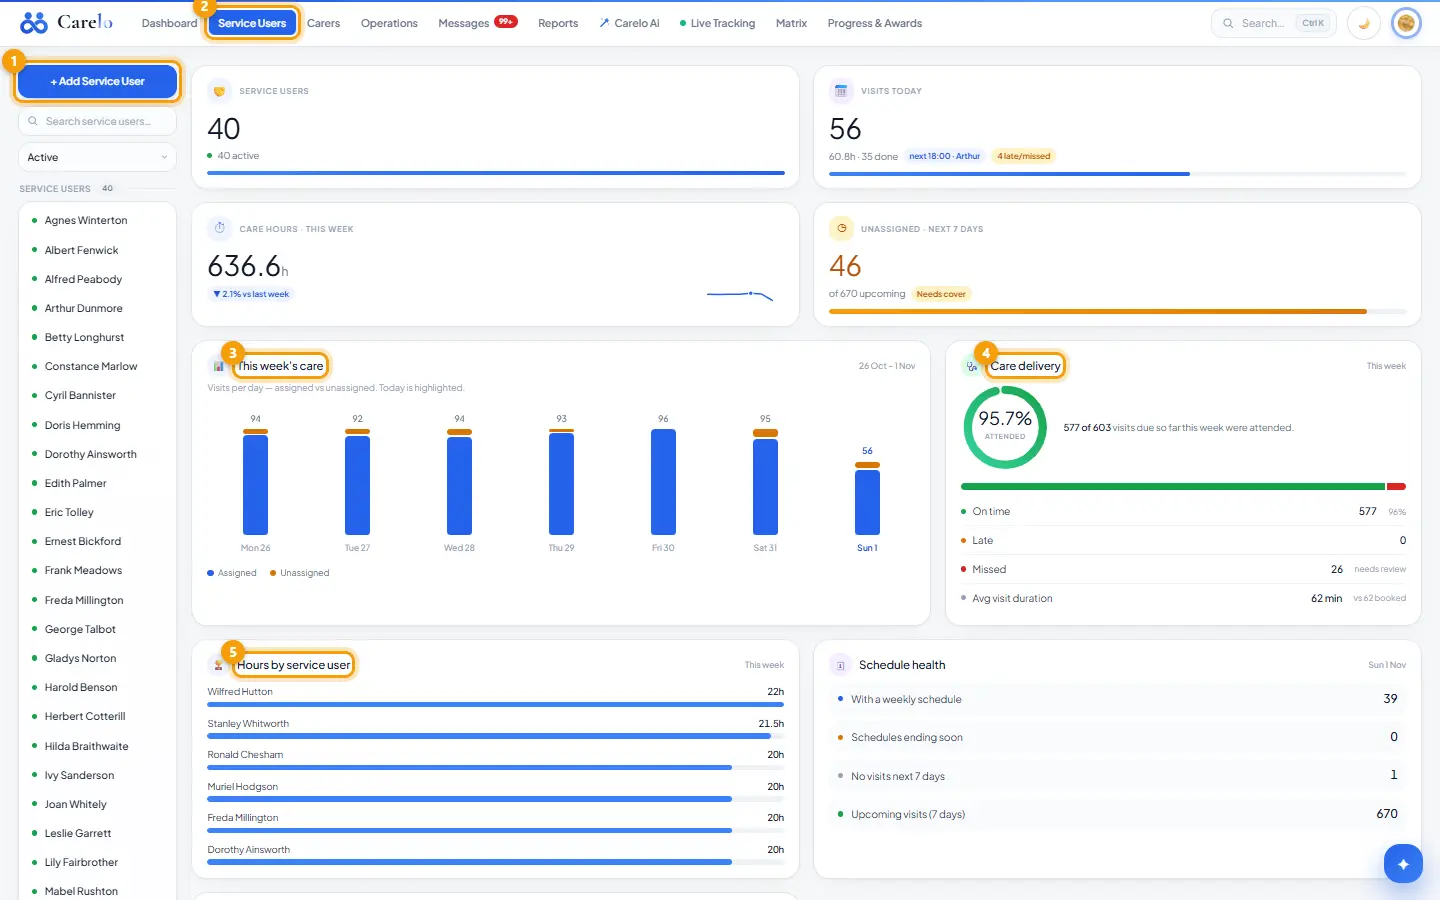
1+ Add Service User2Service users3This week's care4Care delivery5Hours by service user
What it is
The Service Users page is the company-wide view of everyone you care for: a directory on the left (search, status filter, the list) and an overview on the right built from the company's real visits. + Add Service User opens the form that creates a new record with an address and a map pin.
Where to find it
Service Users in the main menu. A name in the list opens that person's Weekly Roster first; the person's own sidebar then holds every other tab.
How to
Find a person
Service Users → type in Search service users….
The status filter shows Active by default. Choose Inactive or All to see people who are off the books; an inactive person's reason shows beside the name.
Read the overview
Service users — total, how many active, how many organisations.
Visits today — count, hours, how many done, the next visit, any late/missed. Opens today's service user roster.
Care hours · this week — with the change against last week.
Unassigned · next 7 days — opens the roster on the first uncovered day.
This week's care — visits per day, assigned against unassigned.
Care delivery — attended, on time, late, missed and average visit length this week (appears once carers record check-ins).
Hours by service user, Schedule health (with a weekly schedule, ending within four weeks, no visits in the next 7 days) and Needs attention, a short list with a link to the right page for each item.
Add a service user
Service Users → + Add Service User.
Client type: Person or Organisation (choose Organisation only when carers visit a location rather than a person).
Fill Status, Title, Forename and Surname (both required), Middle name, Gender, Date of birth.
Contact: Email, Secondary email(s) (use ; between addresses), Landline, Mobile.
Address: Address line 1 and Postcode are required; City / Town, County, Country optional.
In the Location panel press Find on map. Drag the pin if it is not on the house — the carer's app checks in against this pin.
Tick any Branches and Regions the person belongs to (shown only when the company has them).
Press Save service user. You return to the list.
Rules worth knowing
A name is required; the address is saved only when both Address line 1 and Postcode are given.
A form saved without a pin gets a lookup from the typed address; a pin you placed or dragged is kept as the truth.
A person can belong to more than one region and more than one branch.
The list shows active people by default everywhere; inactive people keep their record and history.
Common questions
Why does clicking a name open the roster, not the profile? By design: the week is what the office needs most. The profile is one click away in the person's sidebar.
Can I add care needs or a schedule from this form? No. Save the person first, then use Requirements & Risks and Schedule in their sidebar.
A service user's Dashboard — the care week at a glance
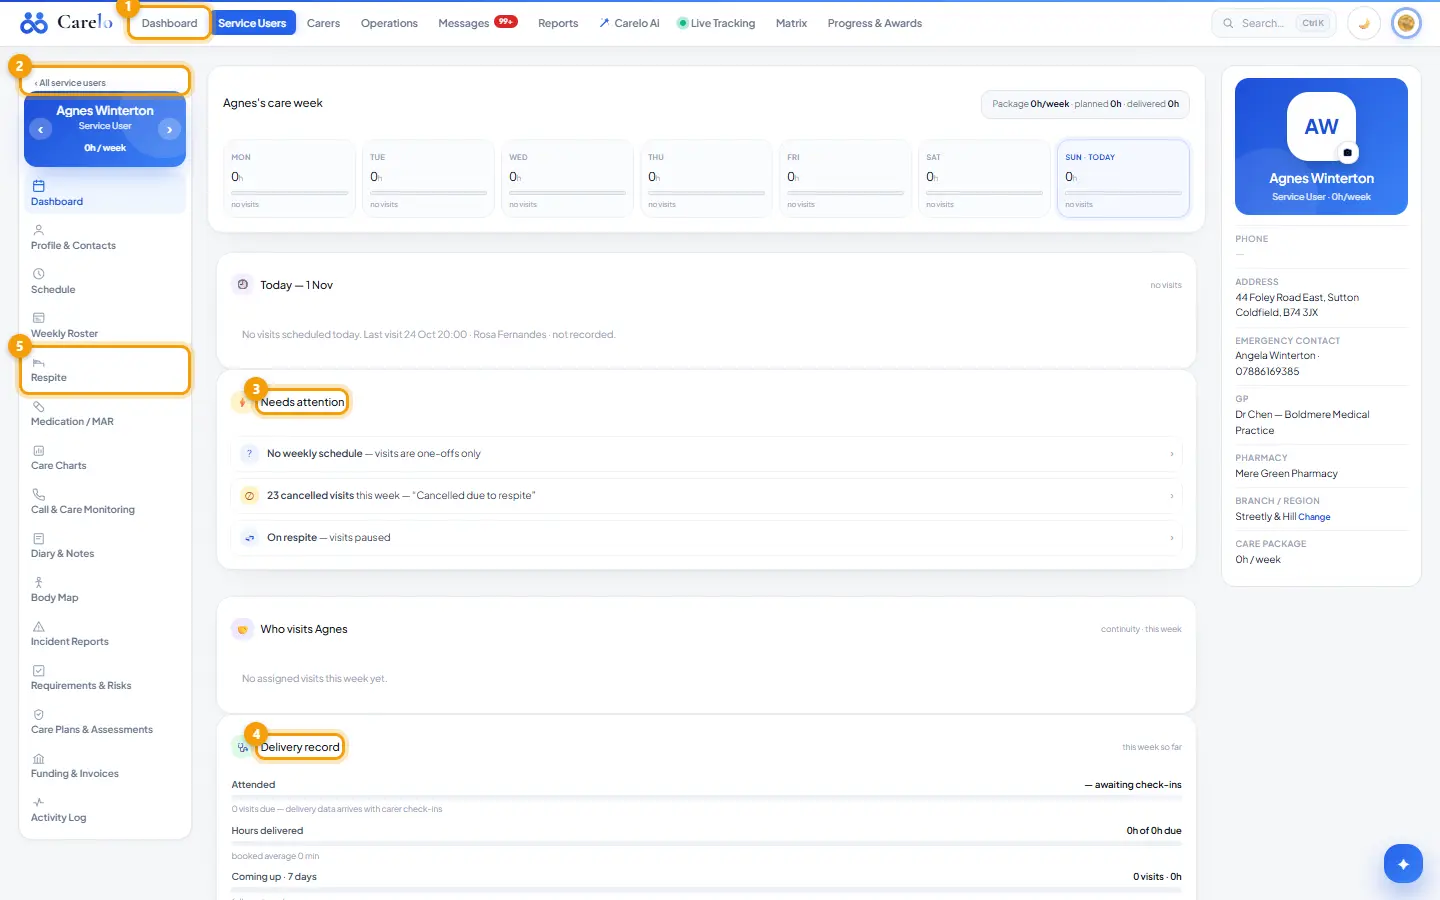
1Dashboard2‹ All service users3Needs attention4Delivery record5Respite
What it is
The first tab in a person's sidebar: their care this week, today's calls, what needs attention, which carers visit them, the delivery record, and the office end of the family portal. Everything is read from real visits; nothing is typed here except the key-info panel and family replies.
Where to find it
Service Users → open a person → Dashboard. The sidebar shows the person's name, their hours per week, a red DNACPR badge when one is recorded, and ‹ › arrows to flip to the previous or next active service user on the same tab. ‹ All service users returns to the list.
How to
Read the page
(Name)'s care week — the seven days with visits and hours, plus Package (agreed hours), planned and delivered this week.
Today — today's calls in time order, or "No visits scheduled today" with the last visit.
Needs attention — missed visits, unassigned visits (with the first date), first-time carers this week, a weekly schedule ending soon, no weekly schedule, cancelled visits (with the reason), or On respite. Each line links to the page that fixes it.
Who visits (name) — the carers on this week's calls with a continuity percentage.
Delivery record — attended, hours delivered against hours due, average visit length, and the next 7 days (with the next respite start if one is booked).
Quick rows to Medication (how many on file), Respite (Active / from a date / Not on respite) and Records & notes.
Edit key information on the left panel
Hover a row (Phone, Address, Emergency contact, GP, Pharmacy) and press the pencil.
Change the value and press Save (or Cancel). Only that row is written.
Branch / region is read-only here; Change opens the profile where the pickers live.
The camera icon on the photo lets you Change picture (images under 5 MB).
Reply to the family
When the person has family app access, Family messages and Family reviews appear at the bottom.
Type in Reply to the family — they see it in the app….
Press Send. Messages are capped at 2000 characters.
Family reviews show the carer, a star rating and any comment; the office cannot edit them.
Rules worth knowing
Changing the typed address moves the map pin only when the address actually changed; a confirmed pin survives an unrelated edit.
A photo is accepted only when the file's real content matches its name (a renamed non-image is refused).
The family section only appears once a family login or a family message exists.
Common questions
Why is a carer flagged as first-time? They have not delivered a call to this person before this week; the dashboard suggests an introduction.
Where do I change the weekly pattern?Schedule in the sidebar; the dashboard only reports it.
Profile & Contacts — identity, address, getting in, care team, status
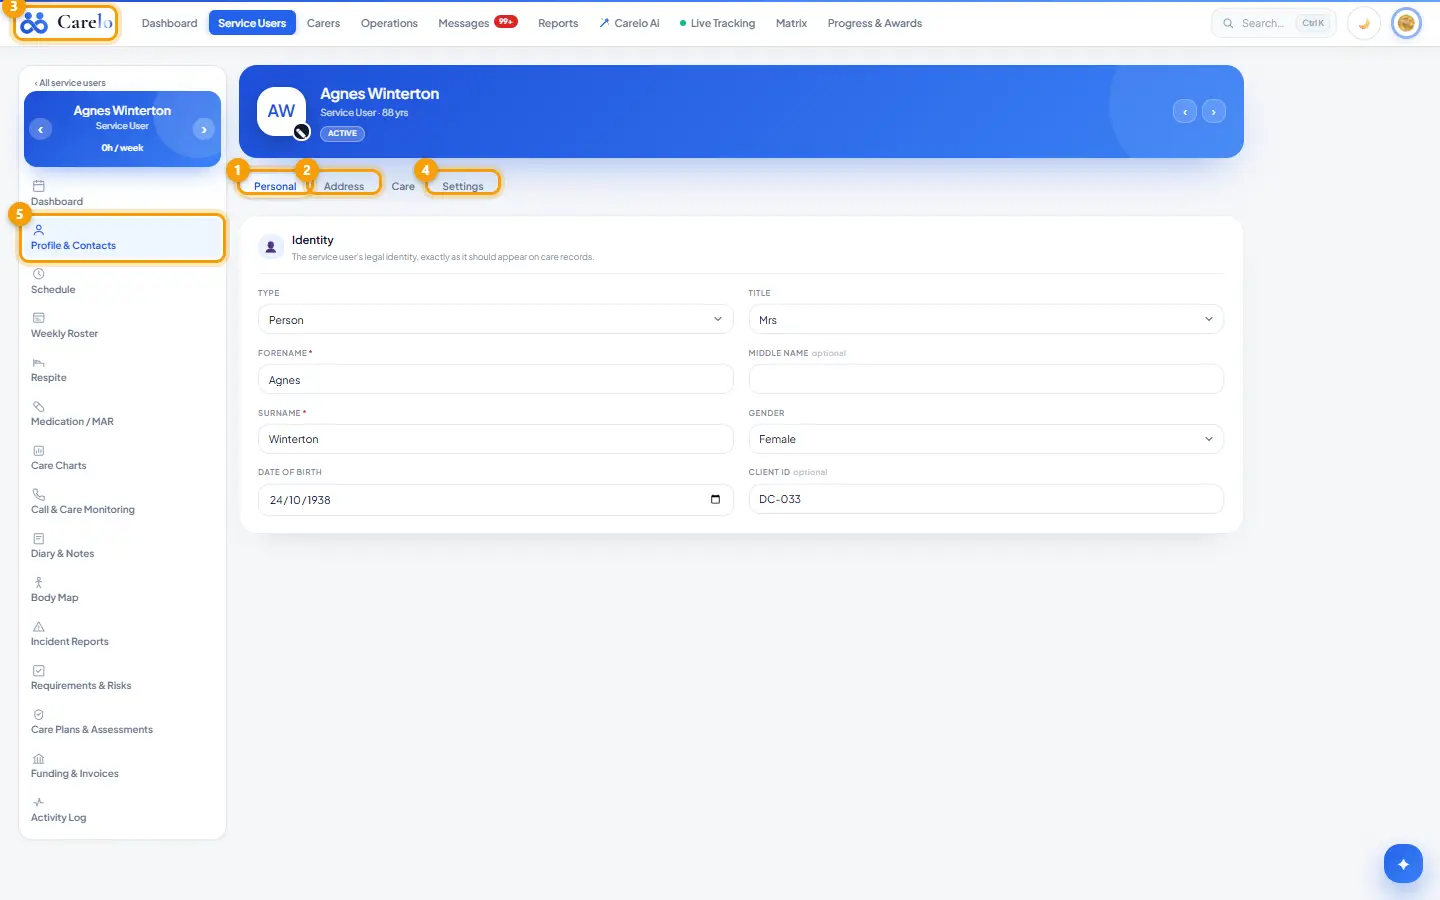
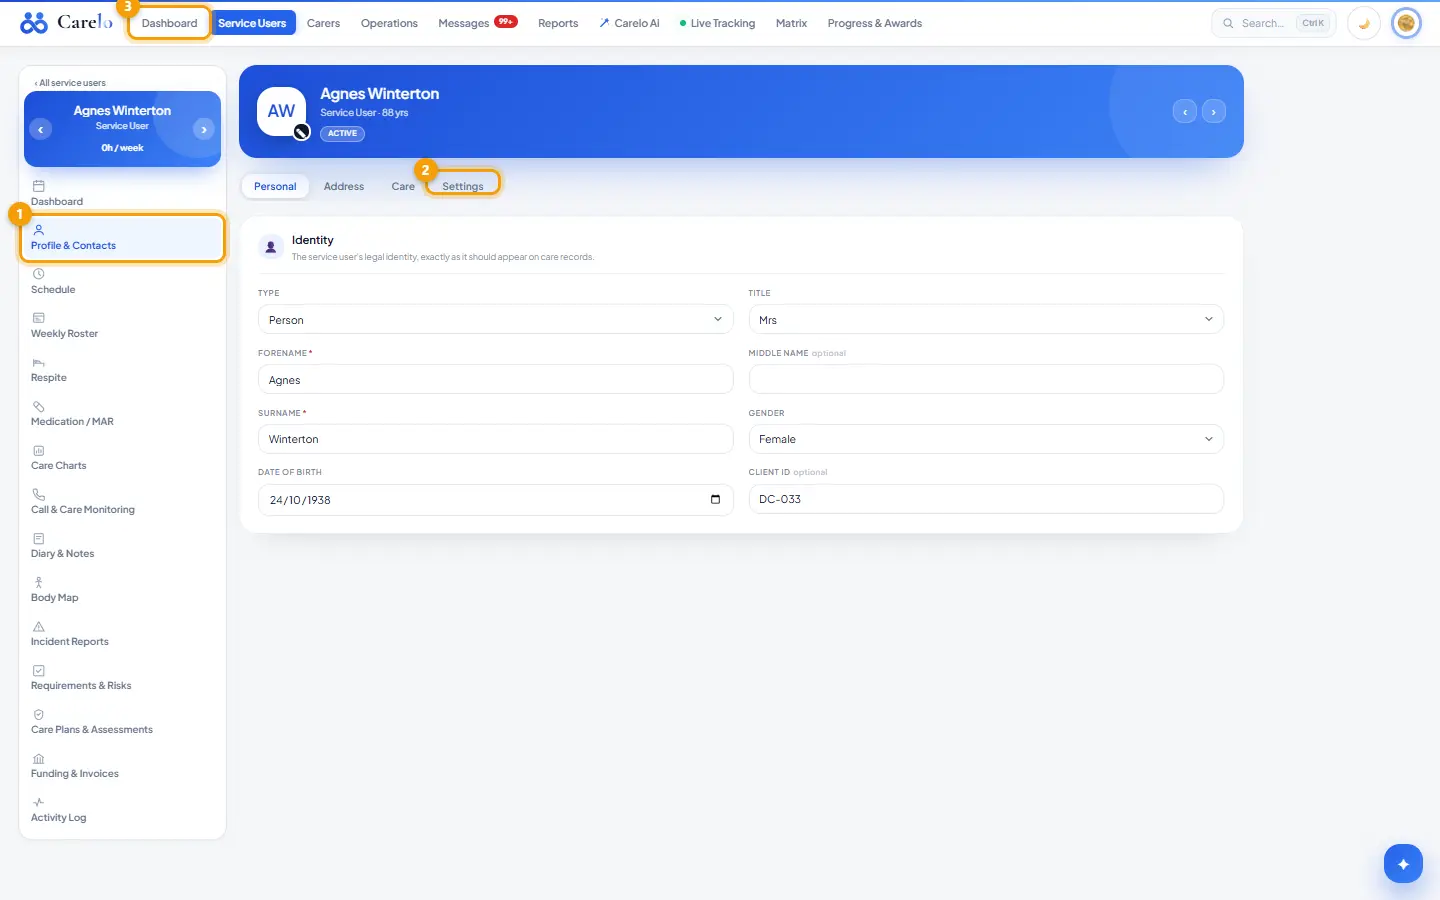
The person's full record in four tabs: Personal, Address, Care, Settings. Most fields save together with Save profile; region, branch, care-team and family-login changes save instantly.
Where to find it
Service Users → open a person → Profile & Contacts. The ‹ › arrows move to the previous or next active service user on the same tab.
How to
Personal
Type (Person / Organisation), Title, Forename, Middle name, Surname, Gender, Date of birth, Client ID (your own reference). Press Save profile in the save bar that appears once something changes; Cancel reloads.
Address: lines 1–2, City / town, County, Postcode. Press Find on map, drag the pin onto the house, then Confirm location — the carer's app checks in against this pin.
App check-in zone (meters): 50–500, or empty for the company default. Tick Check-in anywhere allowed when calls happen away from the address (day centre, relative's home); the app then never refuses a check-in, and the carer's position is still recorded.
Getting in: Keysafe number, Medication keysafe, How to enter the house — shown to the carer on the visit, kept off rosters and prints.
Key contacts: Emergency contact, Next of kin, GP, Pharmacy, Social worker (each with a phone).
Care
DNACPR / ReSPECT: set Yes and record Where the original form is kept. Carers and family then see a red DNACPR badge on every call, and the badge shows in the office sidebar.
Care team: + Add a favourite… (offered first when assigning) or + Block a carer…. A blocked carer is refused on every assignment path. Remove with the × on the chip.
Care requirements and risks live on the Requirements & Risks page.
Settings
Status: Active / Inactive. Inactive requires a Reason (Deceased, Moved away, Hospital / long-term placement, Service ended, Other + note). Inactive hides the person from rotas, pickers, matrices and reports; the record and history are kept.
Care placement: + Add region… / + Add branch… chips, and links to create new ones.
Appointments: Appointment start times can be moved by — Inherit from system, No limit, or a number of minutes (0 = never move) that caps how far the rota may shift this person's start times.
Family app access: see the family-app-access page.
Rules worth knowing
A person cannot be made inactive while they still have upcoming appointments. The page shows Their Schedule Comes First with the count and offers Open Schedule (delete the upcoming calls) or Add Respite (temporary absence — they stay active).
A reason is demanded when the switch is flipped to Inactive; "Inactive since" is stamped once and kept on later saves.
Favourite carers are a preference; blocked carers are enforced by the assignment engine, not just the picker.
Common questions
Where did the free-text Branch box go? Branch membership is now the chips under Care placement; the pickers list what exists.
Can I set regions here for a household on the Personal plan? A household has one hidden region; regions are not shown.
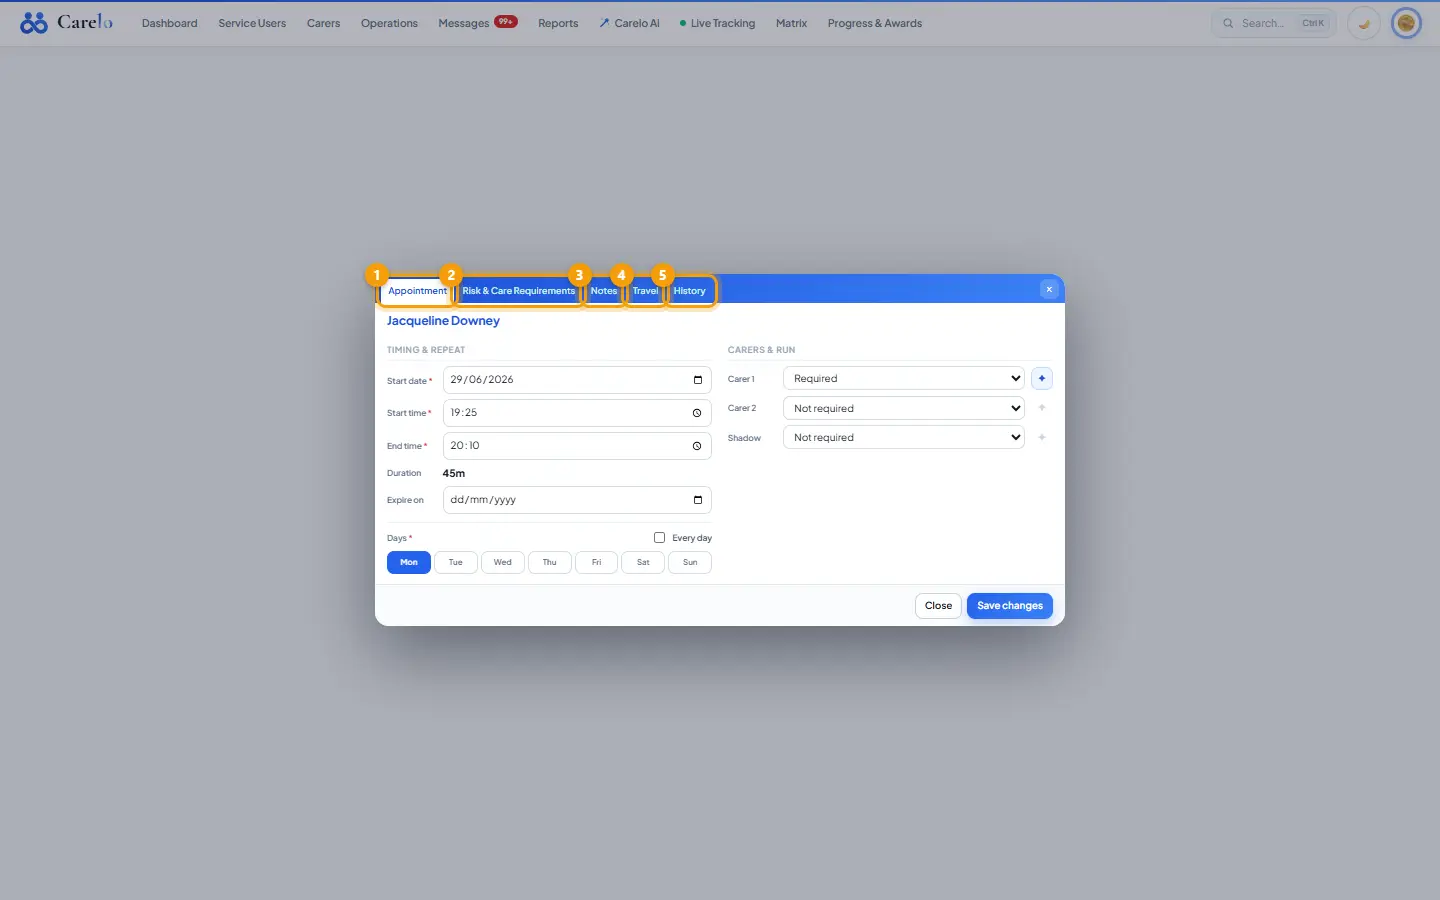
The appointment card — one call's tabs, carers, notes and history
1Appointment2Risk & Care Requirements3Notes4Travel5History
What it is
The pop-up card that opens when you click a call on any roster or schedule. One card, five tabs: Appointment, Risk & Care Requirements, Notes, Travel, History. The /appointment-card page is a preview of the card with sample data; the real card opens from the boards.
Where to find it
Click a call on a Weekly Roster, the Schedule page or the Rota. Drag the card from any empty area to move it off the rows beneath.
How to
Appointment tab
Date comes from the cell you clicked. Set Start time, End time; Duration is calculated. On the Schedule page a new call also takes Start date, Days (chips, or the all-days tick) and Expire on.
Carers & run: Carer 1, Carer 2 (required on a double-up), Shadow, each with an optional Run. A Region filter narrows the pickers. Carers who delivered calls for this person in the last 28 days appear first under "Knows (forename)". The mark beside each seat is a status light: filled, still needed, or not required.
Quick actions in the header: ⊘ Cancel, ↻ Reinstate (a cancelled call), 🗑 Delete.
Footer: This week only / This & future weeks (or Repeat weekly for a one-off), then Save changes, Save & update schedule, Save & repeat weekly, Create weekly schedule or Save for this week only. Close closes without saving.
Actual times
On a delivered or missed call, Actual times is the one place the office corrects check-in and check-out times, with a reason kept in the history. A no-show reads "did not attend — no check-in" and the call shows as missed. On a partially delivered double-up the no-show seat can be re-crewed and the replacement's times recorded.
Risk & Care Requirements
The person's real Requirements & Risks board inside the card, with its own Save changes. A tick here means "on calls like this one".
Notes
Carers' case notes: read-only, one box per carer.
Every week on this appointment: office words pinned to this call's weekly slot, shown on every week until Remove.
Handover — for the carer on this call: + Write handover; tick the every-week box to pin it to the slot.
Office notes: + Add office note, recorded under your name.
Travel and History
Travel shows the road route for the carer's approach leg (from home or the previous client), planned and needed times, and a ↗ Directions link. History lists what the database recorded on this call, newest first.
Rules worth knowing
A checked-in call is a locked care record: the card opens read-only ("Delivered — locked"), with no reassign, delete or time edit. While still in progress and before its planned end it can still be cancelled; the check-in stays on record.
Newest decision wins: a carer saved onto a clashing call comes off the other call, which becomes unassigned and is reported. Nothing double-books.
A blocked carer is refused inline and the card stays open to correct.
The office never writes or edits a carer's case note.
Start and end time cannot be the same; an end earlier than the start means an overnight call (up to 24 hours).
Common questions
Why is Save missing? The call is delivered and locked, or you are on the Risk & Care Requirements tab, which has its own Save.
Where are the old Tasks and Requirements tabs? Replaced by Risk & Care Requirements once a company is switched over.
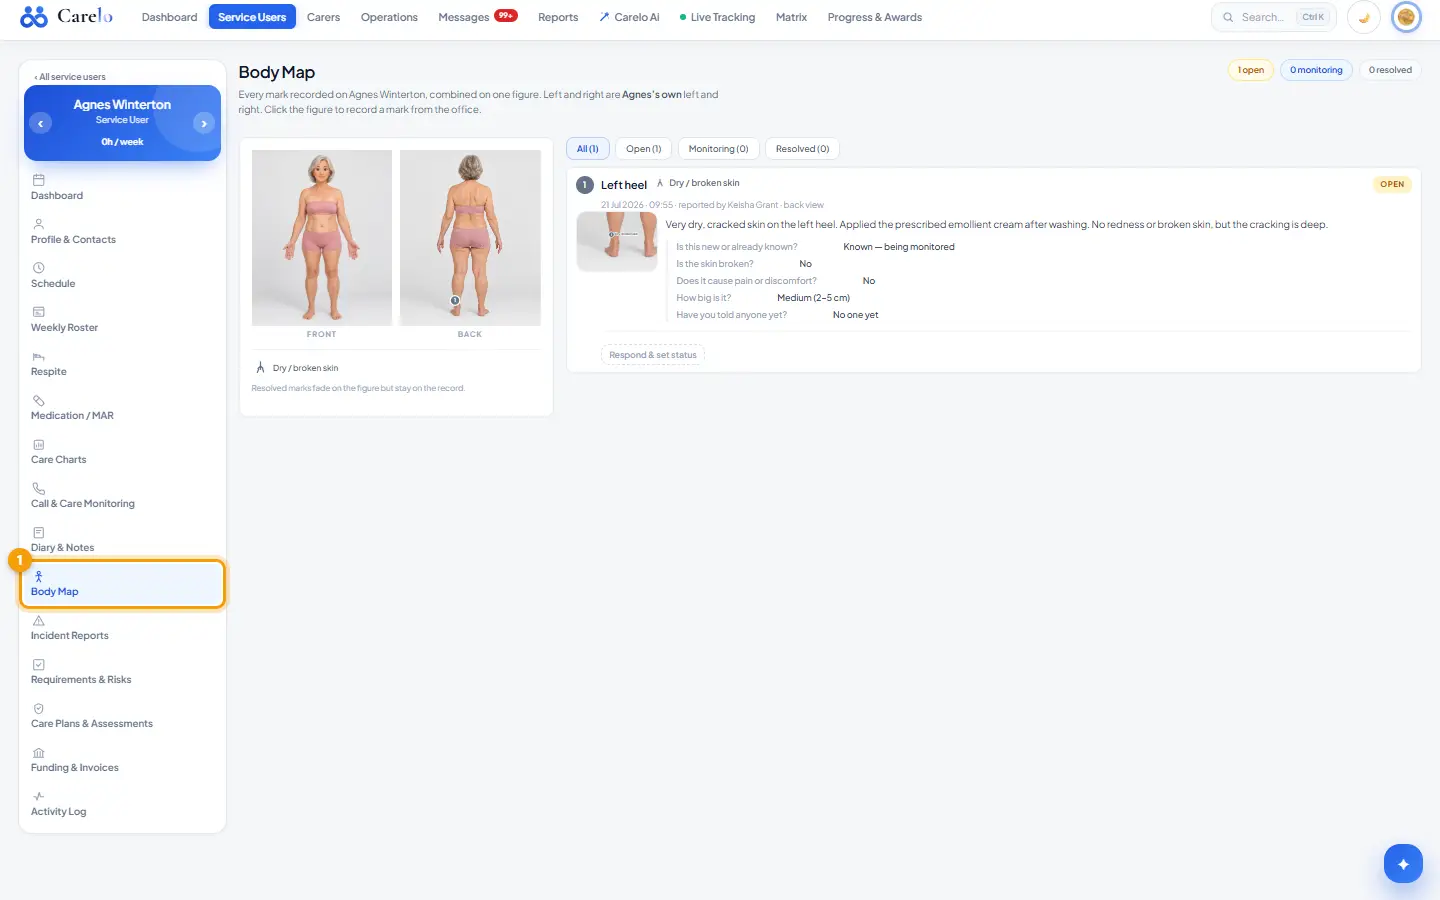
Body Map — skin marks from carers and the office on one figure
1Body Map
What it is
Every mark carers (and the office) have recorded on this person, combined on one pair of front and back figures, with each report worked to resolution alongside. Left and right are always the person's own left and right.
Where to find it
Service Users → open a person → Body Map. The header counts marks open, monitoring and resolved; the figure matches the person's recorded gender, with a switch only when no gender is on file.
How to
Record a mark from the office
Click the spot on the figure.
Choose the type: Bruise, Cut / graze, Pressure sore, Rash, Swelling, Burn / scald, Skin tear, Ulcer / open wound, or type your own in "What is it? Your own words".
Describe the concern — what it looks like, how it was found, anything already done — and save. Cancel discards.
Work a report
Filter the list with All / Open / Monitoring / Resolved. The numbers on the figure match the list numbers; #1 is the newest.
A carer's report shows the whole-body photo and the part close-up side by side; click the close-up for a large view with zoom.
Write Outcome, Actions taken and Future plan, set the status chip (Open, Monitoring, Resolved) and save.
Rules worth knowing
Resolved marks fade on the figure but stay on the record; nothing is deleted.
A carer's report carries both images the app sent; the office cannot edit the carer's words, only respond.
Marks recorded by the office use the same record shape as the app, so they appear on the Operations desk too.
Common questions
Which side is "left"? The person's own left, on both the front and back figures.
Where do carers record marks? In the app during a visit; the office sees them here and on Operations → Body Map.
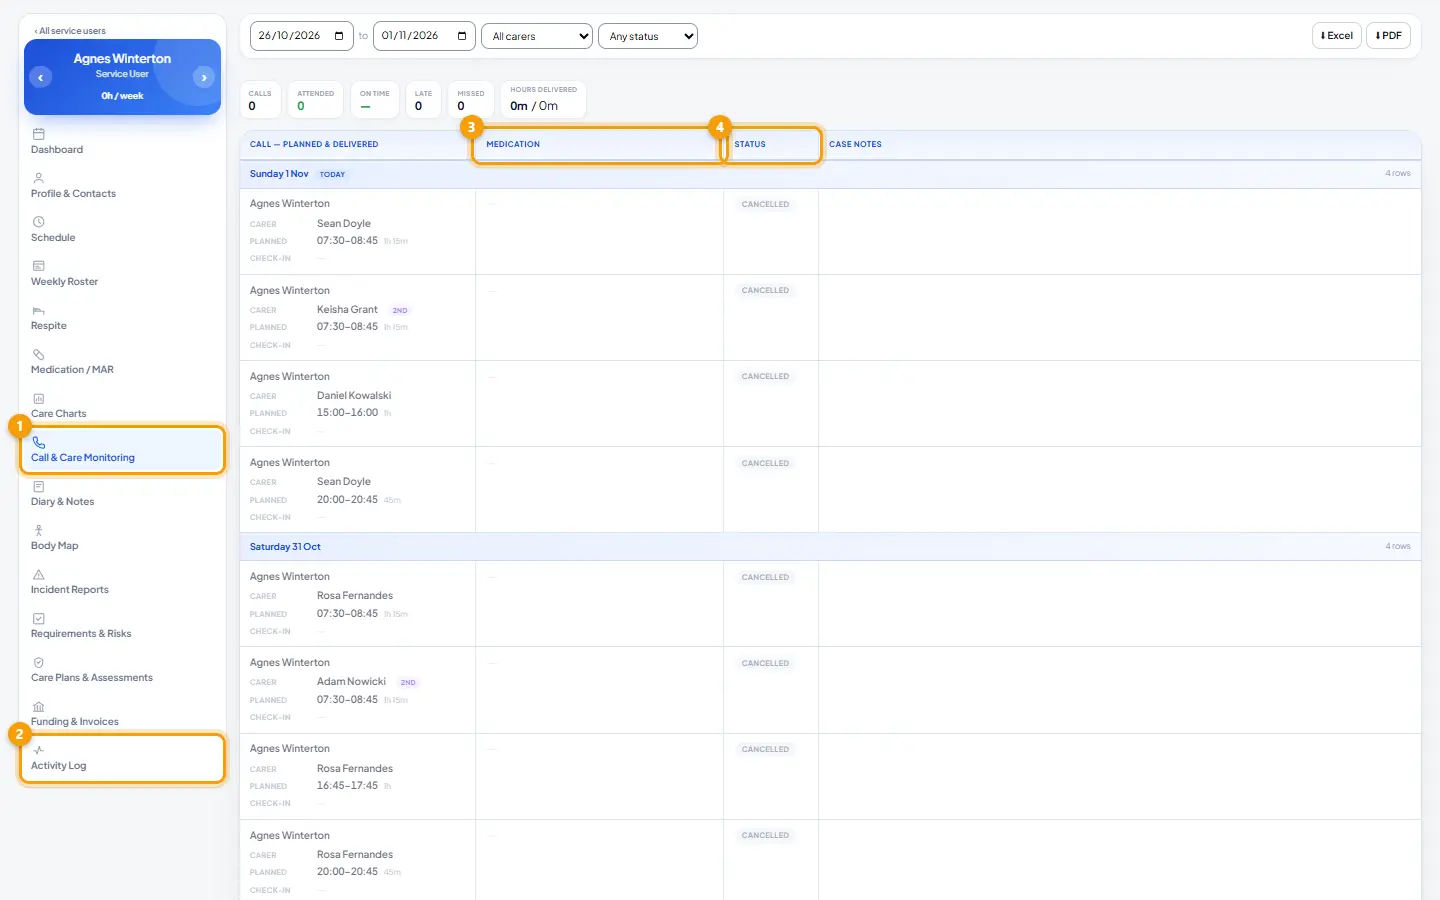
Call & Care Monitoring and the Activity Log — what actually happened
1Call & Care Monitoring2Activity Log3Medication4Status
What it is
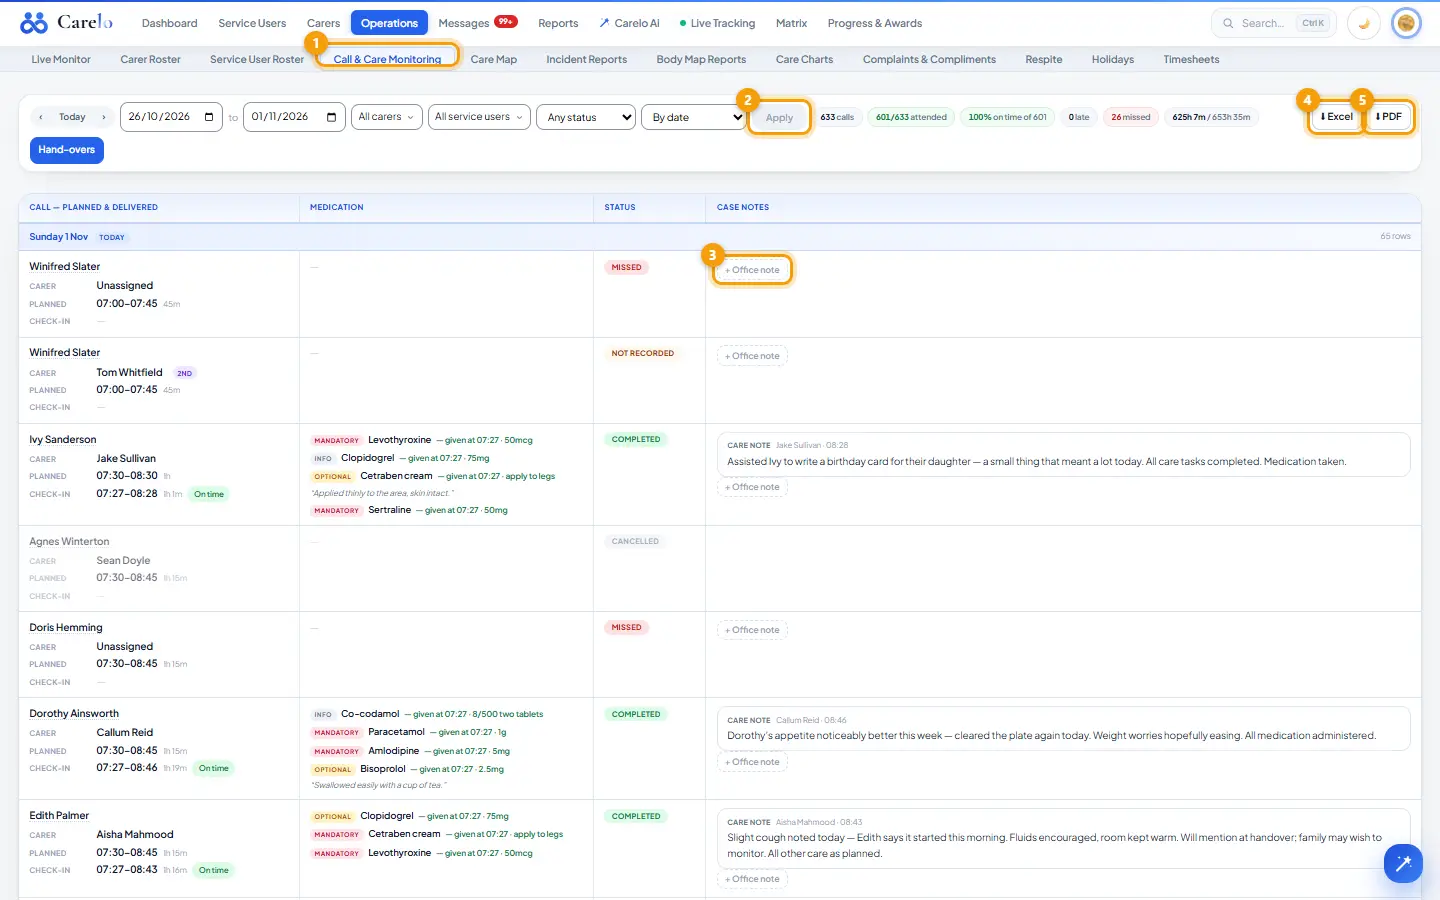
Two read-back pages for one person. Call & Care Monitoring is the electronic call monitoring record: one row per carer attendance (a double-handed call is two rows, tagged as a pair) with planned and delivered times, punctuality, medication outcomes, status and the case notes. The Activity Log is the whole care story day by day: every call delivered, missed or cancelled, every case note, medication outcome and record change, incident, body map, respite start and return, care document, completed review and complaint. Both look back only.
Where to find it
Service Users → open a person → Call & Care Monitoring, or → Activity Log. Both open on the last 7 days including today.
How to
Read Call & Care Monitoring
Set From and To; filter by carer (All carers) and status (Any status, Completed, Late, Missed, Cancelled, Upcoming, Not recorded).
Stats on one line: Calls, Attended, On time (percentage), Late (with the average), Missed, Hours delivered against planned.
Each row shows Carer (2nd on a double-up), Planned times and duration, Check-in and Check-out with punctuality, the Medication outcomes recorded on that call, the Status, and the Case notes column: the carer's care note with its Care given line, any Handover for the next carer, and office notes.
Press + Office note on a row, type the note ("phone update from the carer or family, an observation…") and save. It is saved under your name.
⬇ Excel downloads a styled workbook; ⬇ PDF prints the table.
Read the Activity Log
Move with the month pager (‹ ›), the 7 days / 30 days / 90 days presets, or custom From / To dates (To is capped at today).
One box per day, newest day first; inside, one line per thing that happened with its time, a type chip and a plain sentence.
Export Excel or Export PDF — both carry the whole selected range, not just the screen.
Rules worth knowing
A call whose whole window has passed with no check-in shows as missed straight away.
Times are UK wall-clock as recorded; nothing is shifted for daylight saving.
The office cannot write or edit a carer's care note; it can only add an office note beside it.
The Activity Log is read-only and opens for inactive people too, because it is history.
Every line comes from the module that owns it (visits, medication, incidents, body map, respite, documents), so the screen and the exports never differ.
Common questions
A call shows "Not recorded". The carer was assigned but no check-in or check-out landed and the window has not fully passed; check the carer's app and phone.
Where do I correct a wrong check-out time? On the appointment card's Actual times block, with a reason — not here.
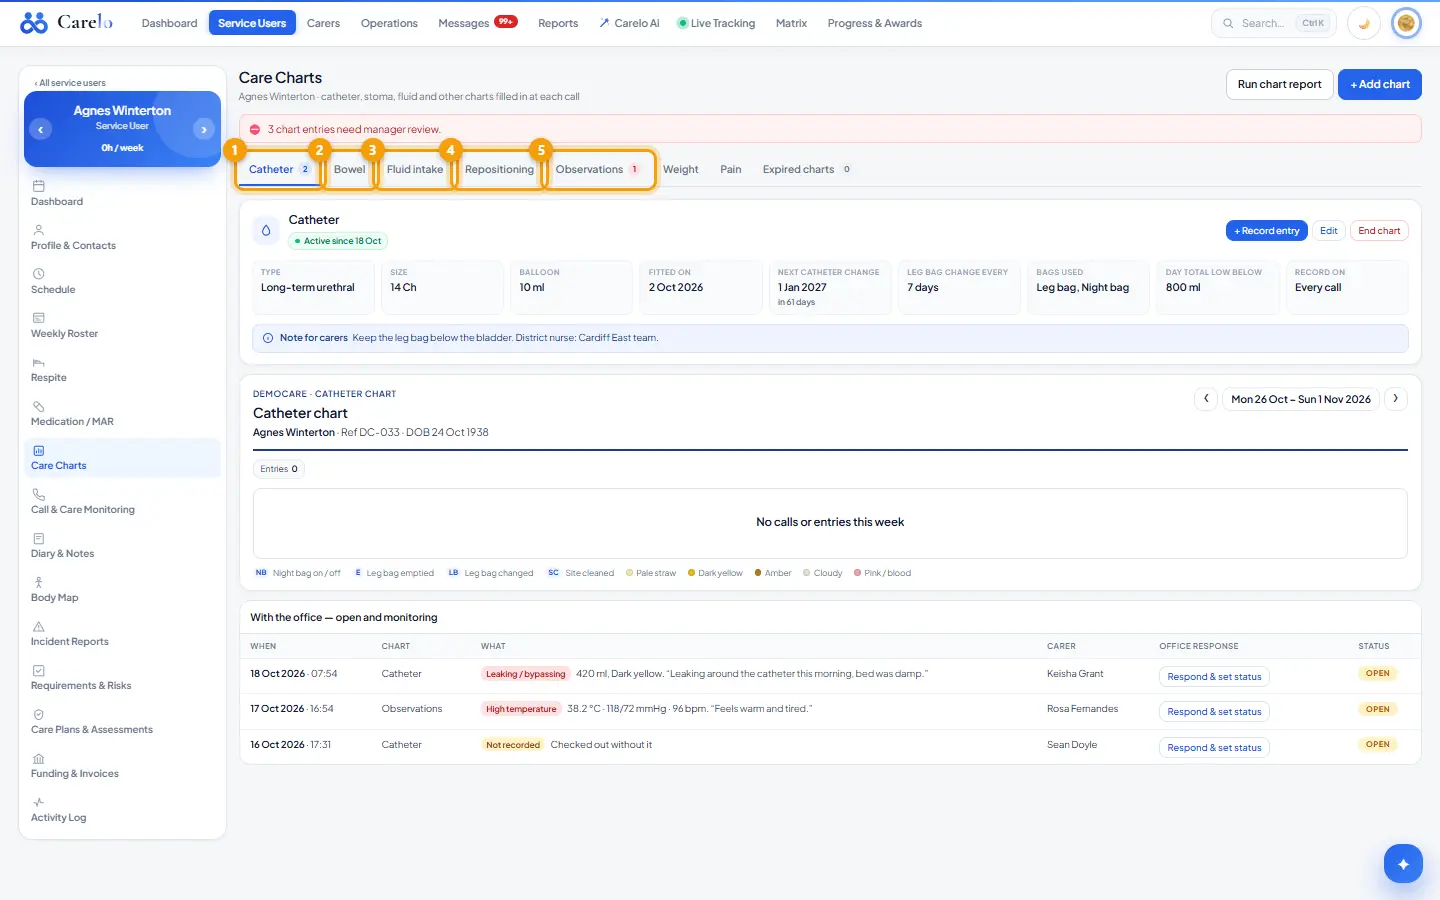
Care Charts — catheter, fluids, repositioning and the other charts carers record
Fourteen charts the office can switch on per person; carers then record them in the app on the right calls. Each chart has a set-up strip, a weekly sheet and a Needs review list, and can be printed as a report. The build mirrors Medication / MAR.
Charts: Catheter, Stoma, Bowel, Continence & pads, Fluid intake, Food intake, Tube feeding (PEG), Repositioning (recorded on every call by default), Observations, Blood sugar, Weight, Pain, Behaviour (ABC), Seizure (recorded when needed by default).
Where to find it
Service Users → open a person → Care Charts. One tab per live chart, plus Expired charts. The report opens from Run chart report; ‹ Care Charts returns.
How to
Add a chart
Press + Add chart and choose the chart.
Fill its set-up fields ("Set up once. Carers see these details every time they record it.").
Remind the carer on: Every call or When needed.
Tell the office straight away when: the conditions that flag an entry for review.
Add a Note for carers if useful and save.
Keep it current
On the chart's strip: + Record entry (an office-recorded entry with Taken on date and time, each measurement or Not measured, Any problem chips and a Note, required when a problem is chosen), Edit the set-up, or End chart with a Reason — carers stop seeing it today and its history moves to Expired charts.
Read the week
Use the week navigation to move; the sheet shows one column per day with each entry's values and the carer who recorded it. Open Expired charts to read an ended chart's history.
Respond to a flagged entry
The alert row says how many entries need manager review; the With the office — open and monitoring table lists them (When, Chart, What, Carer, Office response, Status).
Press Respond & set status. Write Outcome / decision, Actions taken, Future plan and choose Open, Monitoring or Resolved.
Run a report
Press Run chart report (needs a selected chart).
Set the date window — whole weeks in the company's week, six at most. One sheet per week.
Print or Export PDF.
Rules worth knowing
A chart that has been ended is never deleted; its entries stay readable under Expired charts.
An entry with a problem needs a note; the office's own entries show "recorded by the office".
Recorded times are UK wall-clock as entered.
An entry stays on the review list until its status is Resolved.
Common questions
Can a carer record a chart that is not switched on? No. The office adds the chart first; carers see only this person's live charts.
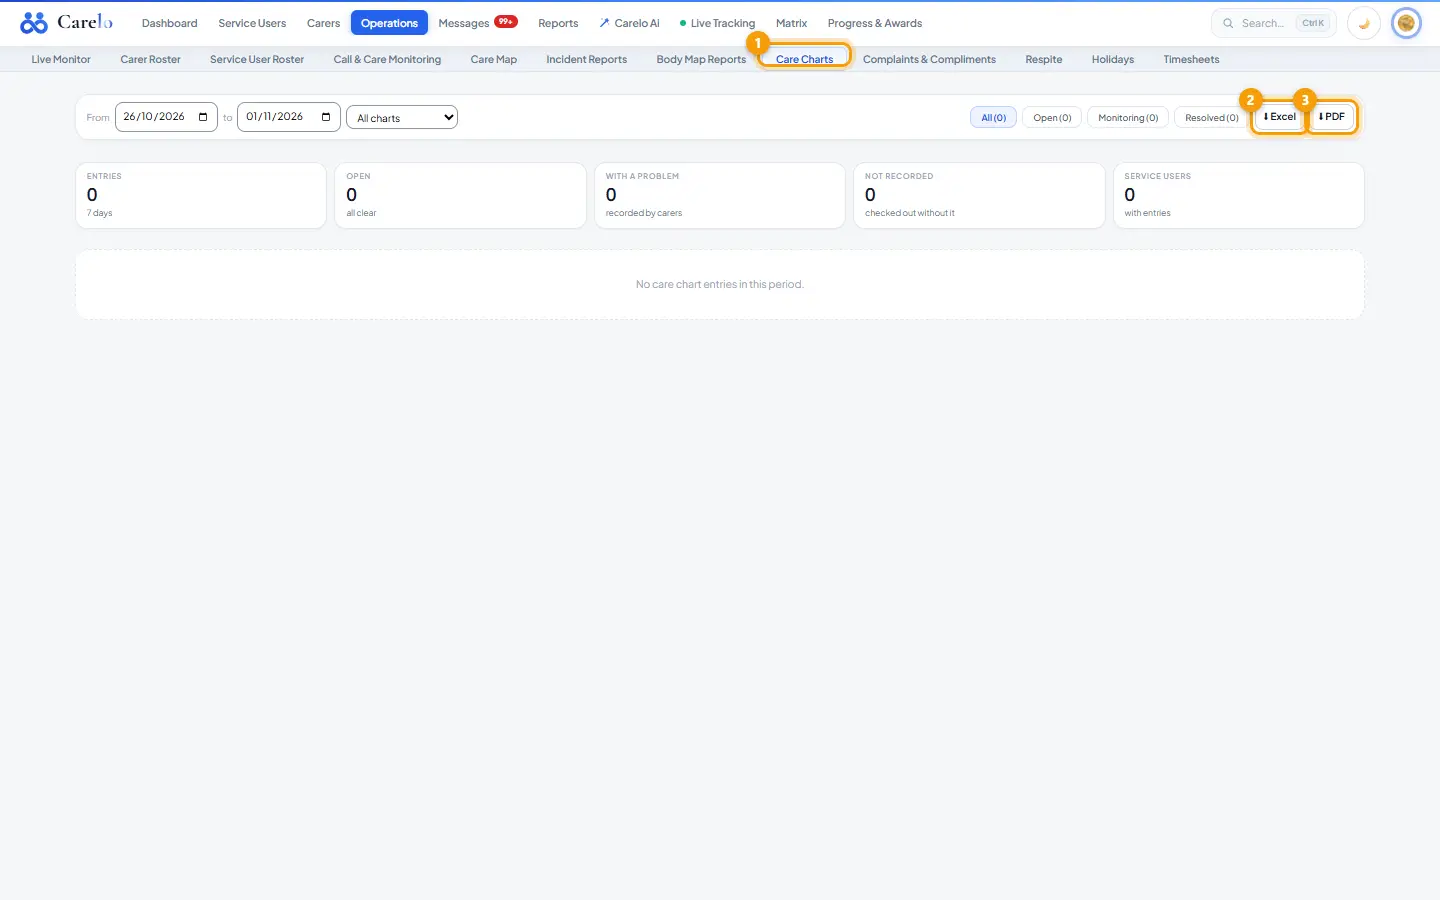
Where do charts appear company-wide? Operations → Care Charts lists every open entry across the company; this page is the one-person view.
Care Plans & Assessments — the document hub for one person
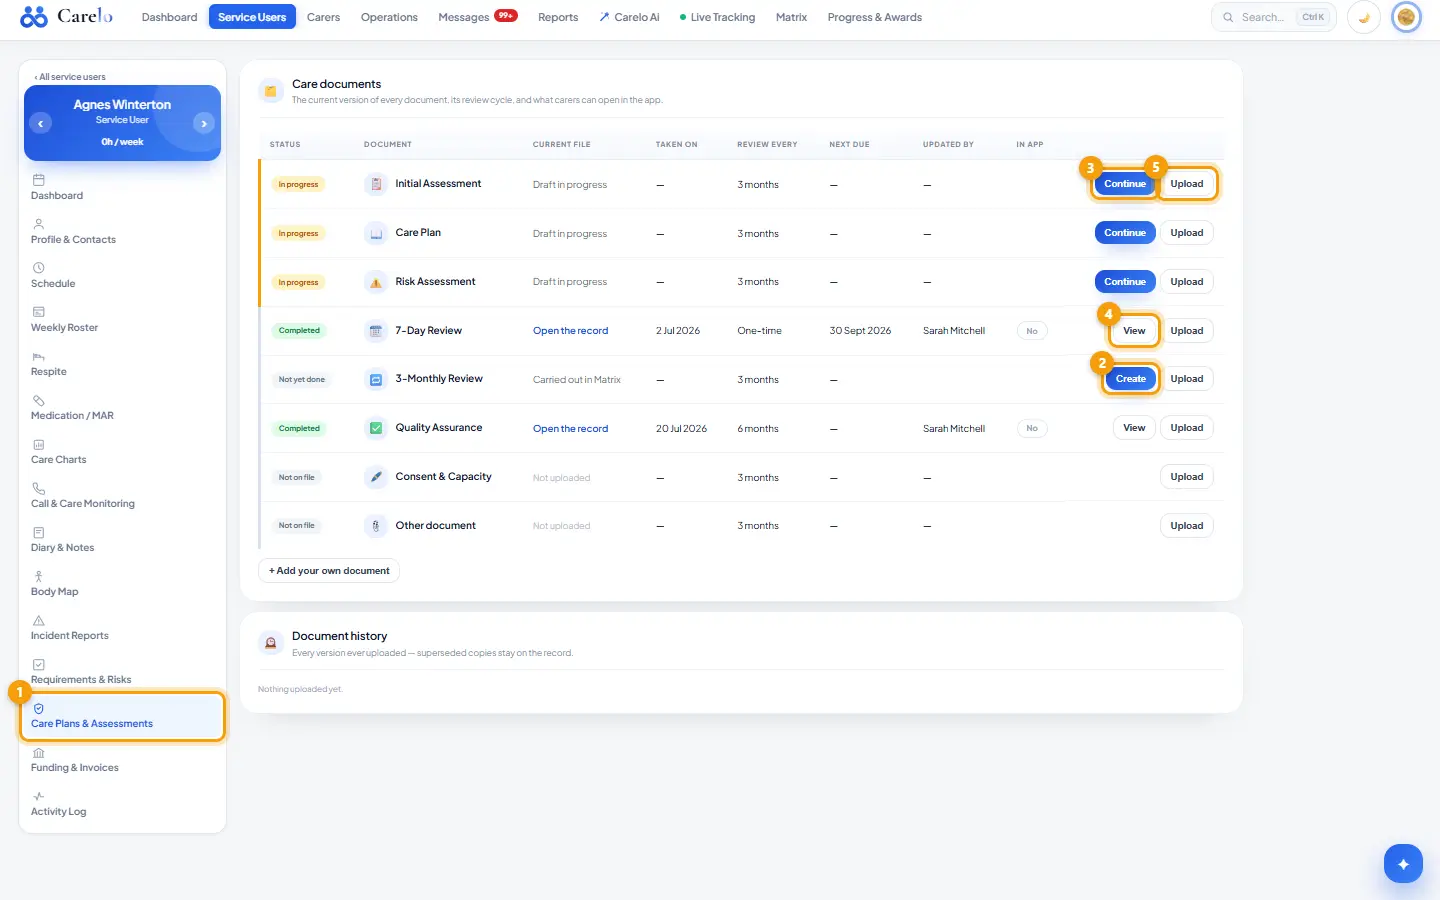
One row per document type with a status chip, the current file, when it was taken, the review cycle, the next due date, who updated it and whether carers can open it in the app. Three documents can be written in Carelo (Initial Assessment, Care Plan, Risk Assessment); the three review documents are carried out in Matrix and shown here; any document can be uploaded.
Rows: Initial Assessment, Care Plan, Risk Assessment, 7-Day Review, 3-Monthly Review, Quality Assurance, Consent & Capacity, Other document, plus any document names you add.
Where to find it
Service Users → open a person → Care Plans & Assessments.
How to
Write a document in Carelo
On Initial Assessment, Care Plan or Risk Assessment press Create (or Continue on a draft, New version on a published one).
The form opens pre-ticked from the person's Requirements & Risks and record; only the sections that apply are shown. Press Fill in from the record to pull the record into an older draft. Answers autosave; the header shows "Saving…" then the time.
When finished, confirm The date this document speaks for and Next review due (offered from company policy, yours to change), tick whether to show it in the app, and publish. Discard draft throws the draft away.
View opens the published document with Print / Save as PDF and an In app: Yes / No switch.
Upload a document
Press Upload (or Replace when one exists) on the row.
Choose the File (PDF / Word / Excel) — PDF, Word, Excel, JPG or PNG under 15 MB — set Taken on, keep or untick Show to carers in the app, press Upload.
For a type not on the list, use the bottom form: Document name, file, Taken on, then Upload.
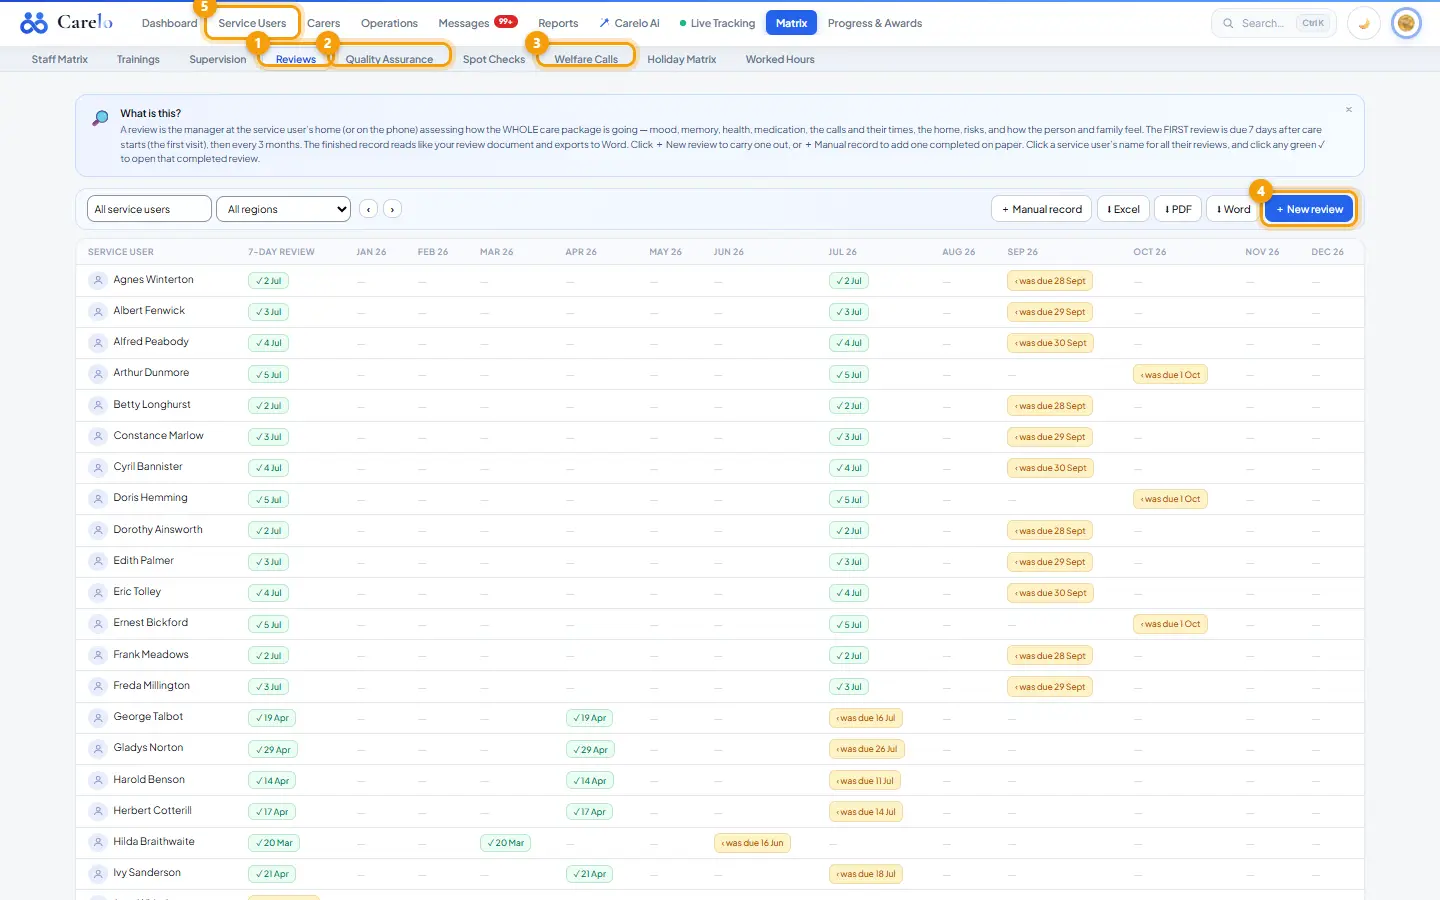
Reviews and Quality Assurance
The 7-Day Review, 3-Monthly Review and Quality Assurance are carried out in Matrix. The row shows Open the record when done, Carried out in Matrix otherwise, with Create / View opening the same review form and viewer here. Upload remains available for a paper review scanned afterwards.
History
Document history lists every version ever uploaded, marked Current or Superseded. Delete removes one version after a confirmation.
Rules worth knowing
Status chips: Not on file, Up to date (or On file with no cycle), Due soon (within 21 days), Overdue.
The review cycle is never chosen at upload; it comes from Settings → Service Users → Compliance cycles.
Uploading replaces the current document and keeps the old one in history; nothing is lost.
Only owners, managers and coordinators can upload. A file whose content does not match its extension is refused.
A document published in Carelo counts as the document; the row never says Not on file about it.
Common questions
Who sees "Show to carers in the app"? Carers open the document from the person's record in their app; family logins see documents marked in app.
Can I set a different review date for a high-risk person? Yes — change Next review due before publishing.
Diary & Notes — every case note on a person, and the printable care diary
1Diary & Notes2⭳ Export PDF3From4To5Show
What it is
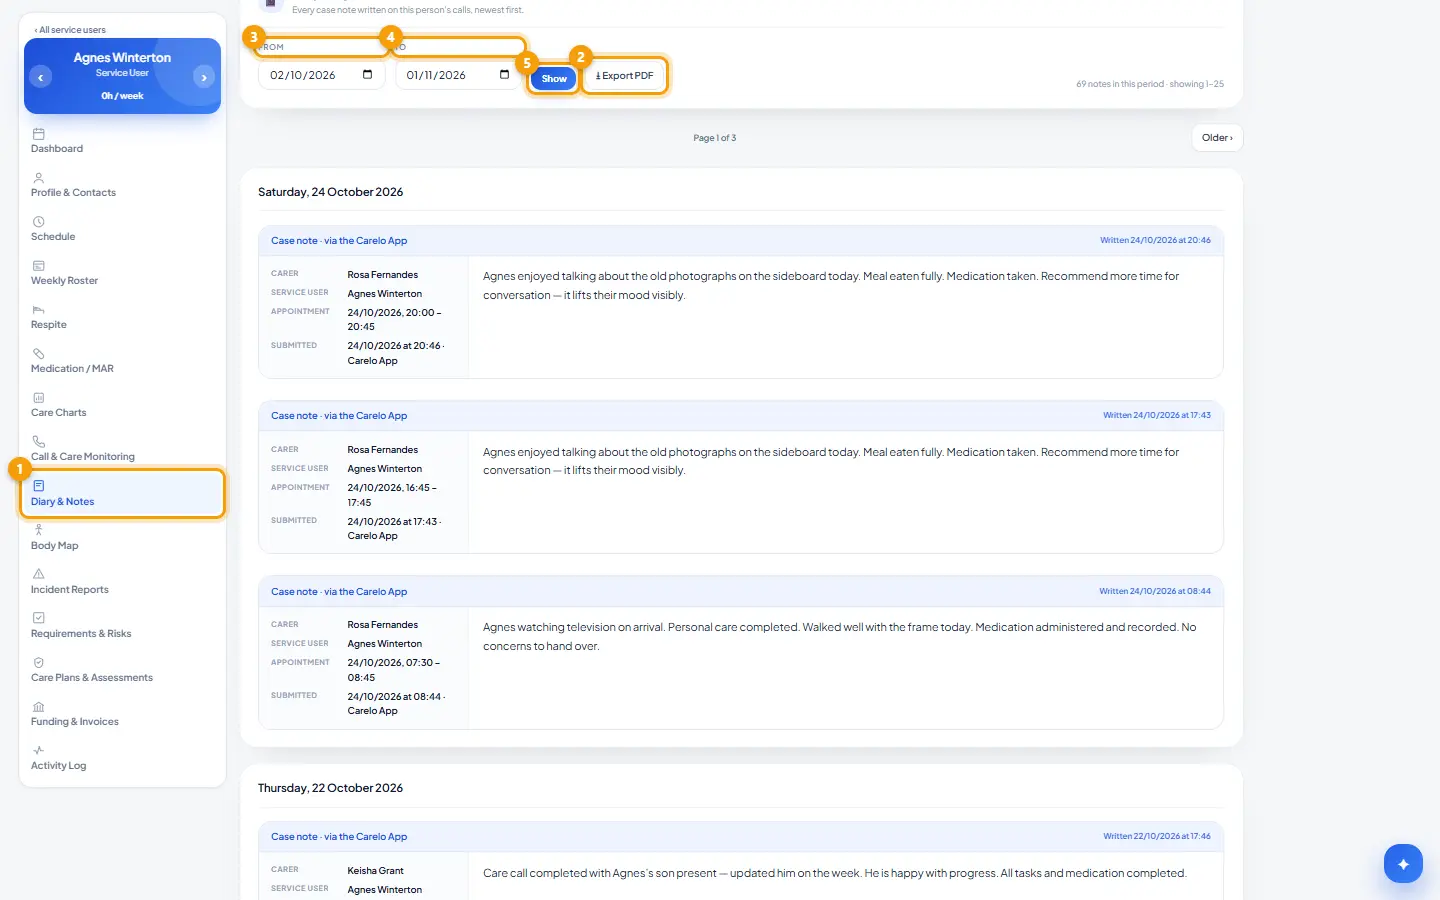
Every case note written on this person's calls, newest first, with the carer, the appointment and the care given. The same records Call & Care Monitoring reads per day; this is the per-person lens for when a family rings or an inspector asks. The print page turns a date range into a formal Care Diary.
Where to find it
Service Users → open a person → Diary & Notes. ⭳ Export PDF opens the print view in a new tab.
How to
Read the notes
Set From and To and press Show.
Notes are paged 25 to a screen and grouped by day; move with ‹ Newer and Older ›.
Each card shows the note type in its header (Case note, Handover note, Alert — supervisor informed, Incident note), then Carer, Service user, Appointment (date and planned times), Submitted (time, and whether it came from the Carelo App or the Office), the text, and a Care given line listing the activities ticked at check-out.
Export the Care Diary
Choose the date range and press ⭳ Export PDF.
The print page opens oldest first, headed with the person's name and marked "Care Diary · Confidential". Use the browser's print dialog and Save as PDF.
Rules worth knowing
Carers write case notes in the app at check-out; the office cannot write or edit a carer's case note.
Office-written notes (added from Call & Care Monitoring or the appointment card) show "Office" as the source and the office user's name.
Timestamps are UK wall-clock as recorded.
The diary shows notes only; delivered and missed calls, medication outcomes and other events are on the Activity Log.
Common questions
A note is missing for a call. Check the appointment on Call & Care Monitoring; the carer may not have checked out, or the note may sit on the other carer's row of a double-up.
Can I hand the PDF to a social worker? That is what the print view is for: chronological, oldest first, confidential header.
Family app access — logins, setup codes, up to ten people per login
1Profile & Contacts2Settings3Dashboard
What it is
The family signs in to the same Carelo app as carers and sees this one person's care: the two-week schedule with live check-ins, care documents, case notes, messages with the office, and carer reviews. The office creates and manages each family login from the person's profile.
Where to find it
Service Users → open a person → Profile & Contacts → Settings tab → Family app access.
How to
Create a family login
Enter Name, choose Relationship (Daughter, Son, Wife, Husband, Mother, Father, Sister, Brother, Guardian, Social Worker, Friend, Other) and their Personal email.
Press + Create family login.
The page shows the Company ID, Username and a one-time Setup code (valid 24 hours), and emails the same details with the app links. They open the Carelo app, enter the details, press Continue and choose their own private 6-digit PIN. The office never sees the PIN.
Press Done.
Issue a new setup code
On the family member's row press Setup code. If no email is on file, add it in No email for … — add it and the setup code is sent there and press Save email and send setup code.
The row shows when the code was issued, where it was emailed and until when it is valid.
Pause, resume or remove
Pause access / Resume access switches the login off and on without deleting it.
✕ beside a device under the name removes that phone; they need a new setup code to use it again.
Remove deletes the login completely after a confirmation.
Reset password appears only for an older account with no PIN yet (legacy sign-in); prefer issuing a setup code.
Add a second person to an existing family login
Create a login on the other service user's profile with the same email. Instead of a new account, that person is added to the existing login; the page says "already has a Carelo family login — this person has been added to it". In the app they tap a name at the top to switch.
Rules worth knowing
One email = one family. The same email on another service user links the two; the same email twice on the same person is refused ("use their Setup code button above").
One login can cover up to 10 people. The eleventh is refused.
The family sees only this person: their schedule, documents the office marked Show to carers in the app / in app, case notes, office messages and reviews. There is no carer-to-family channel; messages go to the office.
Replies to family messages are sent from the person's Dashboard (Family messages).
Common questions
The family lost their phone. Remove the device with ✕, then press Setup code; the old phone can no longer sign in.
Can one relative see two parents? Yes, through the same-email link above, up to ten people on one login.
Funding & Invoices — who pays, and invoices raised from real calls
1Funding & Invoices2Funder type3Name4Reference (PO / SS ref)5Hourly rate (£)
What it is
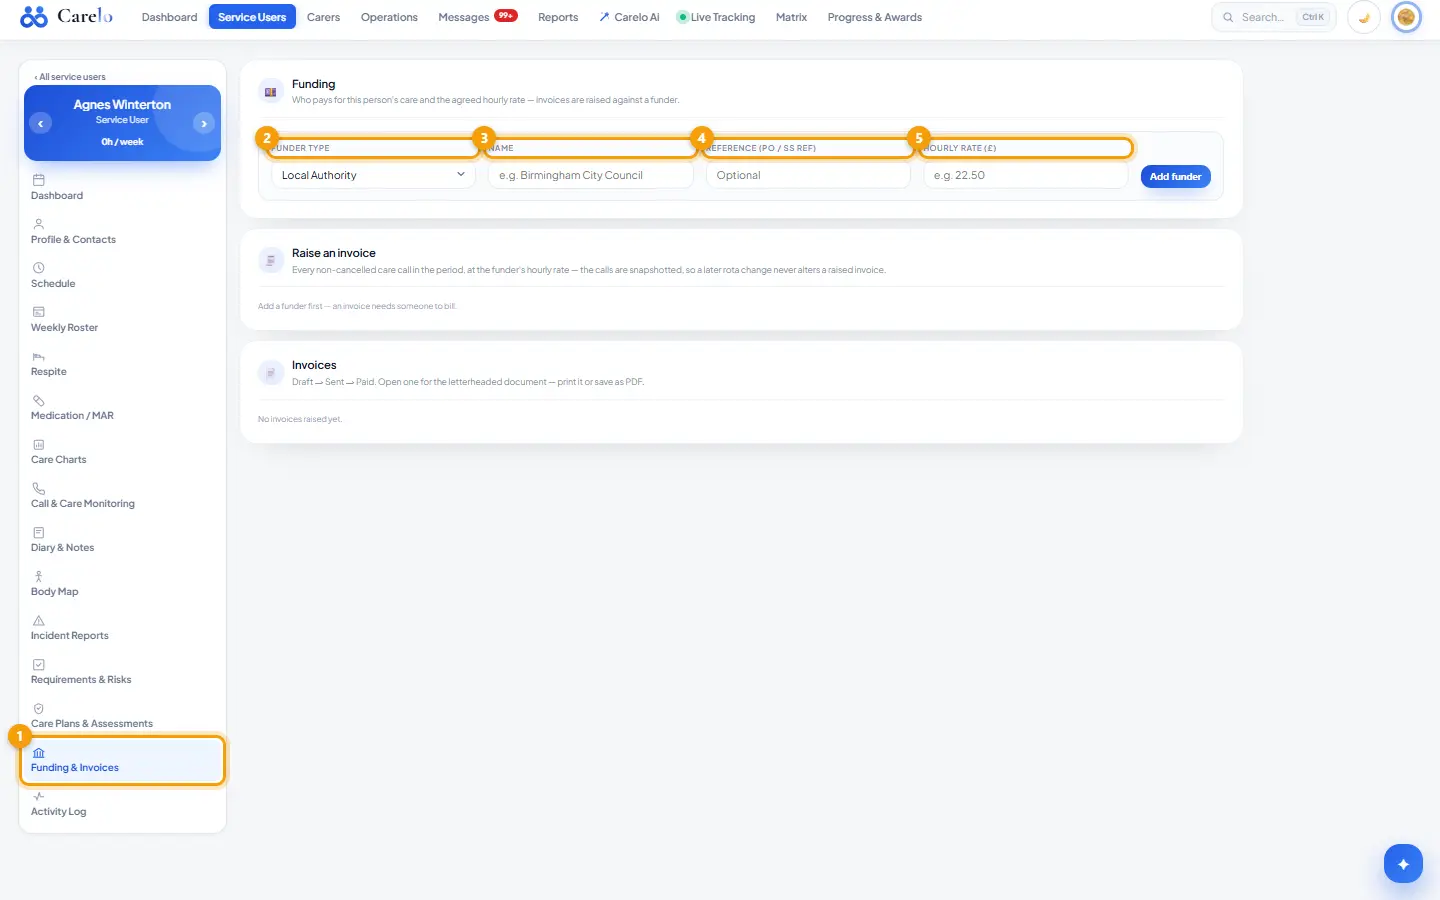
Who pays for this person's care, at what hourly rate, and the invoices raised against those funders from the person's real visits. An invoice is a snapshot of the calls in its period; a later rota change never alters it. Status walks Draft → Sent → Paid, and the letterheaded print view is the document.
Where to find it
Service Users → open a person → Funding & Invoices. An invoice number opens its print view in a new tab.
How to
Add a funder
Press + Add a funder.
Choose Funder type (Local Authority, NHS / CHC, Private (self-funded), Direct Payment, Other), enter Name, an optional Reference (PO / SS ref) and the Hourly rate (£).
Save. Edit a funder on its card; Remove asks for confirmation and leaves raised invoices intact.
Raise an invoice
Under Raise an invoice choose Bill to (a funder and its rate), set From and To.
Press Create draft invoice. Every non-cancelled care call in the period is snapshotted at the funder's hourly rate; the total is exact minutes, shown as hours and minutes.
Move an invoice along
In Invoices each row shows Status, Invoice number, Period, Bill to, Calls, Hours, Rate, Total. Press Mark sent, then Mark paid. A draft can be deleted after a confirmation.
Print or save as PDF
Click the invoice number. The print page shows Bill to, Care delivered to, Period, Issued, one line per call (Date, Call, Duration, Hours, Amount) and the totals: Care calls, Total hours, Hourly rate, Total due.
Use the browser's print dialog or Save as PDF.
Rules worth knowing
An invoice needs a funder; the page says so until one is added.
The hourly rate must be a number between 0 and 500; the From date must not be after the To date.
Only non-cancelled calls in the period are billed on this page.
Invoices are immutable once raised; to correct one, delete the draft and raise it again.
Common questions
Two funders share the cost. Add both funders and raise a separate invoice for each period and payer.
The hours look wrong. The invoice counts the calls as they stood when it was raised; check the roster for the period and raise a fresh draft if calls have since changed.
Incident Reports for one person — the permanent record and the office response
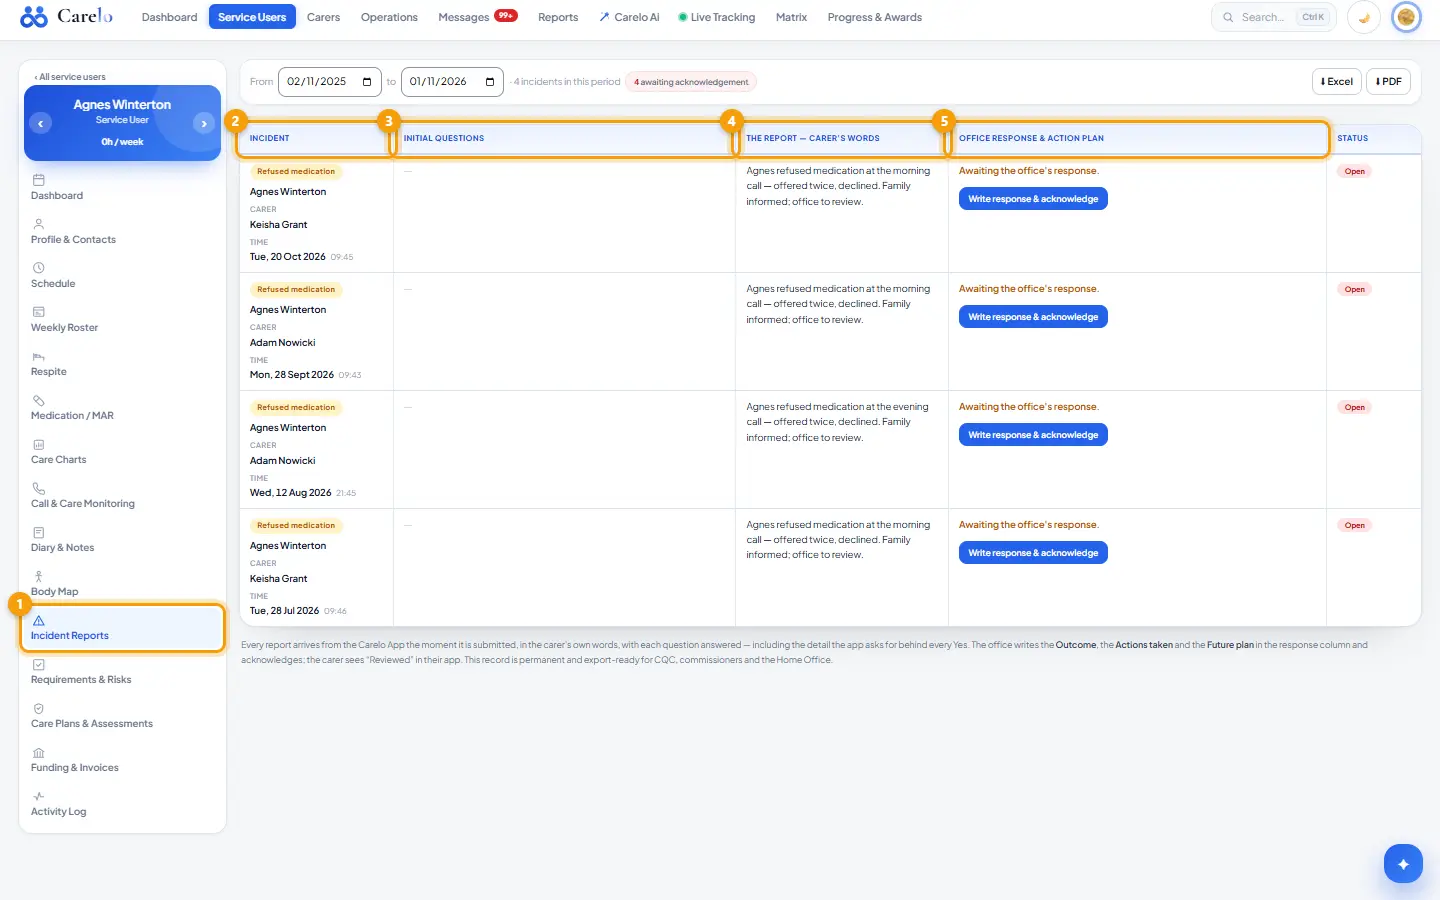
Every incident a carer reported on this person, in the same ruled table as Operations → Incident Reports: the incident (carer, type, time), the initial yes/no questions with the detail behind each Yes, the report in the carer's words, and the office's response. Operations is the combined desk; this is the individual lens, built from the same board so the two never differ.
Where to find it
Service Users → open a person → Incident Reports. The default window is the last year.
How to
Find an incident
Set From and To. The header counts reports "awaiting acknowledgement".
Columns: Incident, Initial questions, The report — carer's words, Office response & action plan, Status (Open or Acknowledged).
Respond and acknowledge
Press Write response & acknowledge on an open report (or Write response / Update response on one already handled).
Write the Outcome, Actions taken and Future plan straight into the cell and save. The status becomes Acknowledged; the carer sees the response in the app.
Export
⬇ Excel downloads a styled workbook of the selected range; ⬇ PDF prints the table on a letterheaded page.
Rules worth knowing
The carer's words and answers are never edited by the office; only the response column is written here.
A report stays Open until a response is written and acknowledged.
Incidents also appear as lines on the person's Activity Log.
Common questions
Can the office raise an incident itself? Not from this page; incidents come from carers' reports in the app.
Why does an old incident still show? The default range is the last year; narrow the dates to shorten the list.
Medication / MAR — the medication list, the administration log and the MAR chart
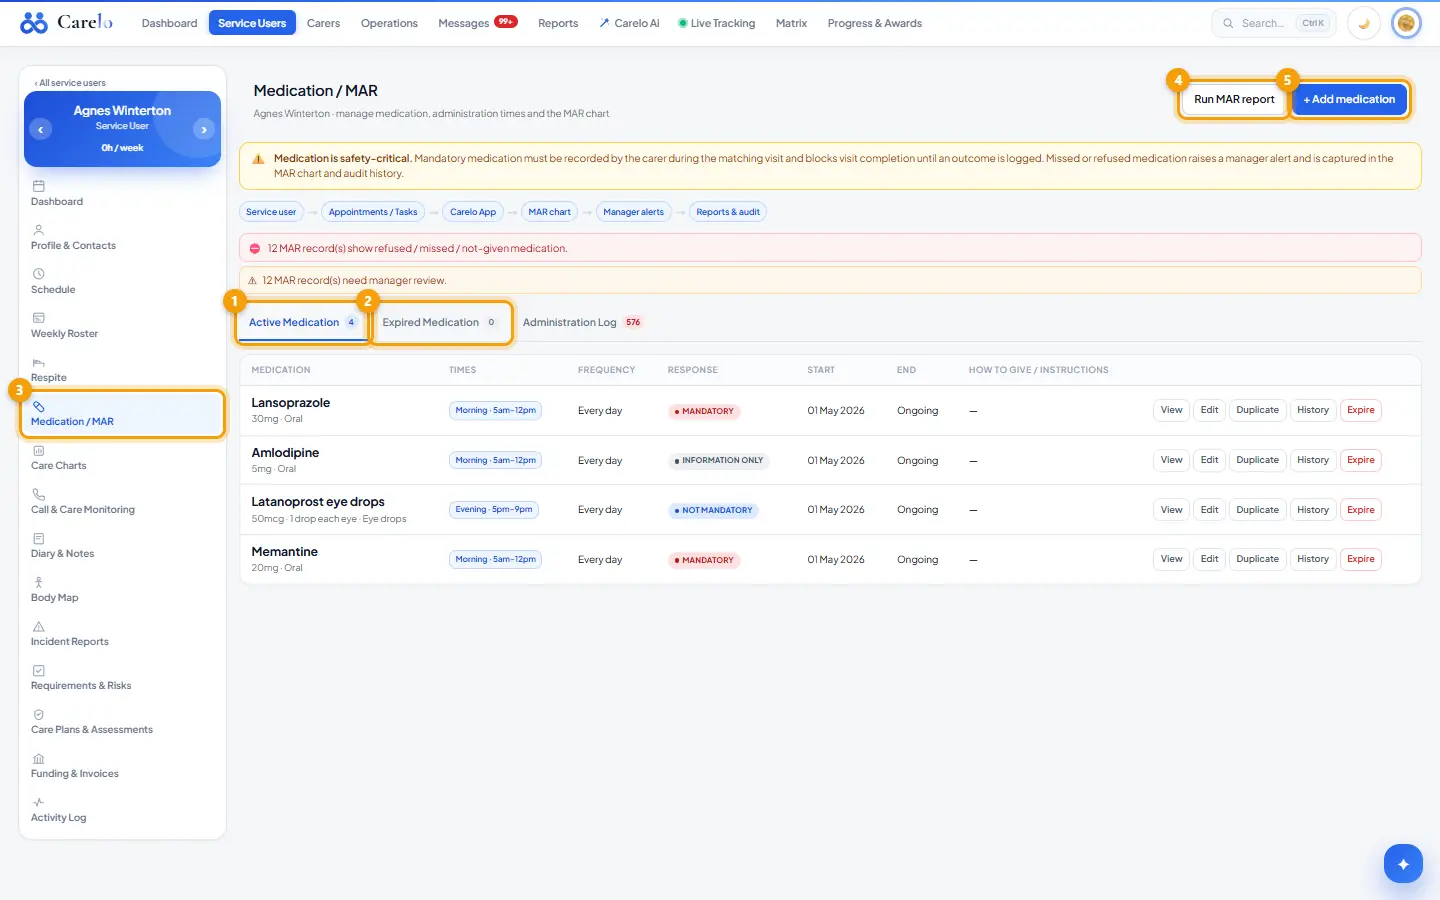
1Active Medication2Expired Medication3Medication / MAR4Run MAR report5+ Add medication
What it is
The person's medication record in three tabs — Active Medication, Expired Medication, Administration Log — and the printable MAR chart. Carers record each dose in the app during the matching visit; the office adds and maintains the medication, approves anything a carer proposed, and reviews the outcomes.
Where to find it
Service Users → open a person → Medication / MAR. The MAR chart opens from Run MAR report, Print or Export PDF on that page; ‹ Medication / MAR returns.
How to
Add a medication
Press + Add medication.
Medication name (start typing for suggestions; any name is allowed), Dose, Strength, Route (oral, topical, transdermal, inhaled, eye drops, ear drops, nasal, injection, other), Frequency (PRN, every day, every 2–7 days, custom), optional Time gap between doses, Notes / instructions.
Administration times: Morning (5am–11am), Lunch time (11am–3pm), Afternoon (3–5pm), Evening (5–9pm), Night (9pm–5am) or Custom time.
Carer response requirement: Mandatory (must be recorded on the matching visit; the carer cannot complete the visit without an outcome; missed/refused alerts the manager), Not mandatory (may be recorded; never blocks), For information only.
Start date (required), optional start time; tick Set an end date (otherwise the medication stays active) for a course.
Press Add medication. Editing an existing one asks for a Reason for change, kept in the history.
Maintain the list
Each row offers View, Edit, Duplicate, History, and Expire (or Reactivate on an expired one). A medication a carer added from the app appears under "Added by a carer — needs your approval" with Approve, Decline or Edit first; nothing schedules until approved.
Review the Administration Log
Columns: Date, Medication, Slot, Recorded, Carer, Outcome, Amount, Reason / notes, Review. Outcomes are Administered, Prompted, Not required, Refused, Not given, Missed, Other; an OUT OF SLOT tag marks a dose recorded outside its listed time. Press Flag to raise a record for review or Mark reviewed to close it. Export CSV downloads the log; Email report is a placeholder.
Run the MAR chart
Press Run MAR report. The chart shows this month so far: one row per medication and slot, one column per day, each cell the outcome code plus the carer's initials, with a reasons-and-notes table beneath.
Use ‹ › to move months, or set from and to dates (a month at most).
Print or Export PDF (the browser's Save as PDF). Export CSV downloads the rows in the window.
Rules worth knowing
Manager alerts at the top of the page count carer proposals awaiting approval, out-of-slot doses, refused / missed / not-given records, scheduled records with no outcome, records needing review, and medication ending within 7 days.
Recorded times are UK wall-clock exactly as the carer recorded them.
The history shows office-added medication and approved carer proposals; declined proposals are kept under Expired with the reason but not in the history.
The end date cannot be before the start date.
Common questions
A carer gave a dose at the wrong time — is it lost? No. It is logged with an OUT OF SLOT tag and raised in the alerts.
Does expiring a medication delete its record? No. It moves to Expired Medication with its full history and can be reactivated.
Requirements & Risks — care needs, visit rules, risks and standing instructions
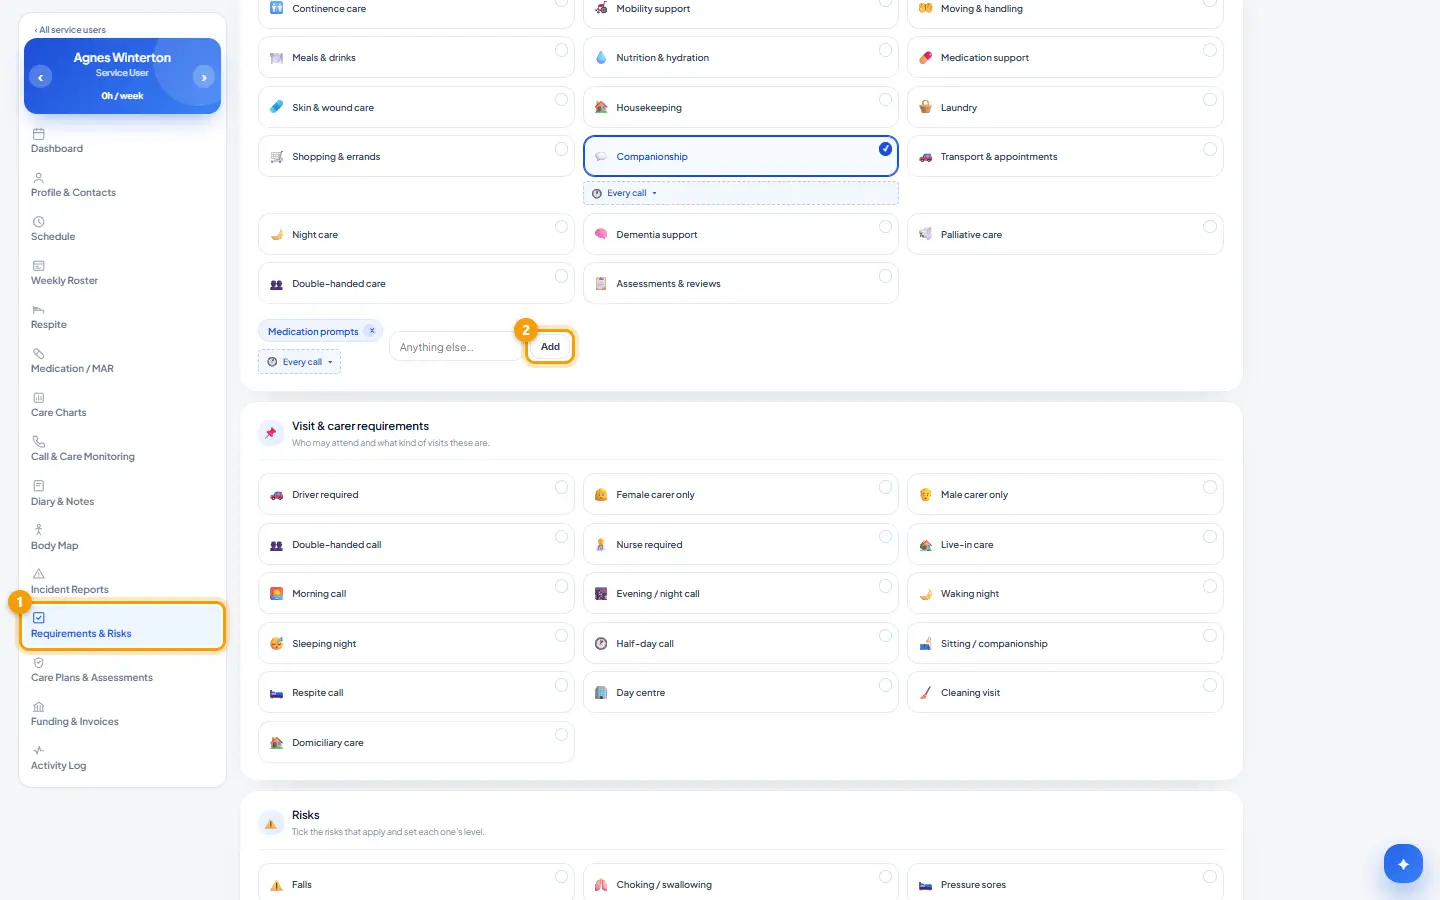
1Requirements & Risks2Add
What it is
The tick board that tells carers what this person's care includes and what the risks are, plus the standing instructions shown on every call they apply to. Everything saved here is what the carer app reads before a visit, and what pre-ticks the care documents written in Carelo.
Where to find it
Service Users → open a person → Requirements & Risks. The same board also opens inside the appointment card on its Risk & Care Requirements tab, where a tick means "on calls like this one".
How to
Tick the care requirements
Under Care requirements tick the tiles that apply: Personal care, Bathing & showering, Dressing & undressing, Continence care, Mobility support, Moving & handling, Meals & drinks, Nutrition & hydration, Medication support, Skin & wound care, Housekeeping, Laundry, Shopping & errands, Companionship, Transport & appointments, Night care, Dementia support, Palliative care, Double-handed care, Assessments & reviews.
On a ticked tile choose when it shows — Morning (06–11), Lunch (11–15), Tea (15–19), Bed (19–22), Night (22–06), Social (over 1 hour). Choose none and it shows on every call.
Anything unusual goes in Anything else… → Add; it saves instantly as a chip.
Press Save changes. The bar confirms "Saved — carers see this on their next visit".
Visit & carer requirements
Tick who may attend and what kind of visits these are: Driver required, Female carer only, Male carer only, Double-handed call, Nurse required, Live-in care, Morning call, Evening / night call, Waking night, Sleeping night, Half-day call, Sitting / companionship, Respite call, Day centre, Cleaning visit, Domiciliary care. Female-only and male-only exclude each other.
Risks
Tick the risks that apply — Falls, Choking / swallowing, Pressure sores, Medication risk, Dementia / confusion, Wandering, Aggression / behaviour, Fire / smoking, Pets in the home, Home hazards, Lives alone, Safeguarding concern — and set each one's level: Low, Medium or High. Other risks go in Anything else… with a level, then Add. Save with Save changes.
Instructions for carers
Under Instructions for carers type the instruction (for example where the creams are kept) and choose when it applies: Days of the week, Times (the same bands as above) and an optional Dates window. Nothing chosen means every call.
Press Add instruction. It appears at the top with Edit, Turn off / Turn on and Remove.
An instruction a carer wrote from the app is tagged From a carer and is fully editable here.
Rules worth knowing
An instruction here is said once and shown on every call it applies to until someone takes it down; a hand-off is for one call only.
One gender rule at a time: ticking Female carer only clears Male carer only, and the reverse.
The board shows unsaved changes with a warning until Save changes is pressed; chips and instructions save on their own.
The care team (favourite and blocked carers) lives on the profile's Care tab, not here.
Common questions
Where are the time bands inside the appointment card? Not asked there: a tick in the card is stored as that call's own band.
Does Double-handed call make the schedule a double-up? No. The double-up itself is set on the package or the appointment card.
Respite — pausing a person's calls for a stay away
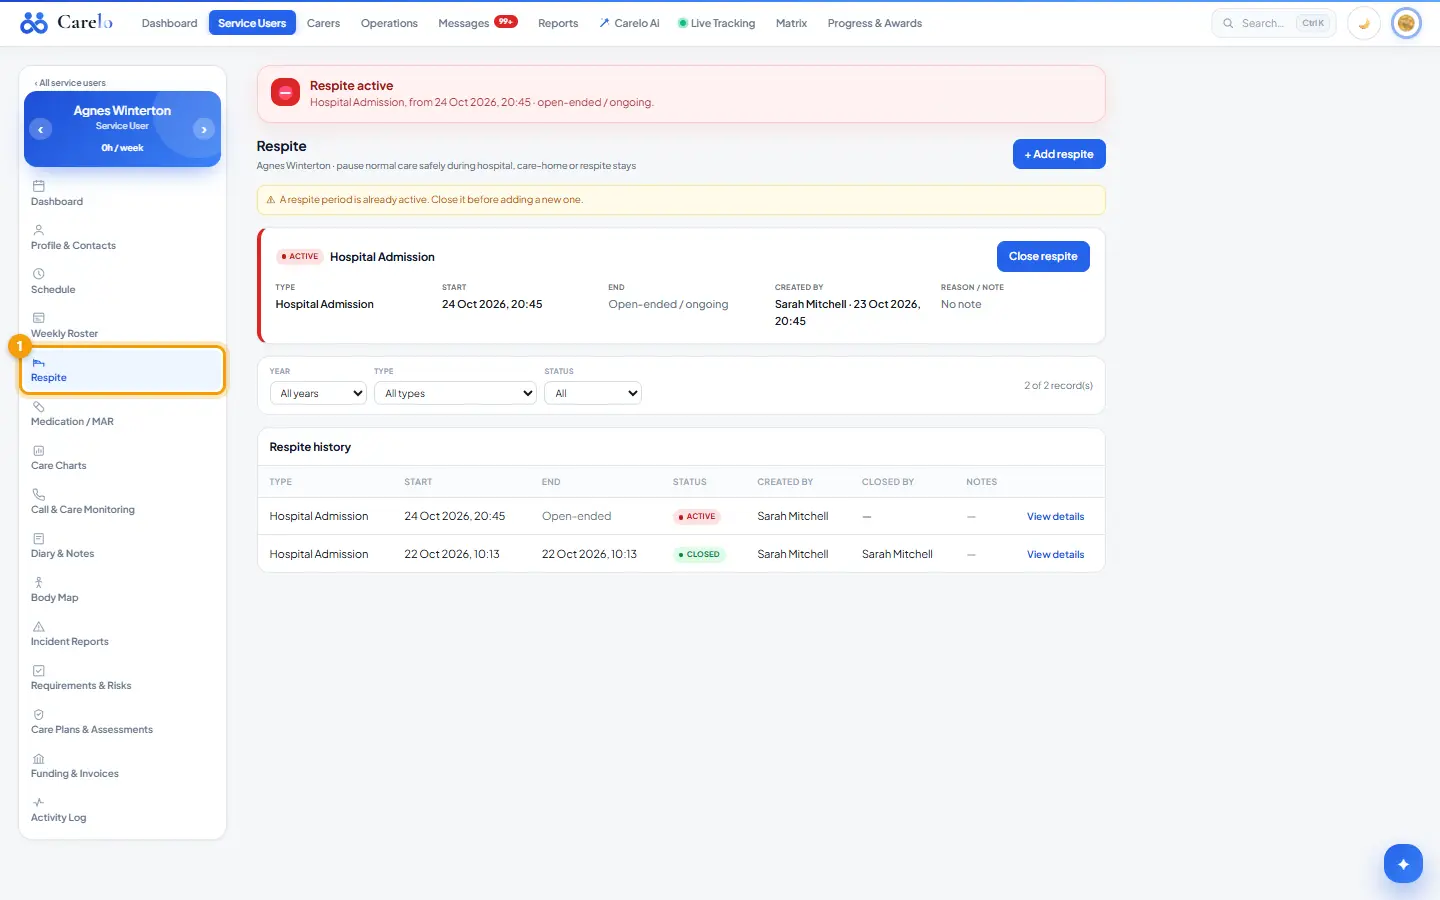
1Respite
What it is
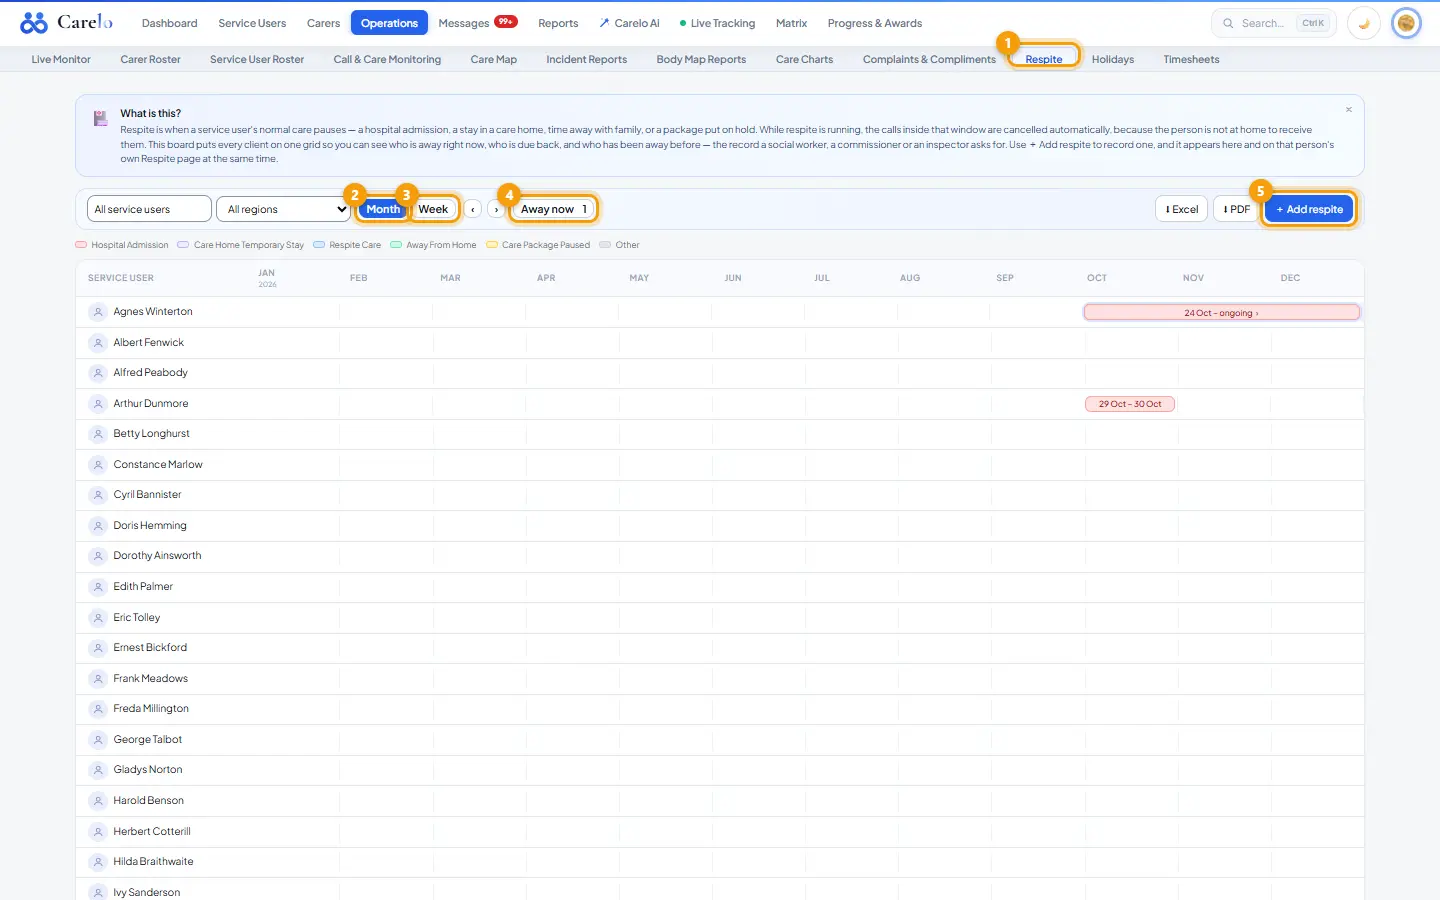
Respite records a period when a service user is away (hospital, a family stay, a respite placement). The calls inside the period are cancelled with the reason recorded, the schedule itself is untouched, and when the respite ends the calls after the end time can be put back in one step.
Where to find it
Service Users → open the person → Respite. Every company's respite periods together: Operations → Respite (Operations → Respite).
How to
Start a respite
Open the person → Respite.
Enter the start date and start time, and the end date and end time if known. Leave the end empty for an open-ended stay.
Add a note if useful and save. The calls inside the period are cancelled with "respite" as the reason; carers see them leave their day.
End a respite that was open-ended
Open the person → Respite → the active period.
Enter the end date and End time, add a closing note if wanted, and choose whether to put the calls back from the end time onward.
Save. Calls inside the respite stay cancelled; calls after the end time return to the roster if you chose to restart them.
Put the calls back later
If the respite was closed without restarting appointments, open the period and use the put-back action; it offers "Put back the calls this respite cancelled after its end time? Calls inside the respite stay cancelled."
Rules worth knowing
The schedule (the weekly pattern) is never changed by a respite; only the generated calls inside the period are cancelled, so the pattern carries on after the end.
A call that was already delivered (checked in) is a locked record and is never cancelled by a respite.
The end must be after the start; the form refuses an end time before the start.
Reinstating puts back only the calls this respite cancelled, never calls cancelled for another reason.
Common questions
Will the family see the respite? The family app shows the person's schedule as it stands, so the cancelled calls disappear from it for the period.
Can I record a respite in the past? Yes; past calls inside it are cancelled with the respite reason unless they were delivered.
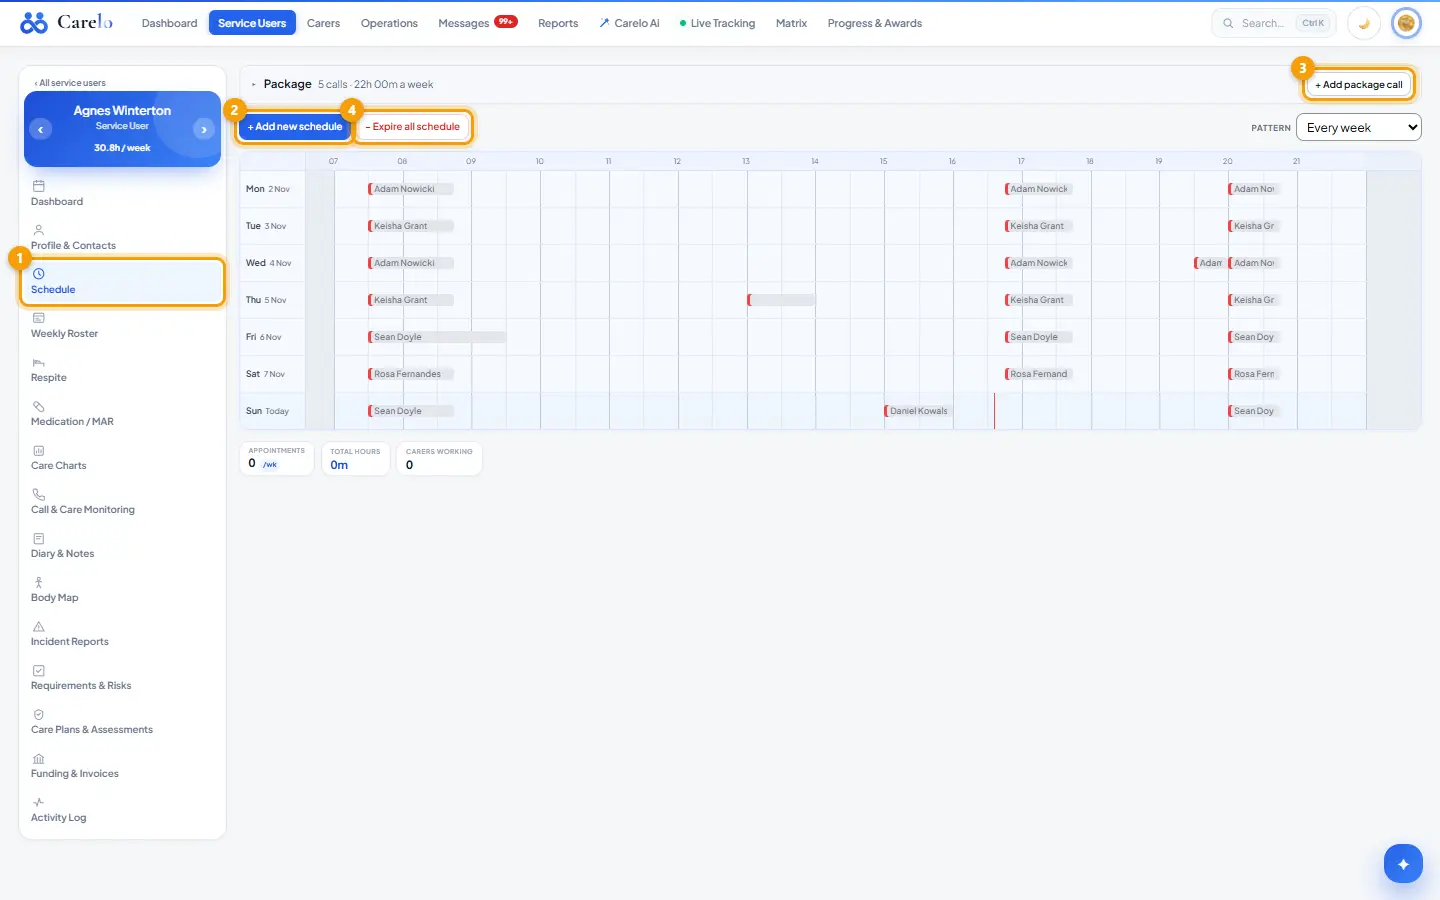
Schedule — the person's weekly pattern, packages and changes
1Schedule2+ Add new schedule3+ Add package call4− Expire all schedule
What it is
The Schedule is a service user's standing weekly pattern: which calls happen on which days and times, with which carer, every week. The rota is generated from it, this week and next straight away and the weeks after quietly in the background. A change on the Schedule changes every future week; a one-week change is made on the rota instead.
Where to find it
Service Users → open the person → Schedule. Direct path: Service Users → person → Schedule.
How to
Add a call to the pattern
Open the person → Schedule → + Add new schedule.
Set the day, start and end time, and whether the call is double-handed. Assign a carer now or leave it unassigned (shown in yellow).
Save. The call appears on every future week from its start date; the rota is written for this week and next at once.
Move a call
Drag the card along its day to a new time (it snaps to the grid) or onto another day, then confirm. The change applies to the pattern, so every future week moves with it. For a single week, open the call on the rota instead.
Set a pattern longer than one week
Use Pattern (top right) to choose a 2, 3 or 4-week pattern. The board then shows Week 1, Week 2 … with the dates each next falls on, and a call can differ between the weeks (Week 1 Alia, Week 2 Asia).
The package
The Package row at the top states what was agreed at the start (for example 3 calls, 16h 30m a week). + Add package call adds a call to the package; the stat strip under the grid shows appointments a week, total hours and carers working.
End a call or the whole schedule
Open a call and set its expire date to end it from that date. − Expire all schedule ends every call in the pattern from a chosen date; the past stays as delivered.
Rules worth knowing
Newest decision wins: assigning a carer who is already on a clashing call moves the older call to unassigned and reports it. Nothing double-books and nothing blocks.
A delivered week is a record, not a blocker: changes to the pattern never rewrite calls that were already checked in.
Overnight calls follow the 24-hour rule: an end time earlier than the start means the next day, and the call is drawn on both days it covers.
A double-handed call shows half navy, half yellow until both seats are filled, on the Schedule, the Weekly Roster and the rota alike.
Cancelled calls are not drawn on the Schedule; a one-week time change shows as a small "this wk" tag so the pattern never looks broken.
Add several calls to a run
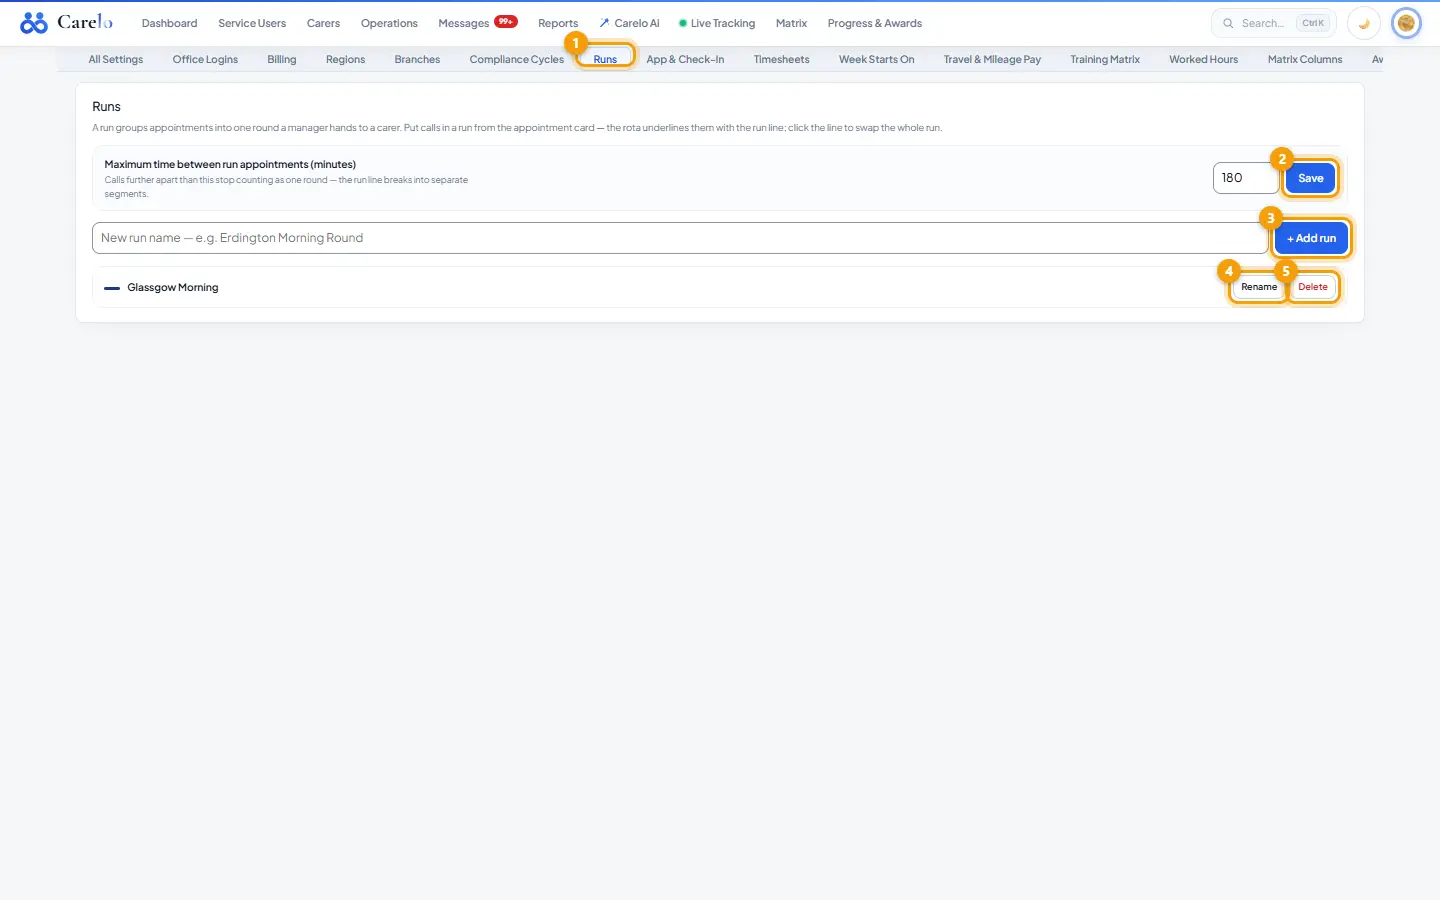
Select calls (drag a lasso, Ctrl-click, or Select on a phone) and use the Run box on the selection card: pick the run (or — Not in run —) and press Assign — on its own or together with a carer. The Schedule is the weekly pattern, so it applies to this week and every later week. Completed calls are left unchanged. Dragging a call never changes its run. Runs are created in Settings → Scheduling → Runs.
Common questions
I changed Tuesday on the rota but next Tuesday is still the old time. Rota changes are for one week. Change the time on the Schedule for every week.
Why is a call yellow? No carer is assigned. Assign one here for every week, or on the rota for that week only.
Does the night band show? The grid gives the working day 07:00 to 22:00 most of the width; calls outside those hours sit in the narrow night band at either edge.
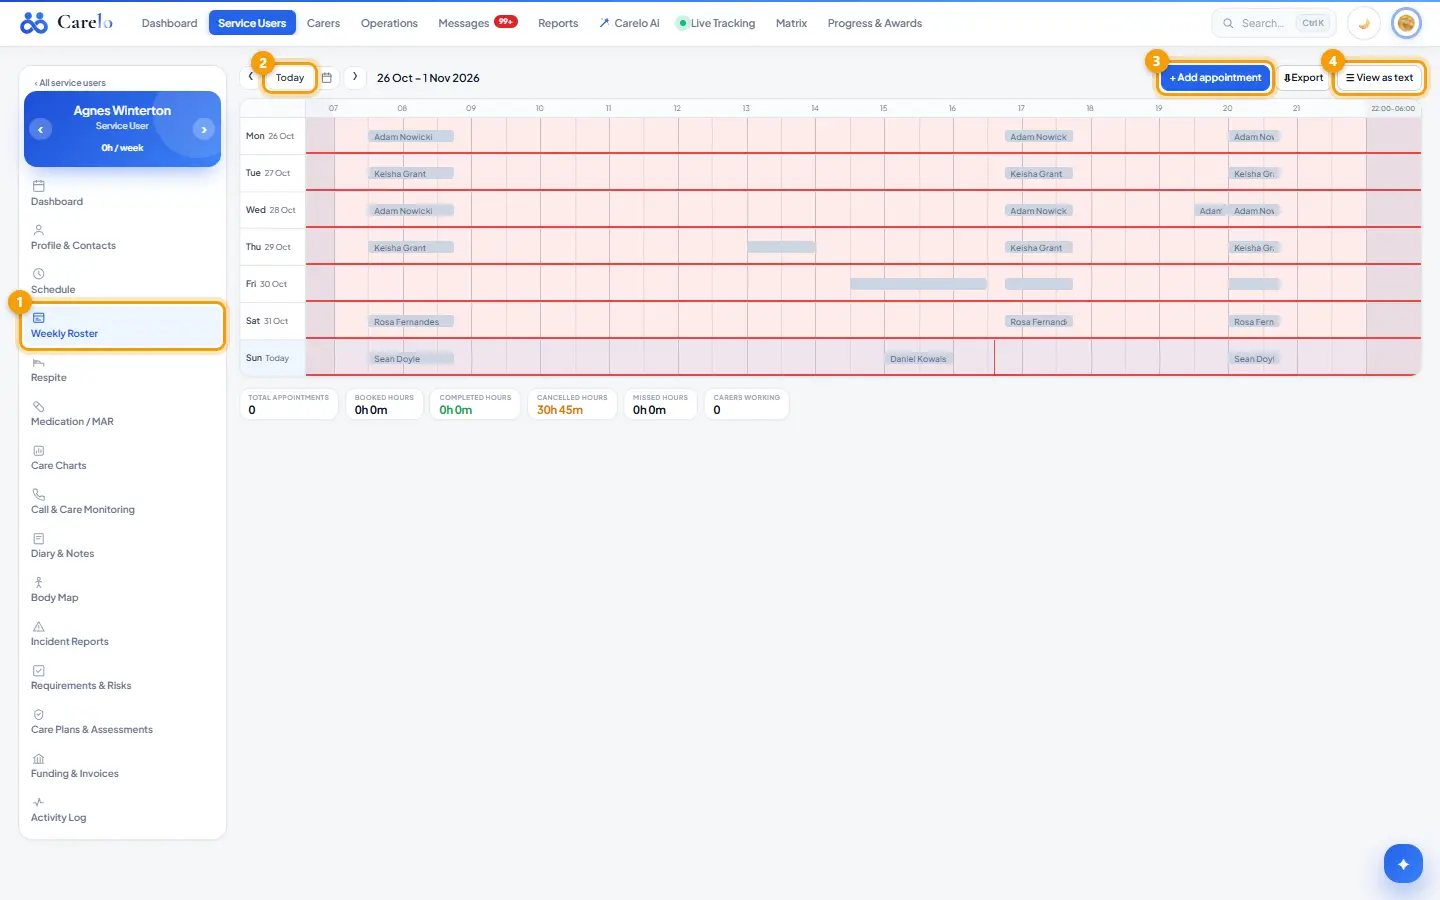
Weekly Roster for a person — one week's real calls
1Weekly Roster2Today3+ Add appointment4☰ View as text
What it is
The real appointments for one service user in one week, drawn on a seven-day grid. The Schedule page is the repeating pattern; the Weekly Roster is the generated week. Changes here touch only the week on screen unless you choose the weekly option on the card.
Where to find it
Service Users → open a person (the list opens here first) → Weekly Roster. Use ‹ ›, Today, or the date picker to move between weeks (Jan 2026 to Dec 2030). When the person has a 2–4 week carer pattern, the header shows "Week 2 of 2 · next week is Week 1".
How to
Add a one-off appointment
Press + Add appointment. The appointment card opens for this week with a Day picker.
Set the day, start and end times and carers, then press Save for this week only. Choose Repeat weekly then Create weekly schedule to make it a pattern instead.
Change one call
Click a call to open its card. Edit times or carers.
Leave This week only selected and press Save changes, or select This & future weeks and press Save & update schedule for a permanent change.
Drag a call to another time or day; the "Move … to …?" box asks you to confirm with Move. Drag the bottom edge to resize, then Change duration.
Work on several calls
Drag across empty grid to lasso calls (on a phone, turn on Select first and tap calls).
The selection card offers Earlier / Later nudges (5–60 min), a carer picker with Assign / Unassign, a Carer 1 / Carer 2 seat choice on double-ups, Repeat weekly, Edit (one call), Cancel, Reinstate and Delete. When the company has runs, a Run box lets you pick a run (or — Not in run —) and the same Assign button applies it, on its own or together with a carer; with Repeat weekly ticked it goes into the schedule, so every later week too.
Cancel or delete
Cancel opens the cancellation form: reason (Client in hospital, Client on holiday, Cancelled by client, Cancelled by family, Client unwell, Other), optional details, whether to invoice the client and pay carer attendance and mileage, and two ticks to remove the call from the carer's roster and from the client's roster. Unticked, it stays greyed as Cancelled.
Delete removes the appointment permanently after a confirmation; the dialog offers Cancel it instead.
Read the week
Stats under the grid: Total appointments, Booked hours, Completed hours, Cancelled hours, Missed hours, Carers working. ☰ View as text lists the week as plain text. A red respite band marks days the person is away. Hover a call for its carers, check-in and check-out times, and any "This week only" note.
Rules worth knowing
Newest decision wins: assigning a carer who is already on a clashing call moves that other call to unassigned and reports it. Nothing double-books and nothing blocks.
A checked-in call is a locked care record: it cannot be reassigned, cancelled or deleted here. Bulk actions skip it and say so.
A blocked carer is refused before anything is written.
A call cancelled with "remove from the client's roster" ticked is hidden here.
An overnight call (end before start) runs into the next day, up to 24 hours; last Sunday's night call is drawn as Monday's tail.
Common questions
Why does the hover say "This week only"? The call was moved on this roster; the schedule time is unchanged and shown beside it.
I want to drop a carer from every week. Use Unassign with Repeat weekly ticked, or do it on the Schedule page.
Chapter 3
Carers
Your team: profiles, documents, app access, availability, leave, timesheets and supervision.
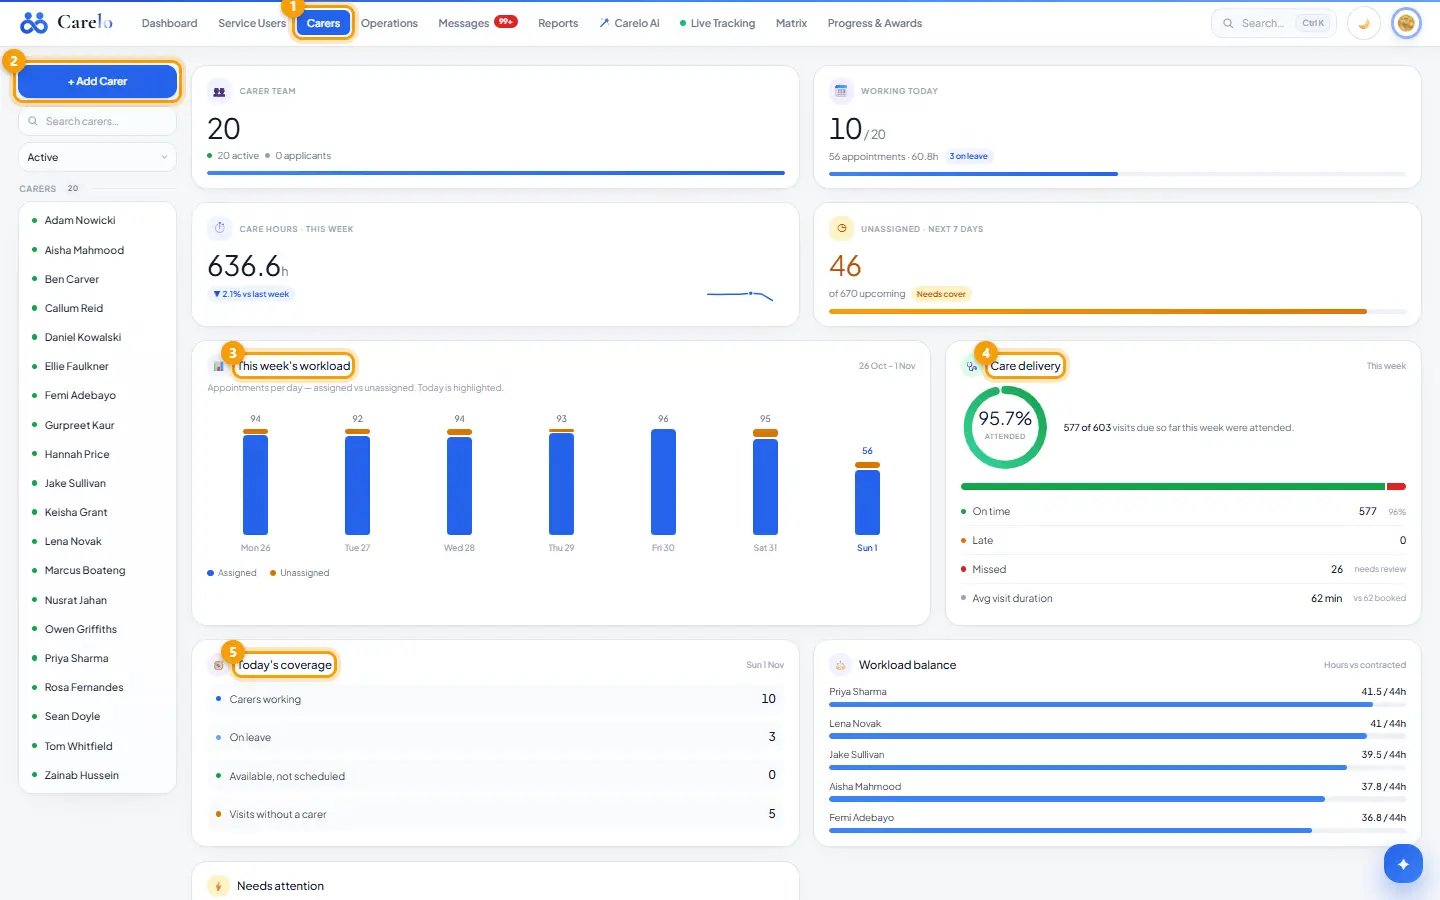
Carers is the team overview: a directory of every carer on the left and the manager's briefing on the right — who is working today, this week's hours against last week, visits still unassigned, care delivery so far this week, workload against contracted hours and a "needs attention" list. Add Carer creates a new carer record.
Where to find it
Main menu → Carers. The + Add Carer button sits at the top of the directory and opens /carers/new.
How to
Find a carer
Type in Search carers….
The status dropdown shows Active by default; switch to Inactive or All to see people who have left. An inactive carer shows their reason under their name.
Click a name. It opens that carer's Weekly Roster (the ‹ › arrows on the carer pages flip to the previous or next active carer on the same tab).
Read the briefing
Carer team — total, active, applicants, suspended.
Working today — carers with calls today out of active carers, appointments and hours, and how many are on leave. Click it to open today's rota.
Care hours · this week — with the change against last week.
Unassigned · next 7 days — click to open the rota on the first uncovered day.
This week's workload — appointments per day, assigned against unassigned.
Care delivery — attended, on time, late, missed and average visit length, from check-ins.
Today's coverage, Workload balance (this week's hours against each carer's maximum) and Needs attention (missed visits, unassigned visits, overdue supervisions, applicants, suspended carers — each line opens the right screen).
Add a carer
Carers → + Add Carer.
Work status: Status (Active or Applicant), tick Branches and Regions where the company has them, choose a Job role, add a Start date.
Personal details: Title, Gender, Forename, Surname, Middle name, Date of birth.
Contact details: Email, Secondary email(s) (separate with ;), Mobile, Landline.
Address: Address line 1, City / Town, County / Province, Country / Region, Postcode. In the Location panel press Find on map; drag the pin if it is not on the house. The pin is saved with the record and feeds travel and run ordering.
Press Save Carer (or Save & Add Documents). Both save the record and return to the Carers list; documents are then added on the carer's Profile → Documents tab.
Rules worth knowing
Forename, surname, gender, address line 1 and postcode are required; the save is refused without them.
A carer can belong to several regions and several branches.
Active-only everywhere: inactive carers appear only when this directory's dropdown asks for them. Every statistic on the page counts active carers only.
Opening a carer lands on their Weekly Roster, not the profile.
On a personal (household) plan the Carers page is a simpler household view: this week's calls, care delivery, today, time off and paperwork.
Common questions
Why does a carer not appear in a picker on the rota? They are inactive. Check the directory with All selected, then their Profile → Settings → Status.
Where do I set contracted hours? On the carer's Availability page (min / max hours per week). The Workload balance card uses the maximum.
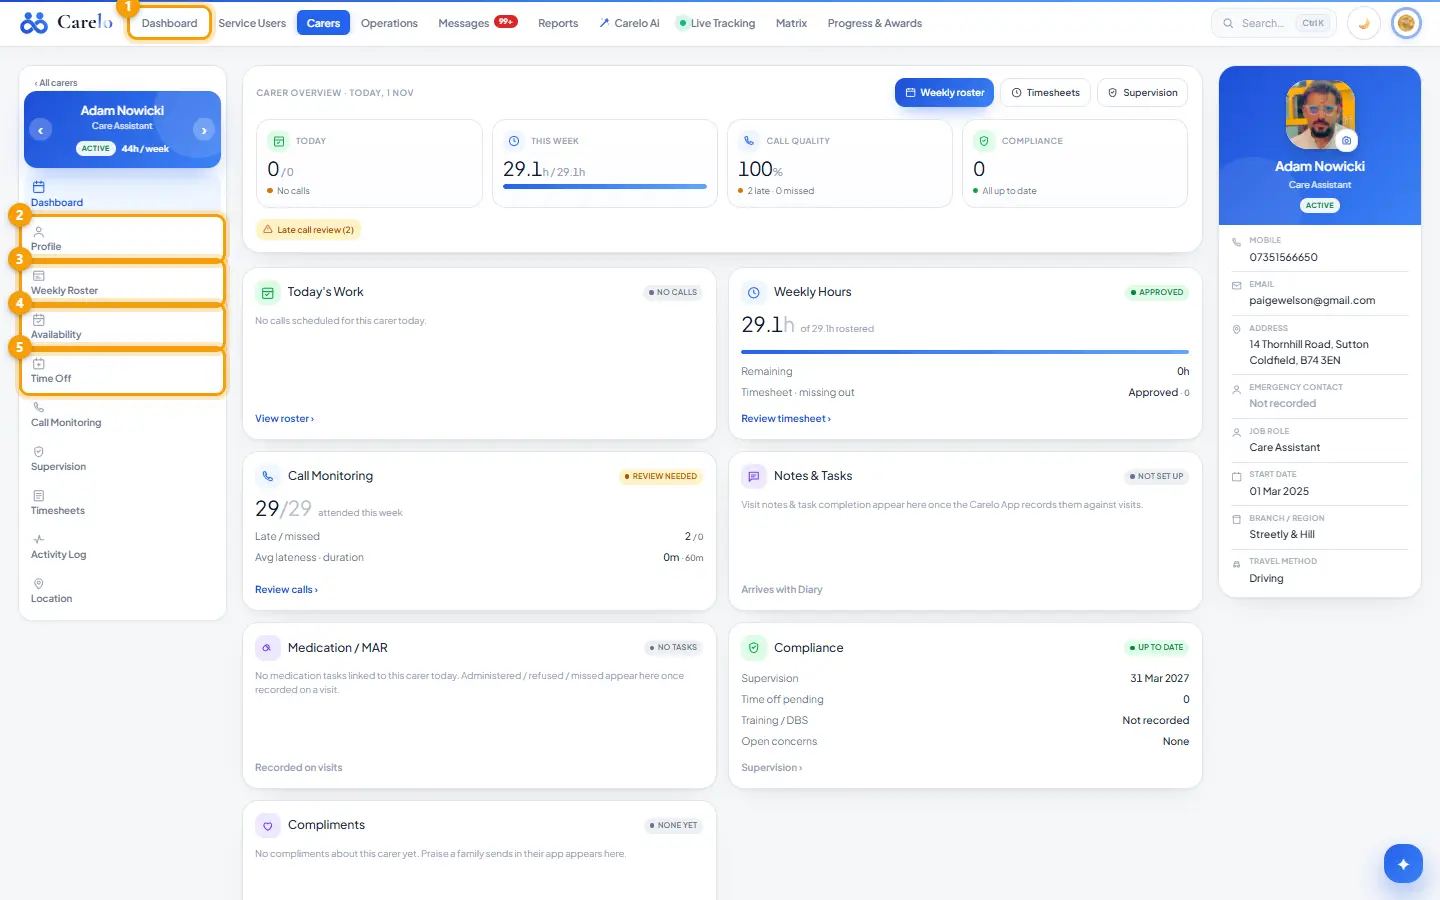
Carer dashboard — one carer's overview
1Dashboard2Profile3Weekly Roster4Availability5Time Off
What it is
One carer's page: today's calls, this week's worked hours against rostered, call quality (late and missed), compliance actions (supervision due, time off pending), compliments families have sent about them, and a profile card on the right.
Where to find it
Carers → open a carer → Dashboard (first item in the carer's side menu). The side menu lists: Dashboard, Profile, Weekly Roster, Availability, Time Off, Call Monitoring, Supervision, Timesheets, Activity Log, Location. ‹ All carers returns to the directory; ‹ › flip to the previous or next active carer on the same page.
How to
Read the overview
The header buttons jump to Weekly roster, Timesheets and Supervision.
Today — calls completed out of calls booked, with the next call time and a status (No calls, Not started, On track, In progress, Completed, Attention).
This week — worked hours against rostered hours.
Call quality — attended share this week, late and missed counts.
Compliance — the number of actions waiting (supervision to book, time off to review).
Alert chips appear for supervision overdue or not scheduled, missed call today, missing check-out, late calls to review and time off pending.
Use the cards
Today's Work — next call and late / missed; View roster ›.
Weekly Hours — worked, overtime over the contracted maximum, remaining, and the timesheet state (Draft / Review needed / Approved); Review timesheet ›.
Call Monitoring — attended this week, average lateness and duration; Review calls ›.
Notes & Tasks and Medication / MAR — fill as the carer app records visits; they say so plainly when empty.
Compliance — supervision state, time off pending, and Book supervision › / Review time off › when something is due.
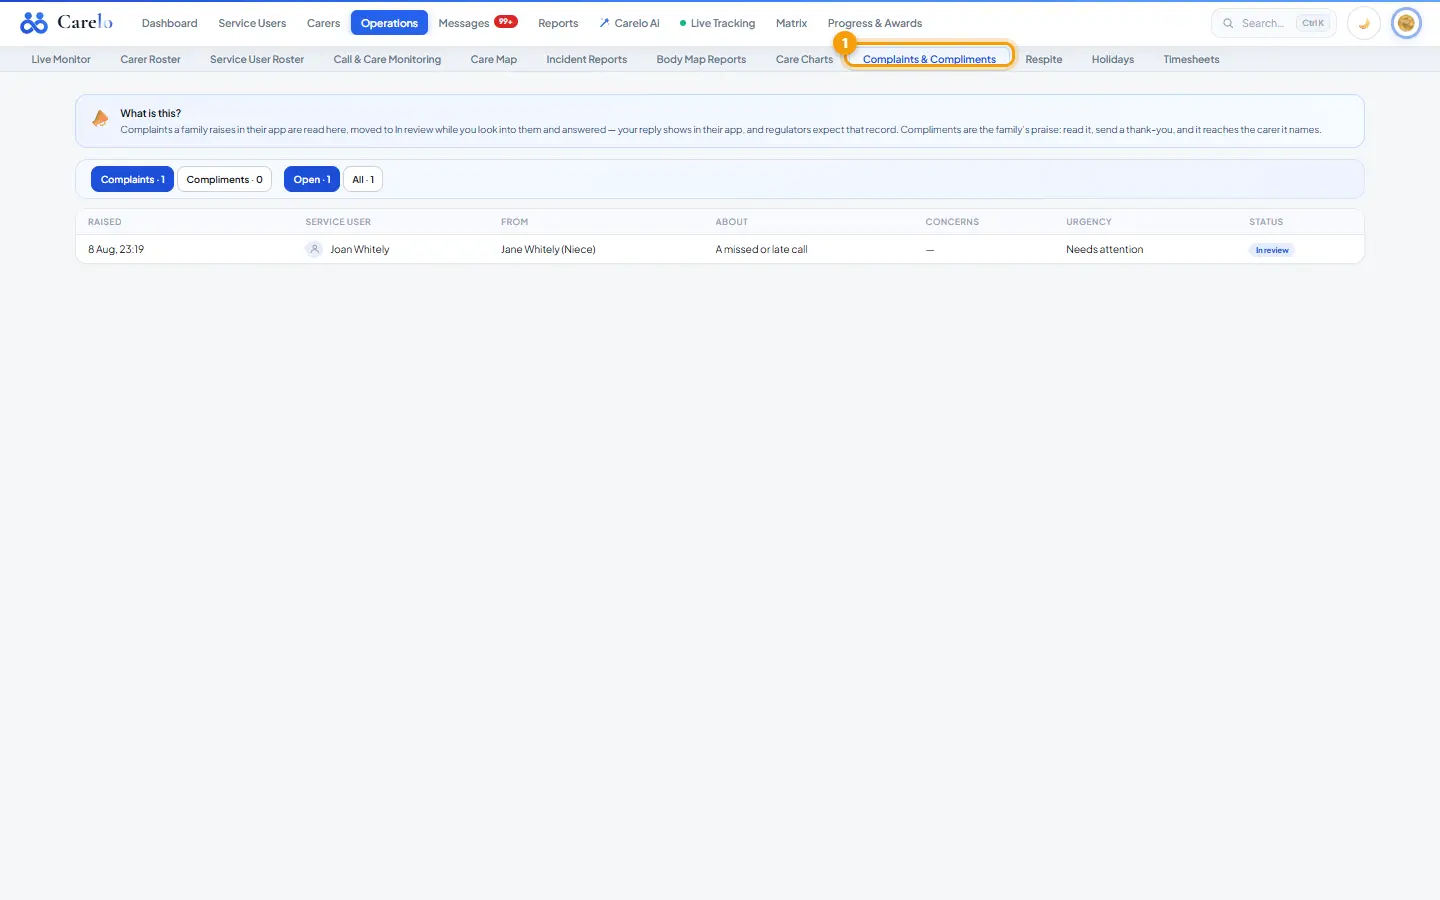
Compliments — praise a family sent in their app naming this carer; answered on Operations → Complaints & Compliments (Compliments desk ›).
Change the photo
Click the camera on the profile card and choose an image (under 5 MB). It uploads immediately.
Edit a detail on the profile card
Hover a row (Mobile, Email, Address, Emergency contact, Job role, Start date, Branch / region, Travel method) and click its pencil — it opens the exact Profile tab that owns that field.
Rules worth knowing
Worked, late, missed and quality figures come from the carer's timesheet for the company's current week (Settings → Week starts on).
Supervision is "Overdue" when a booked session's date has passed without being held, or a completed session's next-due date is in the past; "Due in N days" within 14 days.
Only files whose bytes are a real image are accepted as a photo, whatever the file is called.
Common questions
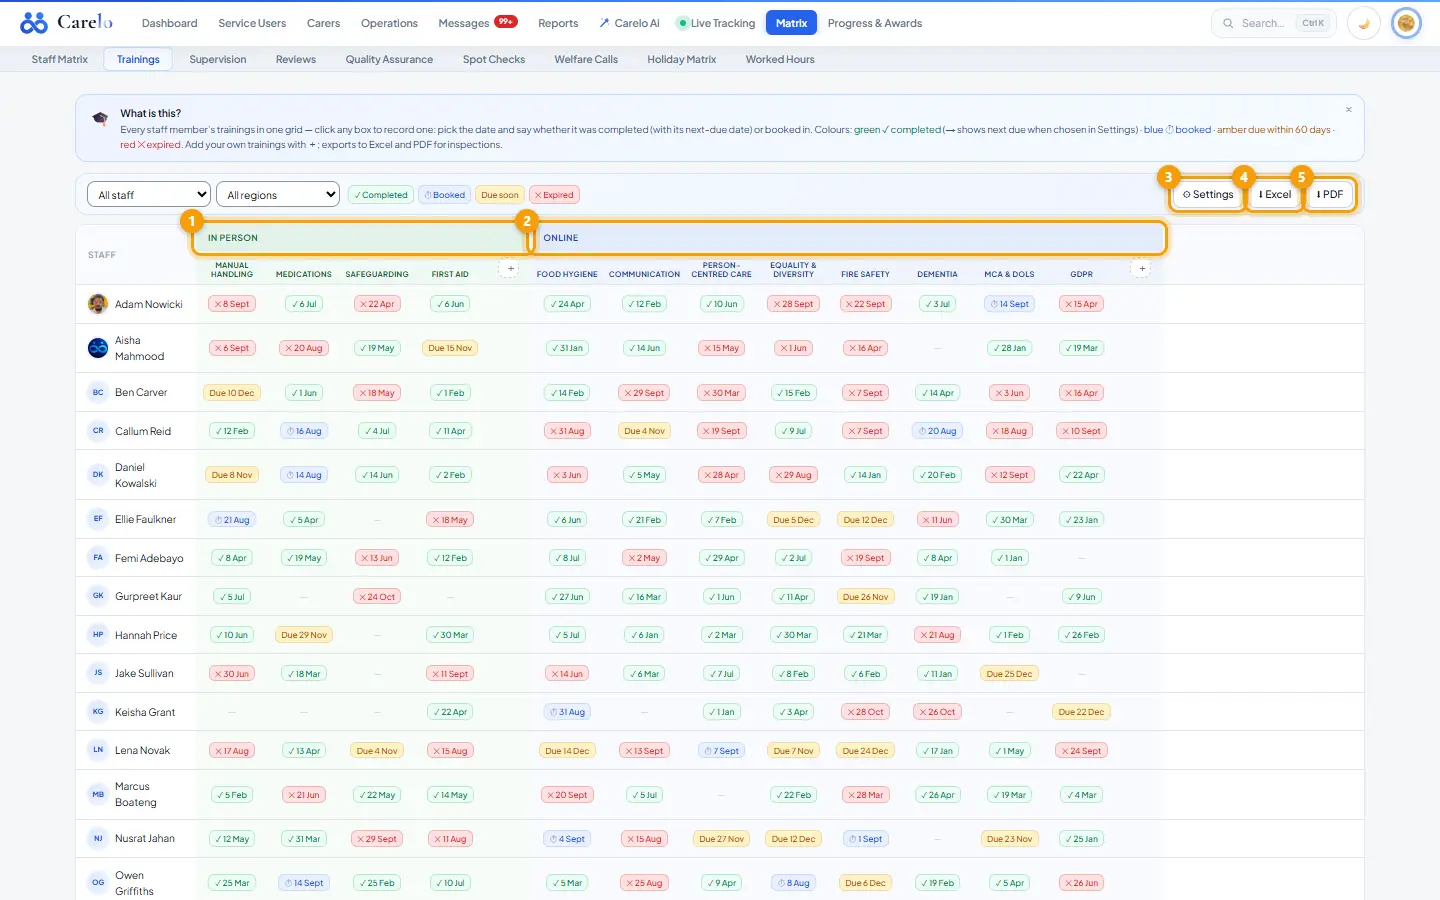
The Compliance card says "Training / DBS — Not recorded". Those live on Profile → Compliance and Matrix → Trainings; this card does not read them yet.
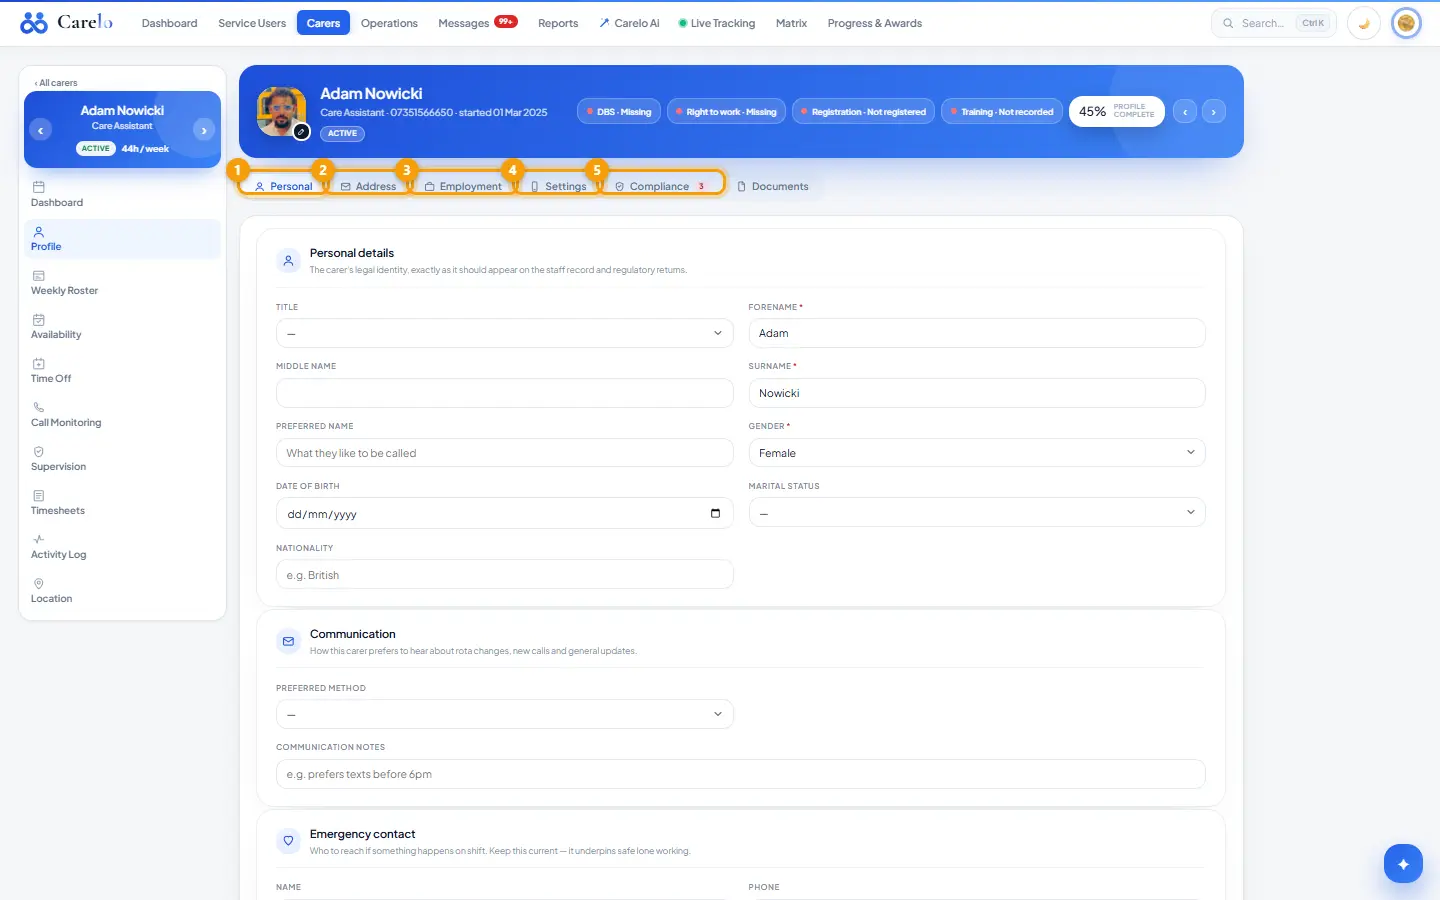
Carer profile — details, status, compliance and documents
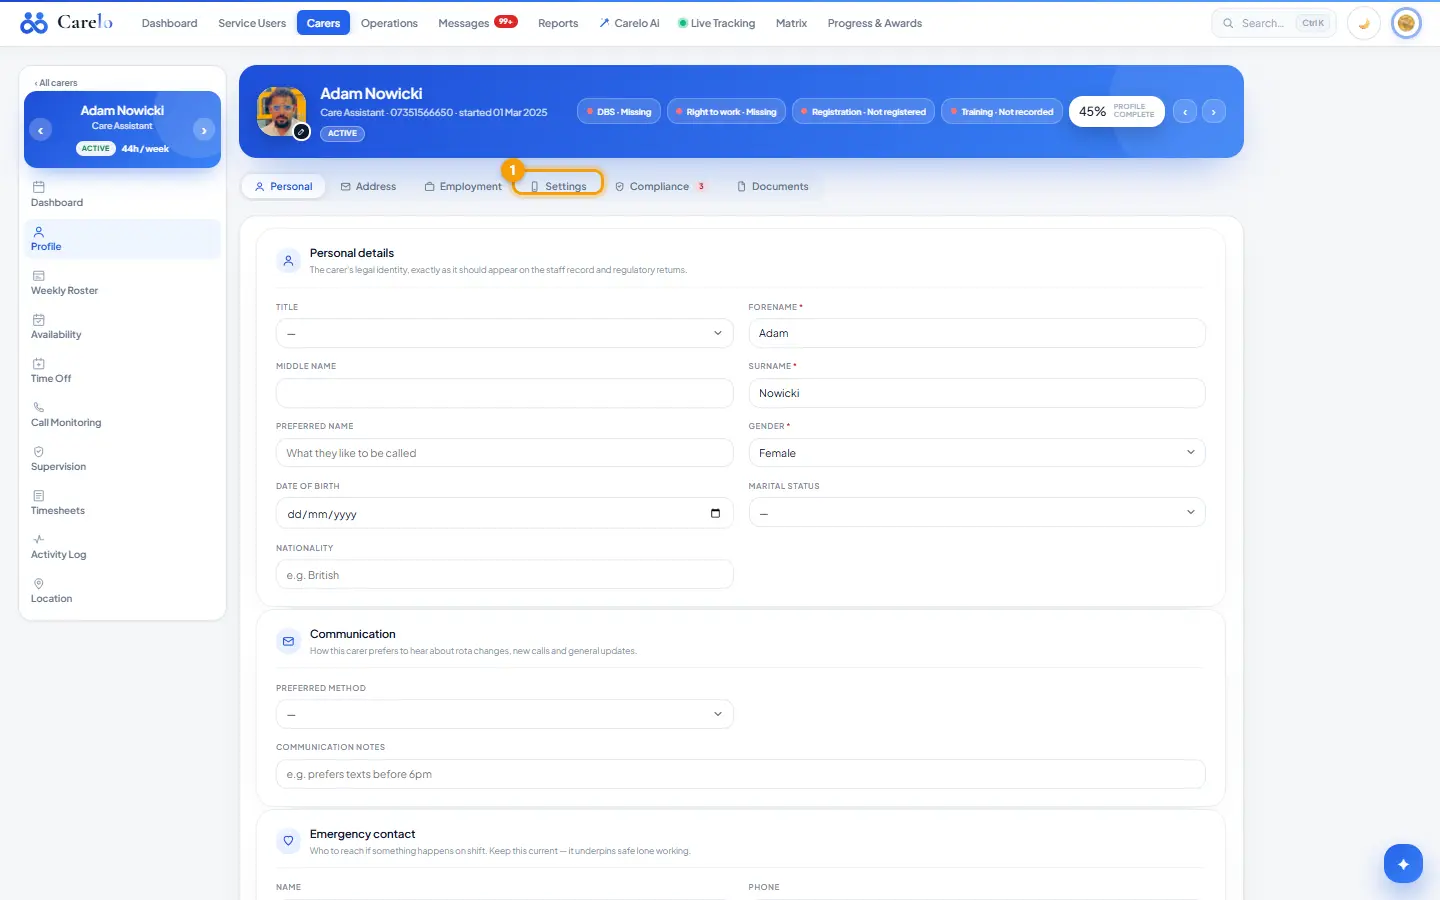
1Personal2Address3Employment4Settings5Compliance
What it is
The carer's full record in six tabs: Personal, Address, Employment, Settings, Compliance, Documents. It is the one place every field is edited; other screens link here. The App access card (device sign-in) sits at the bottom of the same page — see "Carer app access and setup code".
Where to find it
Carers → open a carer → Profile. A pencil on the dashboard card opens the matching tab directly.
How to
Edit and save
Change any field. A bar appears with Cancel and Save profile.
Press Save profile. Forename, Surname, Gender, Address line 1, Postcode and Job role are required; the bar highlights what is missing.
Region and branch chips, the travel method and documents save instantly without the bar.
Make a carer inactive (or active again)
Settings tab → Status → press Inactive.
Pick a Reason: Left employment, Dismissed, Long-term leave, Retired or Other (Other asks Please specify). The save is refused without a reason.
Save profile. If the carer still holds upcoming calls, a dialog says Release N upcoming appointments? — press Make Inactive & Release For Cover or Cancel. Released calls go to Unassigned on the rota; delivered and checked-in calls are untouched.
Press Active and save to bring them back. The reason clears.
Set job role, regions, branches, travel and roster delivery (Settings tab)
Job role — a dropdown of home-care roles.
Regions / working areas — Add to region…; regions never block assigning the carer elsewhere.
Branches — shown when the company has branches; a carer can be in several.
Travel — Driving, Walking, Cycling or Public transport (saves on click), Paid travel time and Travel rate (£ per mile).
Roster delivery — Email the weekly roster, Include in printed rosters, Text a daily summary.
Record compliance (Compliance tab)
DBS & right to work (certificate number, issue and expiry, right-to-work status and expiry), Professional registration, Training & induction, Qualifications, Workforce record (employment status, year first in social care, source of recruitment and similar). The header chips DBS, Right to work, Registration and Training summarise them and open this tab.
Keep documents (Documents tab)
In Document vault choose the File, give a Document name, pick a Type (DBS, Right to work, Passport/ID, Contract, Training certificate, Manual handling, Medication training, Supervision record, Appraisal, Other) and an optional Expiry.
Press Add document.
Each row shows Uploaded and Expiry dates and a status — Valid, Expiring (within 30 days), Expired or No expiry — with View, Replace and Delete.
Rules worth knowing
Inactive hides the carer from rotas, pickers, matrices and reports and closes their Carelo app with a "contact your office" message. History is kept.
Documents: PDF, Word, Excel, CSV, text or image only, under 10 MB, and only office staff who can write (owner, manager, coordinator) may upload. Files are stored privately and opened through the office session.
A file whose contents do not match its name is refused (photo and document uploads alike).
The address pin moves only when the typed address changes; a pin the office dragged survives other edits.
Branch is optional and never blocks saving.
Common questions
The Documents tab shows an "App access" box with greyed buttons. That box is a placeholder. The working App access card is at the bottom of the Profile page, below the tabs.
Where are contracted hours?Availability (Min / Max hours per week), not the profile.
Carer app access — setup codes, PINs and devices
1Settings
What it is
How a carer gets into the Carelo carer app. The office issues a one-time setup code; the carer redeems it on their own phone and chooses a private 6-digit PIN that nobody in the office can see. Every later login is the PIN on an authorised device.
Where to find it
Carers → open the carer → Profile (left side bar) → Settings tab → Open App access, which jumps to the App access card at the bottom of the page. Scrolling to the bottom of the Profile page reaches the same card. There is no App access item in the side bar itself.
How to
Give a carer the app for the first time
Make sure the carer has a personal email on their profile. If not, the card asks for it: Carer's personal email — setup codes and security alerts go there.
Press Create app account and send setup code. The account is created and the setup email goes out in the same step.
The card now shows Company ID (the company's subdomain) and Username.
Carer side (carer app)
Install the Carelo app from the links in the email.
Enter the Company ID, the username and the setup code once.
Choose a 6-digit PIN. From then on the app opens with the PIN.
Issue a new code (new phone, lost code)
Press Issue setup code. If the profile has no email the card asks for one: Save email and send setup code.
The green notice reads "Setup code emailed to the carer … valid until …". Issuing again replaces the previous code.
Remove a device (lost phone)
Under Authorised devices (N of 3) press Remove on the device and confirm. The carer is signed out on it and needs a new setup code to use it again.
Rules worth knowing
A code is valid for 24 hours and is emailed to the carer's own inbox. The office screen never shows a carer's code.
Up to 3 authorised devices per carer.
10 wrong PINs lock a device: it shows LOCKED — needs a new setup code.
A carer can also request a code from the app themselves; the card then says "They requested it from the app — sent to …".
An inactive carer's app access is closed (see the profile page).
Removing a device is audited.
Common questions
The carer says the email never arrived. Check the email on the profile, correct it, and press Issue setup code again — the old code stops working.
Can the office set the PIN? No. Only the carer chooses it, on their phone.
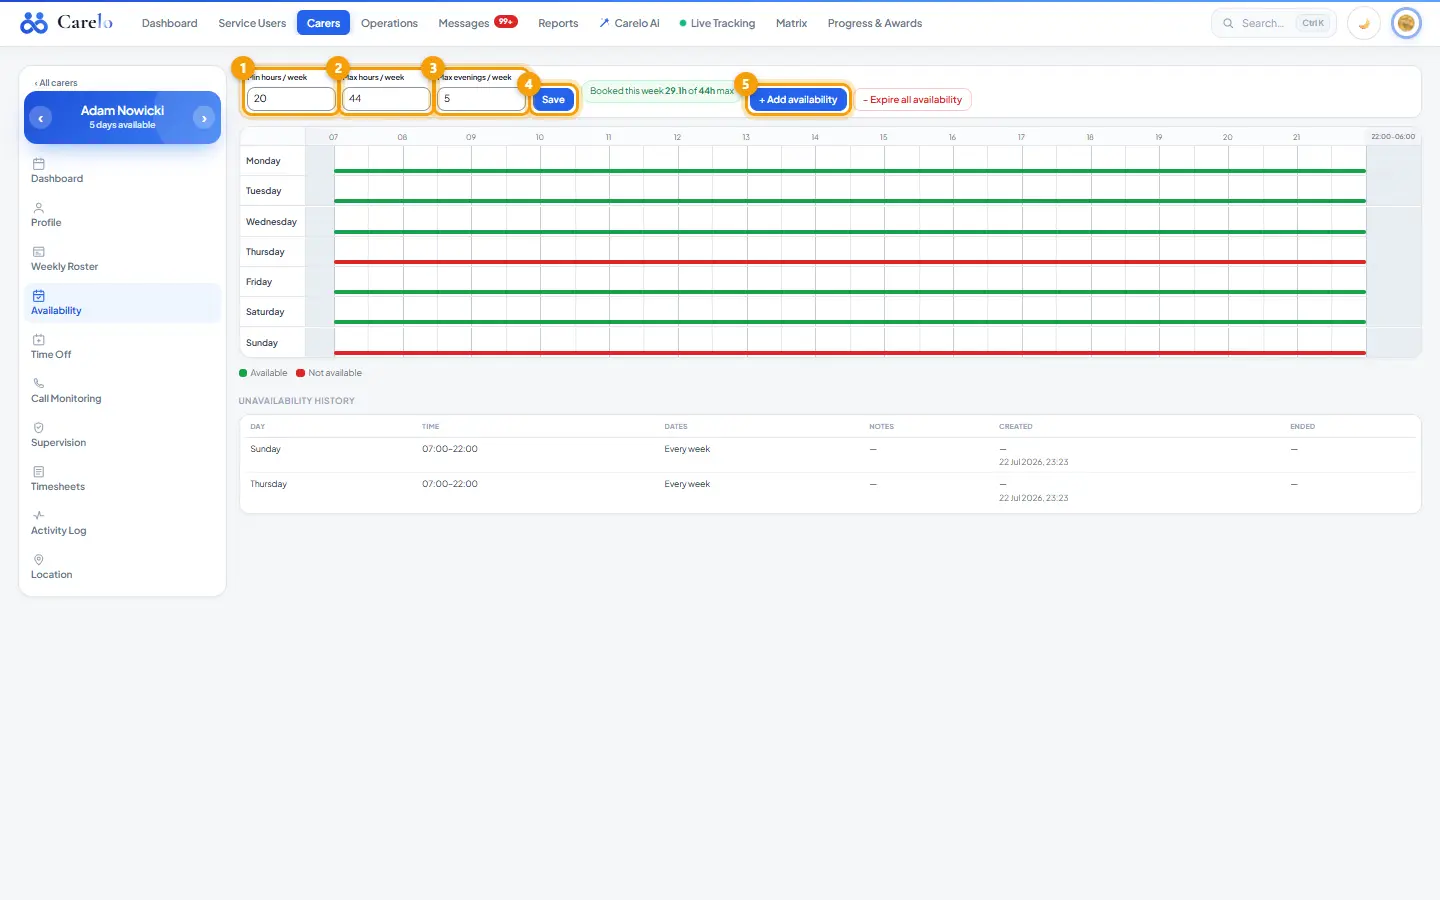
A weekly grid of when the carer is Available or Not available, plus their working-hour limits (minimum and maximum hours a week, maximum evenings). The rota reads these when assigning; Time Off and the Staff Matrix read the off-days.
Where to find it
Carers → open a carer → Availability.
How to
Set hour limits
Fill Min hours / week, Max hours / week and Max evenings / week in the top bar.
Press Save. The bar then shows Booked this week Nh of Mh max so the limit is visible against real bookings.
Add availability
Press + Add availability (or click an empty slot in the grid).
Choose Available or Not available, Start time, End time, optional Start date / End date, the days of the week, and Notes.
Press Add. One block is created per selected day.
Change a block
Click a block → edit → Save.
Drag a block to another day or time and confirm Move. Drag its right edge to resize.
Expire ends the block from Now (today) or From a future date (Expire block) and keeps it in history.
Delete removes it permanently.
End everything
− Expire all availability → Now (today) or From a future date → Expire all. Every live block is kept in the history; nothing is deleted.
Rules worth knowing
Hours must be 0–168; minimum cannot exceed maximum; evenings 0–7 as a whole number.
End time must be after start time; at least one day must be picked; an end date cannot be before the start date.
The Unavailability history table lists only not-available entries, with who added and who expired them.
The rota warns before an assignment breaks the weekly limits.
Weekdays with no availability count as off-days on Time Off and in the Holiday legend.
Common questions
Does availability stop me assigning a call? No — it warns; the office decides.
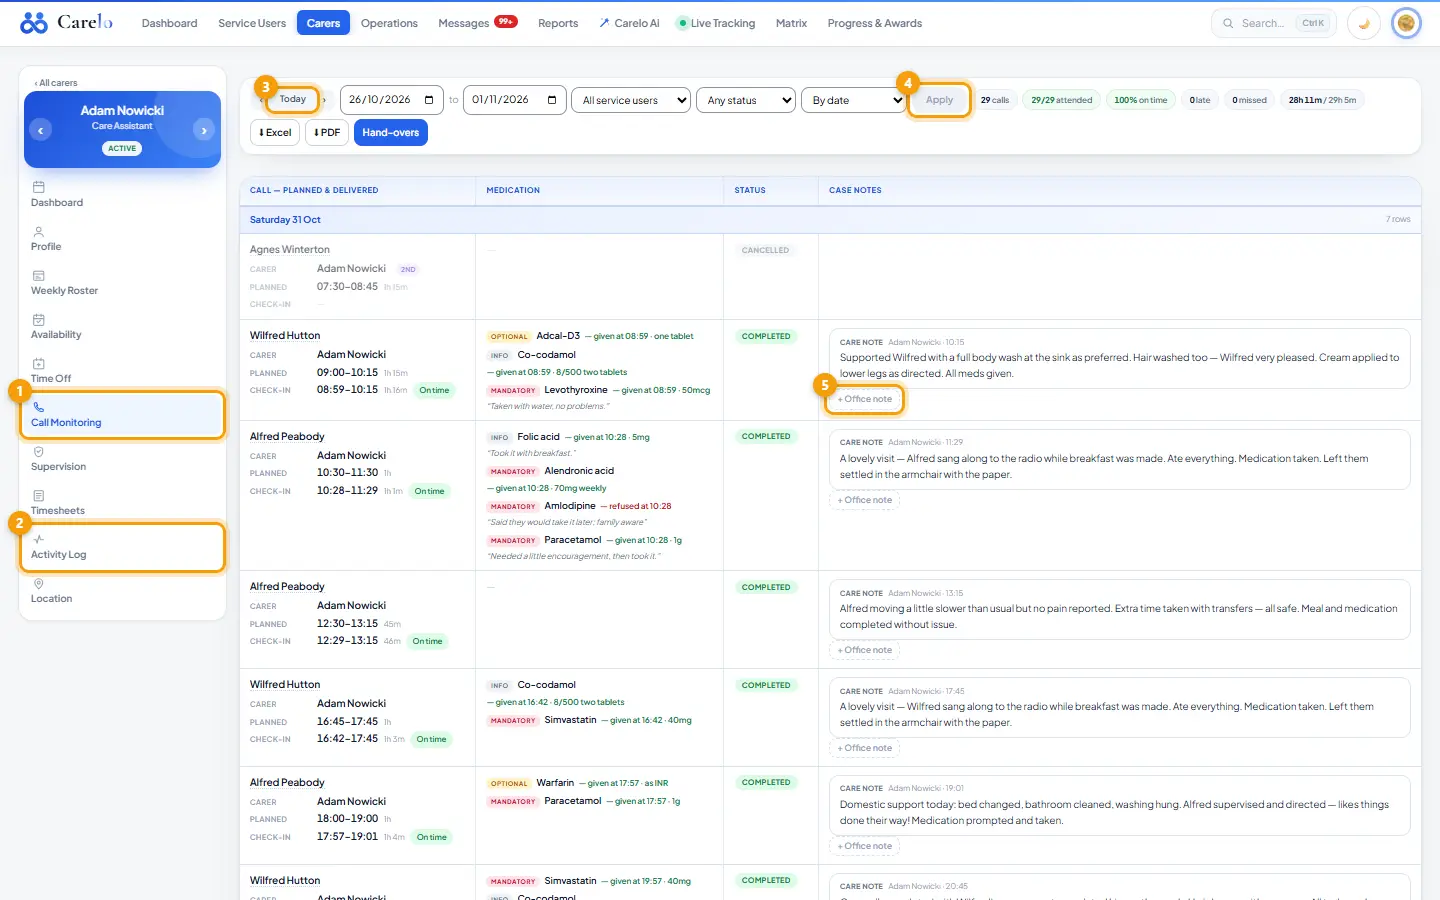
Call Monitoring is the company's Call & Care Monitoring table locked to one carer: every call in the window with planned against delivered times, medication, status and case notes. Activity Log is that carer's complete past record — calls delivered, missed or cancelled, case notes, medication outcomes, incidents, body maps, time off, awards and the quiet record trail.
Where to find it
Carers → open a carer → Call Monitoring / Activity Log.
How to
Review calls
The default window is the last 7 days. Use ‹ Today › for one day, or set From / To.
Filter by service user and status (Completed, Late, Missed, Cancelled, Upcoming, Not recorded); group By date or By service user. Press Apply.
Add context with + Office note → Save office note (saved under your name against that call).
⬇ Excel or ⬇ PDF export the whole selection.
Read the history
The default window is the last 7 days; use the month pager or set a range.
One box per day, newest first, one line per thing that happened.
Export with the Excel button; printing produces a headed compliance record.
Rules worth knowing
Call Monitoring uses the same row builder and table as Operations → Call & Care Monitoring; the two cannot disagree. The carer dropdown is absent because the carer is the page.
Activity Log is past only and read-only, and opens for inactive carers too.
A very wide window still renders, capped at the most recent 1,000 activities with a notice to narrow the dates.
The Reports catalogue's Carer Activity Log report is built by the same engine.
Common questions
A double-up call shows the other carer's row too. The carer filter on the board drops it; the row exists because the visit came back whole.
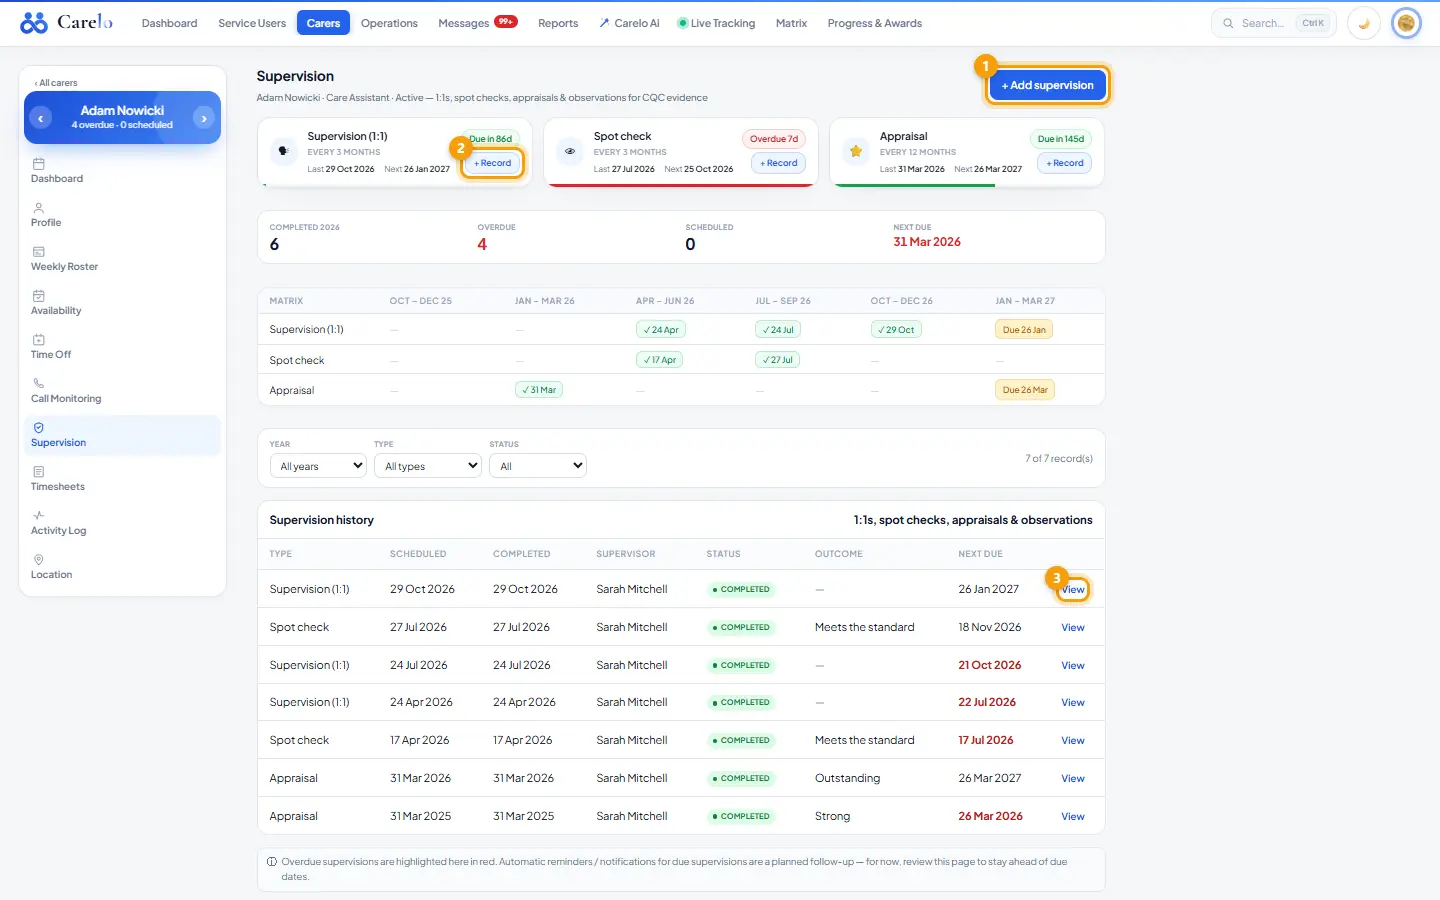
Carer supervision, spot checks and appraisals
1+ Add supervision2+ Record3View
What it is
One carer's supervision record: three cycle cards (Supervision (1:1), Spot check, Appraisal) with last and next dates, a one-line six-quarter matrix, and the full list of sessions. New records are recorded through the Matrix question-bank forms with this carer preselected.
Where to find it
Carers → open a carer → Supervision. The dashboard's Compliance card links here when something is due.
How to
Record a session
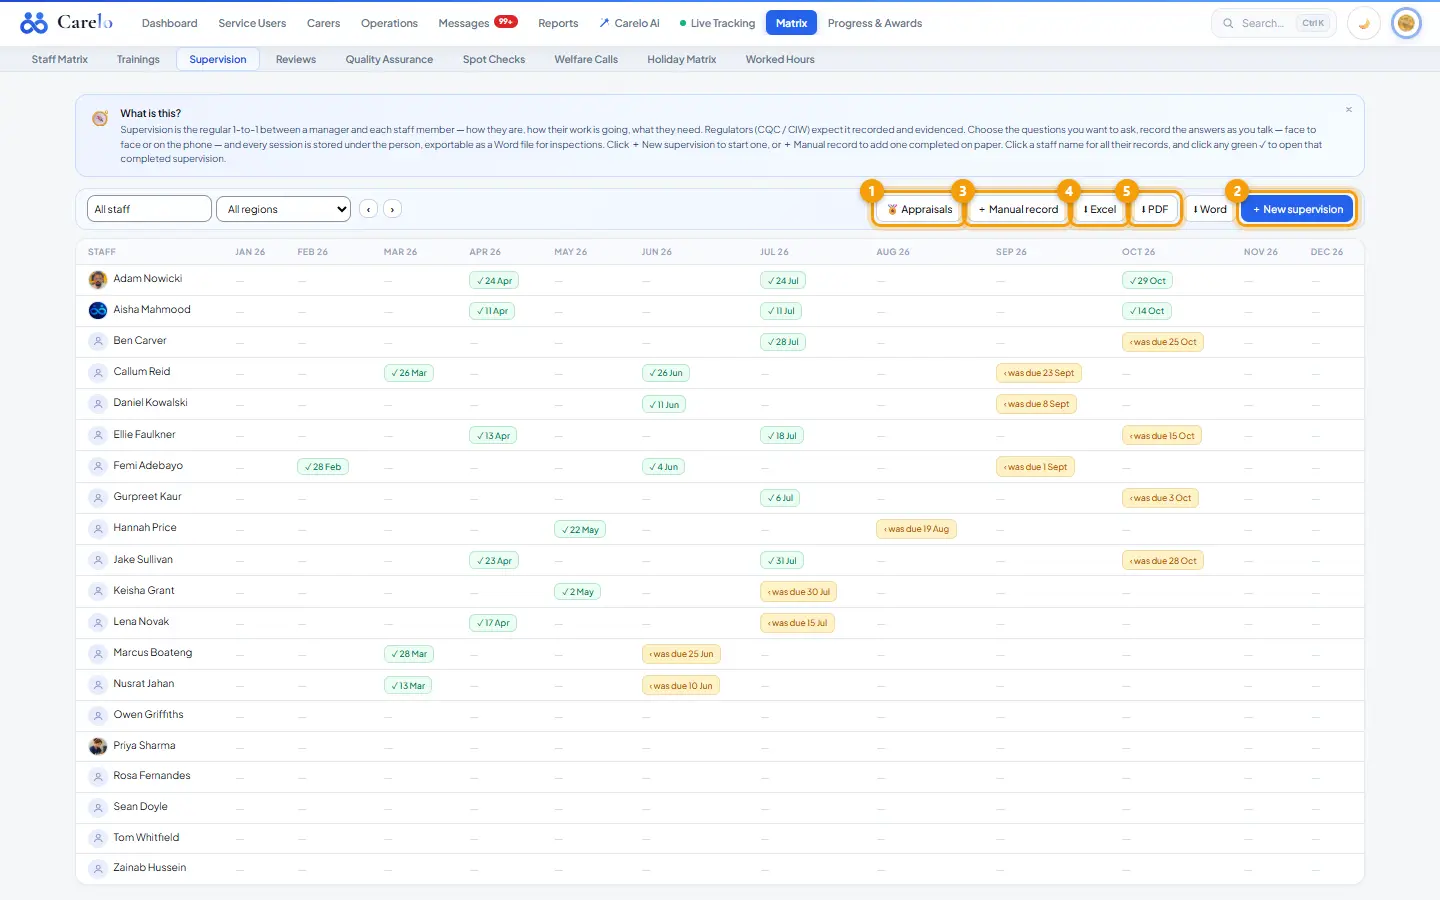
+ Add supervision opens Matrix → Supervision with the carer preselected.
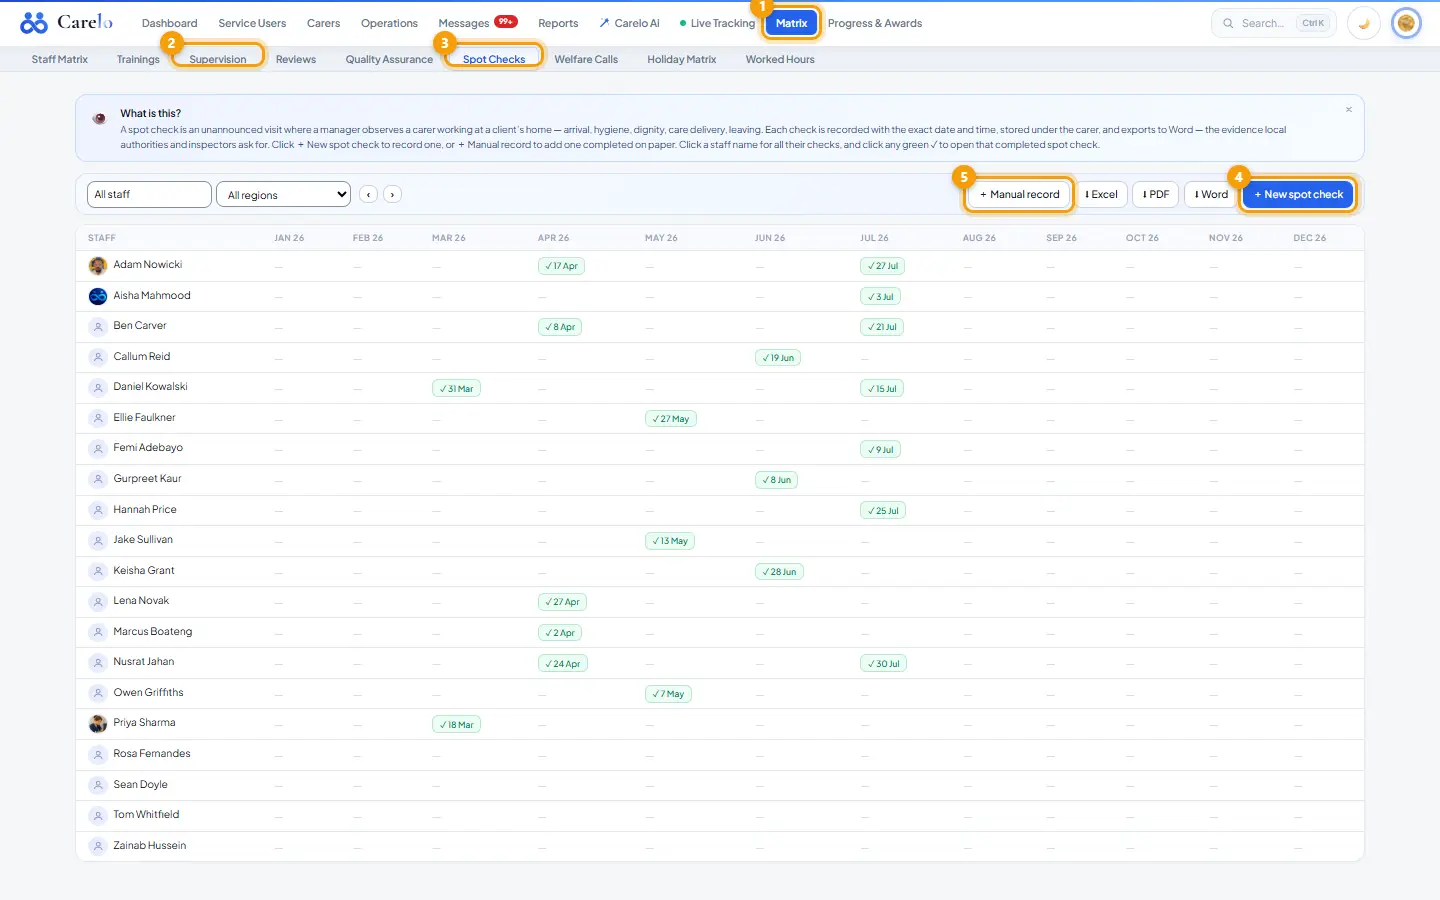
Each cycle card has its own + Record button: Supervision → Matrix → Supervision; Spot check → Matrix → Spot Checks; Appraisal → Matrix → Supervision → Appraisals. Clicking the card itself opens that matrix.
Work the list
Columns: Type, Scheduled, Completed, Supervisor, Status, Outcome, Next due.
View opens the record (question-bank records open the same viewer as the Matrix).
For a scheduled session: Edit, Mark complete (completed date, outcome, actions, next due) or Cancel (kept on record as cancelled).
Edit can attach the paper record (PDF or Word, under 10 MB).
Rules worth knowing
Supervision (1:1) is due 89 days after the last one; appraisal 360 days after the last (12-month cycle); spot checks read "Every 3 months" on the card but never carry due chips.
A card reads Never done, Booked, Due in Nd, Due today or Overdue Nd; "soon" means within 14 days.
A next-due date cannot be before the scheduled or completed date.
Overdue supervisions count on the Carers page under Needs attention.
Common questions
Why can I not type a new session here? The old form was retired: every new record goes through the Matrix question bank so the carer page and the Matrix always show the same record.
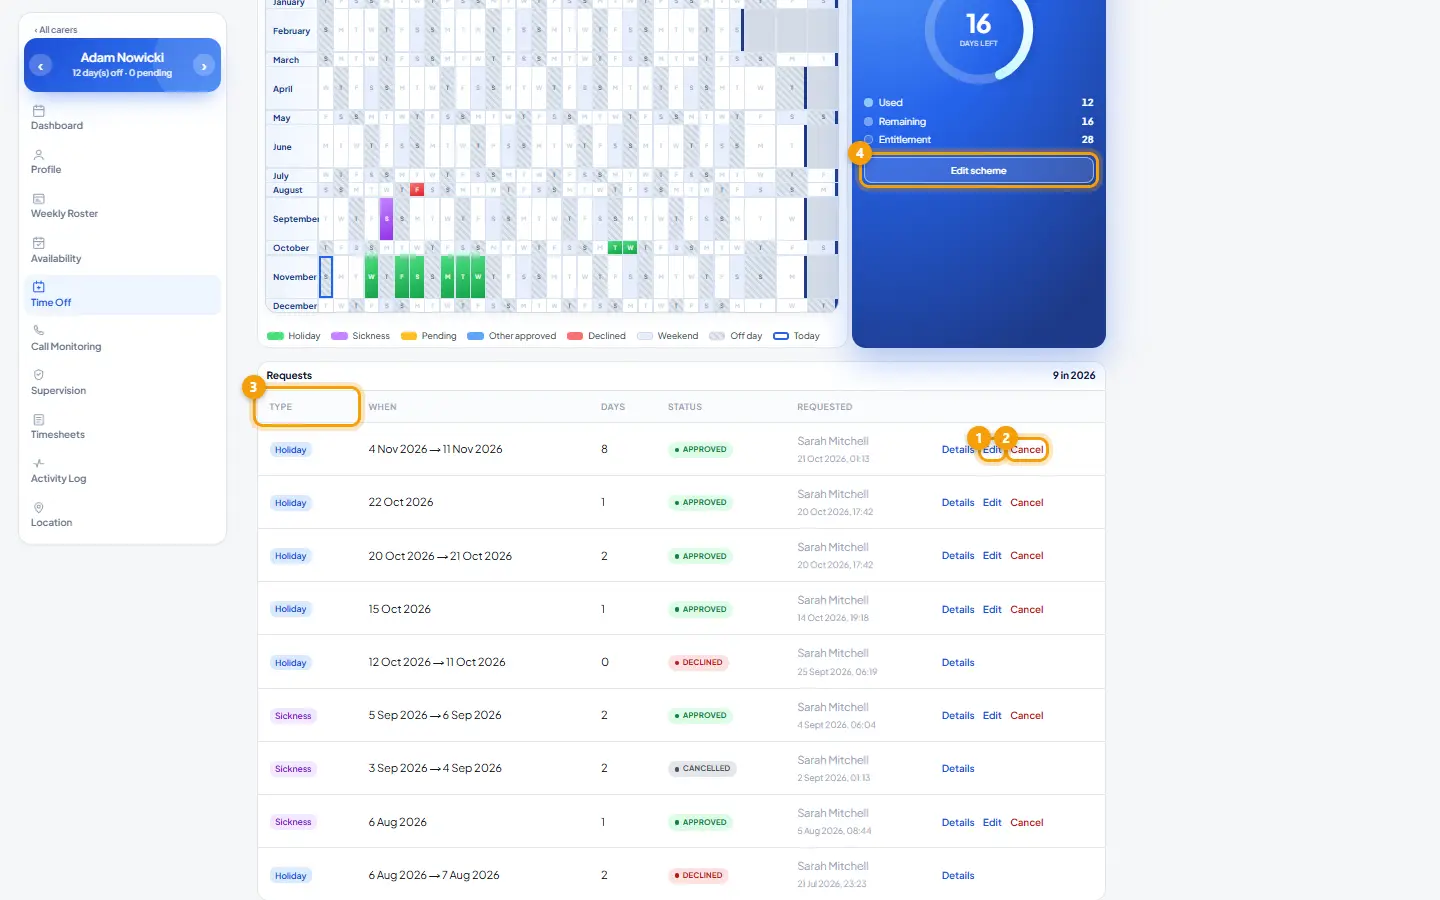
Time off — holidays, sickness and leave for one carer
1Edit2Cancel3Type4Edit scheme
What it is
One carer's leave: entitlement and days used, requests awaiting decision, a year calendar, sickness with the Bradford Factor, and every request with its outcome. Requests come from the carer app or are added by the office. The company-wide views are Operations → Holidays and Matrix → Holiday Matrix.
Where to find it
Carers → open a carer → Time Off.
How to
Decide a request
Under Awaiting decision, press Approve.
Optionally pick a cover carer (Type a carer… (or leave for Unassigned)), then Approve & move or Approve — Unassigned.
Or press Decline and give a note. Edit changes the dates; Cancel withdraws it.
Add leave from the office
+ Request time off.
Type: Holiday, Sickness, Unpaid leave, Emergency leave, Appointment, Training or Other. Choose Approved (add it now) or Pending request. Pick a cover carer if wanted.
Full day(s) or Part day with times; add a note and an optional document link.
Press Add time off or Send request.
Change the allowance
Press Edit scheme by the Holiday allowance ring, set the entitlement, Save scheme. The default entitlement is 28 days.
Browse
Year buttons or a custom From → To with Apply. The Requests table lists Type, When, Days, Status, Requested, with Details, Edit and Cancel.
Carer side (carer app)
Holidays tab → Request time off: first day and number of days; the team-leave calendar shows limited and fully booked days.
Off sick: first day, last day, what is wrong, whether they had medical advice, optional proof (photo or PDF/Word).
Both arrive here as Pending and also post a line in the carer's Messages thread.
Rules worth knowing
Approving leave releases the carer's calls in that window: to the cover carer (new-wins; calls that clash, are blocked or fall on the cover carer's own leave stay Unassigned) or to Unassigned. Delivered calls stay with the carer who delivered them. The outcome note lists the counts.
Extending approved leave releases the newly covered calls the same way.
The carer receives a push notification on approval or decline.
Declining and cancelling ask for a note; records are never deleted.
Days are counted as calendar days, the same as Operations → Holidays. A half day on a single day counts 0.5.
Bradford Factor = spells² × days, approved sickness in the selected range.
Common questions
Who can decide? Any office login that can write; the decision records who decided and when.
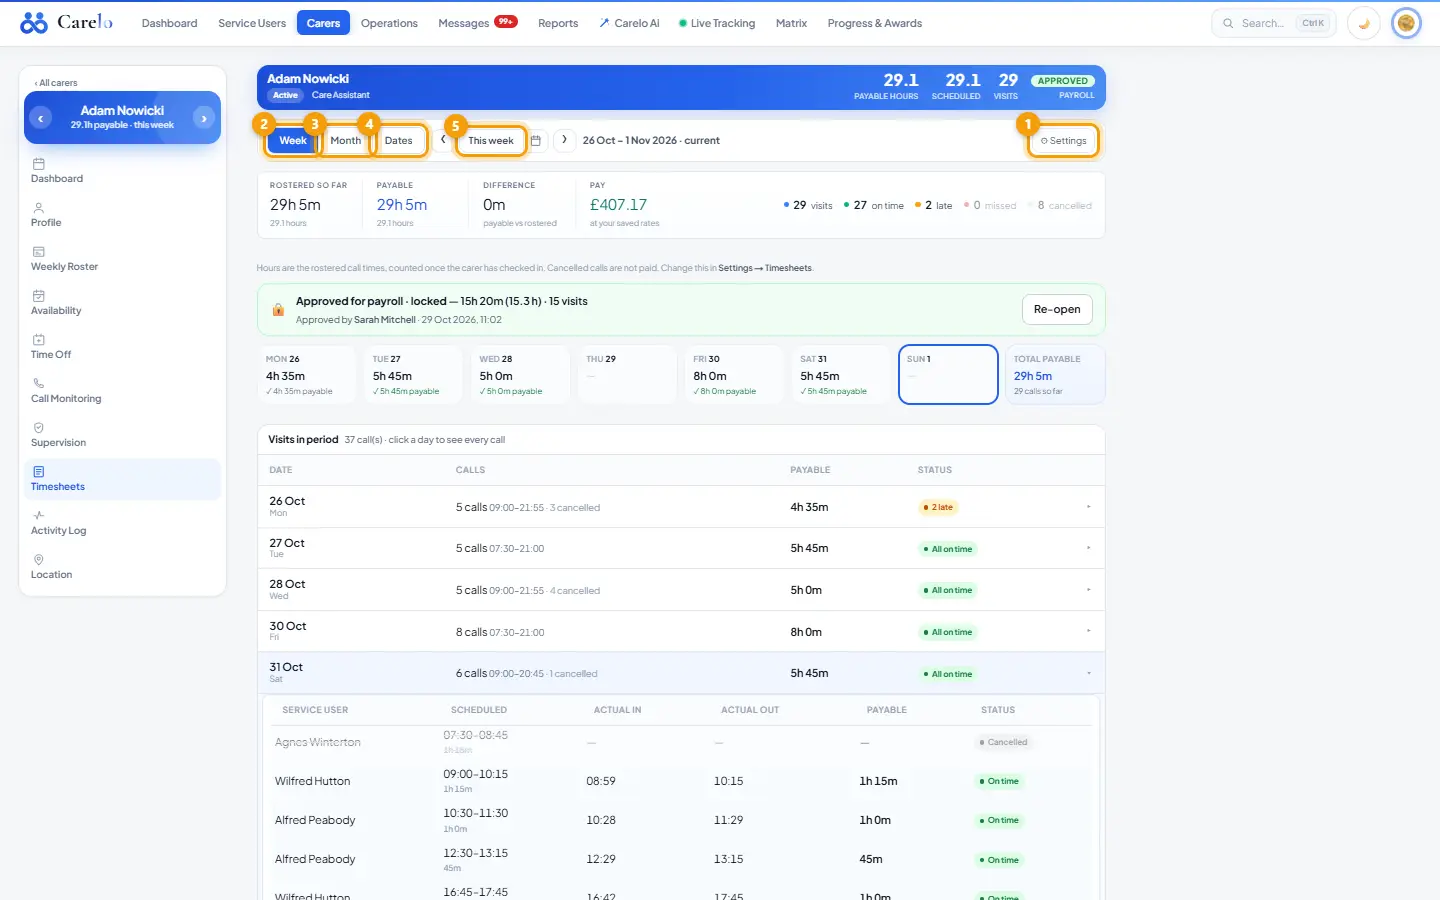
Carer timesheets — payable hours and payroll approval
1⚙ Settings2Week3Month4Dates5This week
What it is
The carer's worked hours for a week, a payroll month or any date range, built from check-ins against the rota and the company's counting rules. A manager approves a period for payroll, which locks it.
Where to find it
Carers → open a carer → Timesheets. The counting rules and pay rates are in Settings → Timesheets (⚙ Settings on the toolbar).
How to
Pick a period
Week, Month or Dates. ‹ › step; This week / This month returns to today.
In Dates choose From and To and press Apply.
Month view follows the payroll month set in Settings (for example 26th → 25th). Click a day in the calendar to see that day's calls.
Read it
Top line: Payable hours, Pay (£ from the company's rates), then visits, on time, late, missed, awaiting and cancelled (marked "paid" when the policy pays cancellations).
Rows: Service user, Scheduled, Actual in, Actual out, Payable, Status.
Approve for payroll (manager only)
Press Approve for payroll (optionally Add note first).
Write a note if useful and press Approve & lock. The period shows Approved by with the name and date.
Re-open unlocks it if something must change.
Rules worth knowing
Only an owner or manager can approve or re-open. A coordinator sees "Only a manager can approve payroll."
Figures are past-only: future calls never appear in the totals.
Hours are derived from the carer's check-ins and the rota — nothing about hours is typed here. Correct the call on the rota or Call Monitoring; the timesheet follows.
Approve is disabled when the period has no visits.
Common questions
Why does Matrix → Worked Hours show the same numbers? Both use the same maths; they cannot disagree.
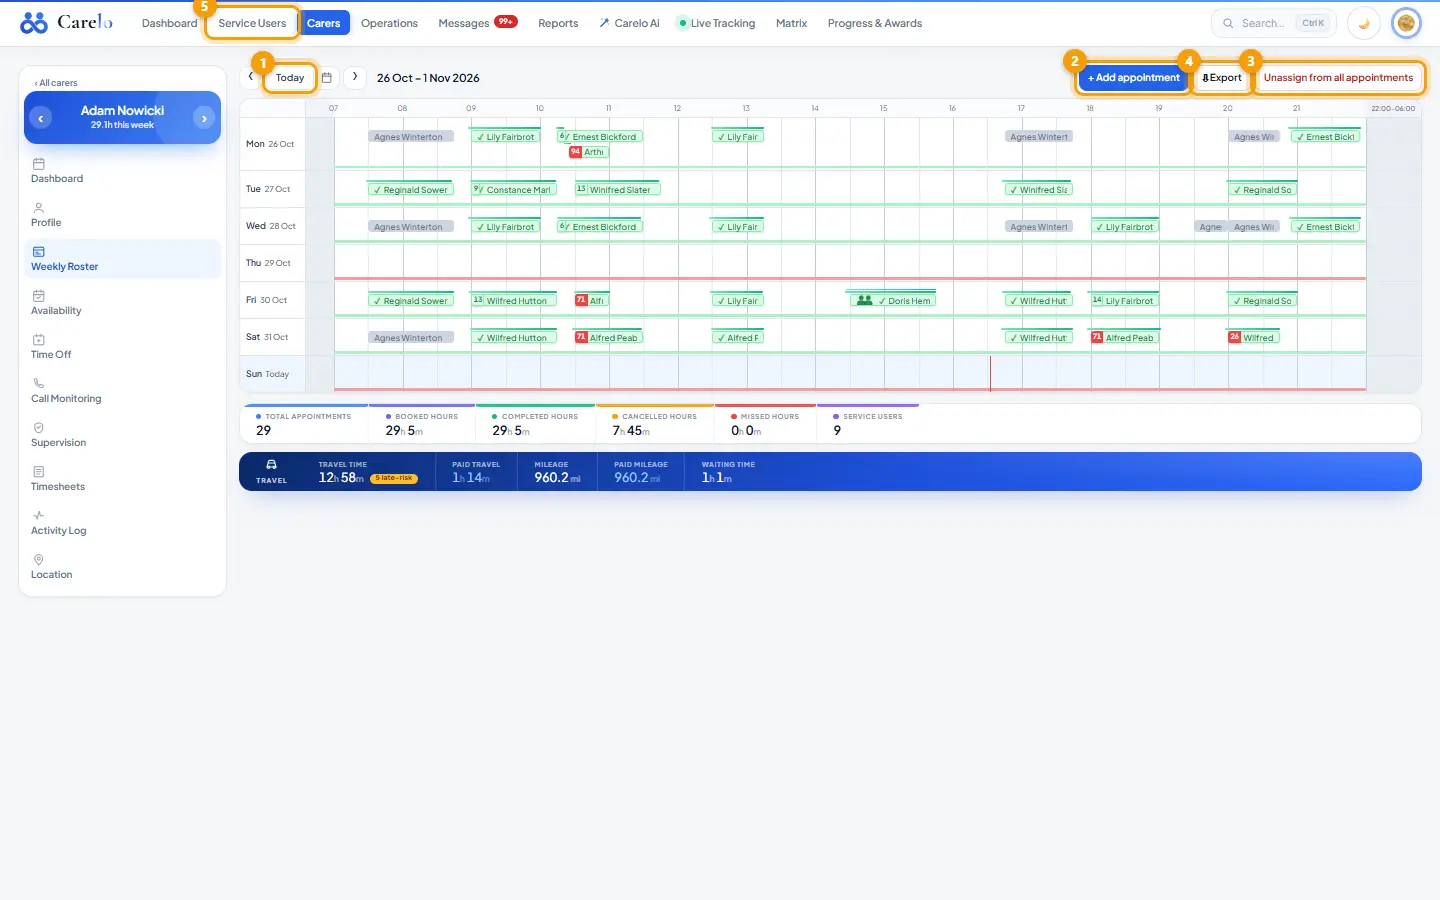
Carer weekly roster
1Today2+ Add appointment3Unassign from all appointments4⇩ Export5Service Users
What it is
One carer's week as a grid of calls — planned, in progress, completed, late, missed and cancelled — with the week's totals and travel. Calls can be added, moved, resized and exported, and the carer can be released from every upcoming call in one step.
Where to find it
Carers → open a carer → Weekly Roster (also where clicking a carer in the directory lands).
How to
Move around
‹ › change week, Today returns, the calendar icon picks a week.
Add or change a call
+ Add appointment opens the appointment card for the selected day.
Select several calls (drag a lasso; on a phone turn on Select first) for the selection card: carer picker with Repeat weekly, a Run box when the company has runs (pick the run, or — Not in run —, and press Assign — on its own or together with a carer; every later week too when Repeat weekly is ticked), Edit, Cancel, Reinstate, Delete.
Drag a call to another day or time → confirm Move … to …? with Move.
Drag the right edge → Change duration.
Drag a box around several calls to act on them together.
Release the carer from all upcoming calls
Press Unassign from all appointments.
Set As of (today or later) and Assign to — Nobody or another carer.
Press Assign. Calls go Unassigned or to the chosen carer; the notice reports what moved.
Export
⇩ Export → Week, 2 weeks, 4 weeks or 8 weeks → PDF or Excel.
Read the strip
Total Appointments, Booked Hours, Completed Hours, Cancelled Hours, Missed Hours, Service Users; below, Travel Time, Mileage, Waiting Time and the Paid figures the company's travel policy pays.
Rules worth knowing
Changes never touch the past: "as of" is today at the earliest.
Role-aware: on a double-up, unassigning this carer releases only their seat; the partner keeps the call.
Handing calls to another carer follows new-wins: the receiver's clashing calls become unassigned and are reported. Calls that overlap each other in the same batch are skipped (a carer attends one call at a time), and a carer blocked for that service user is refused by name.
Delivered or checked-in calls are locked — they are skipped and reported.
Travel figures are computed on the server; after an edit the strip dims until the next load.
Common questions
A call shows as missed before anyone looked at it. When the whole check-in window has passed with no check-in, the roster shows missed live, the same as Operations.
Chapter 4
Operations and the Rota
Planning and running the day: rotas, live monitoring, holidays, incidents, hand-overs and exports.
Rota — the day board (Carer Roster and Service User Roster)
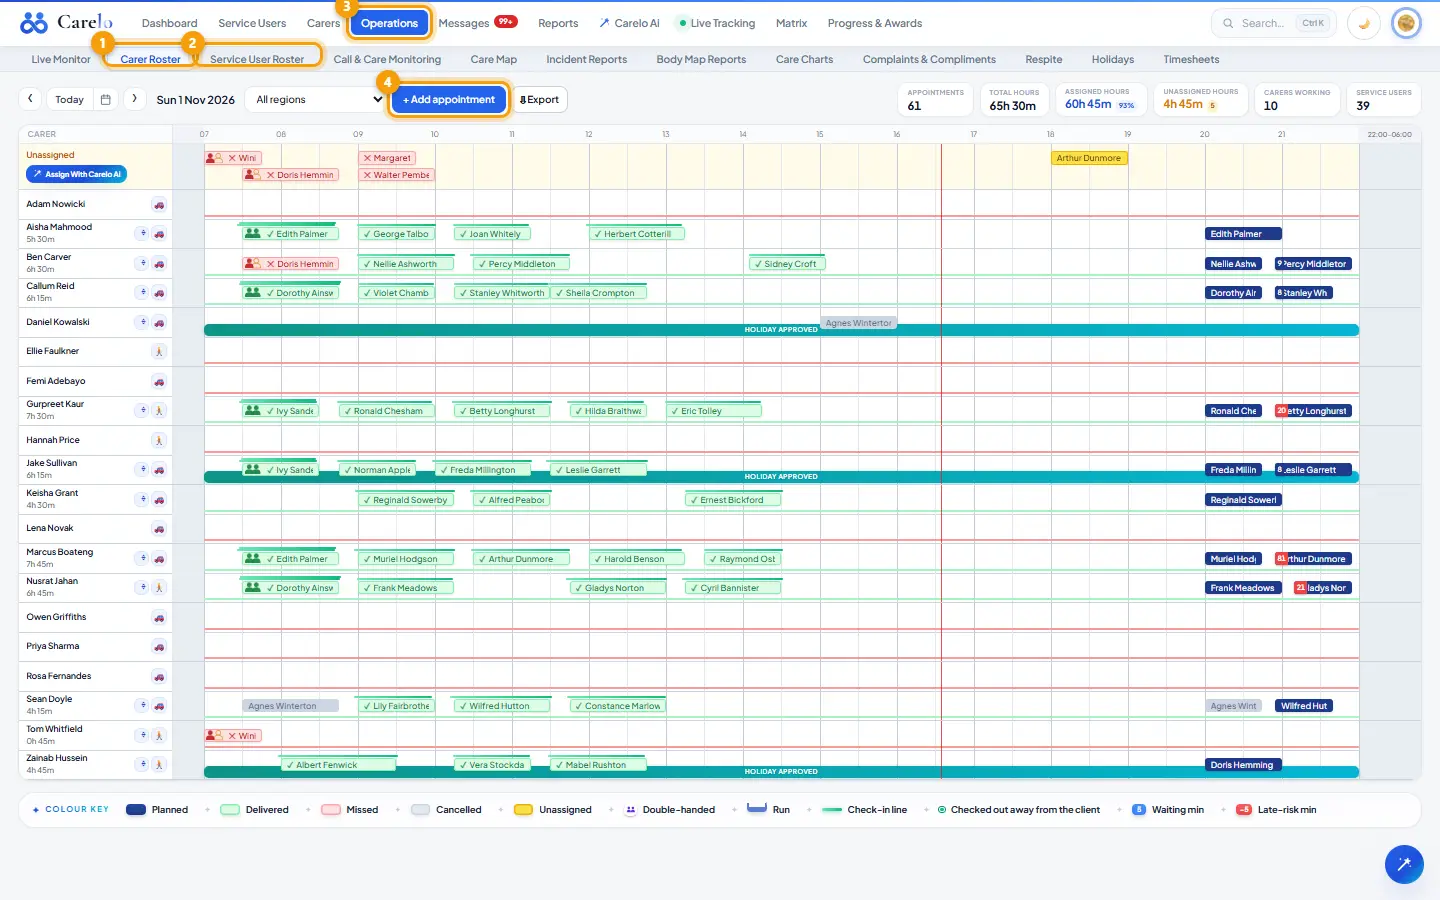
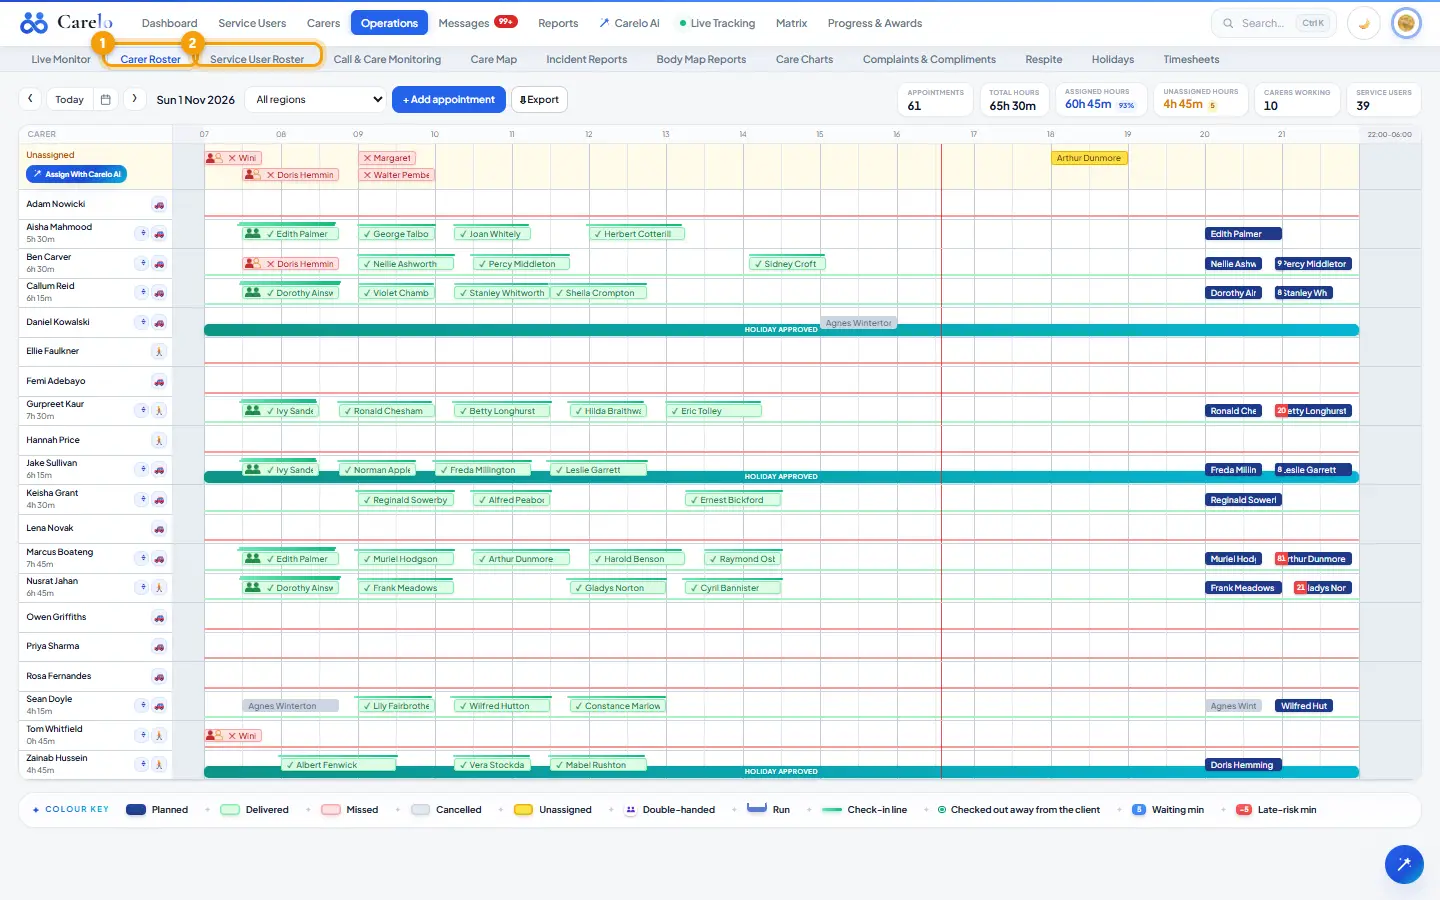
1Carer Roster2Service User Roster3Operations4+ Add appointment
What it is
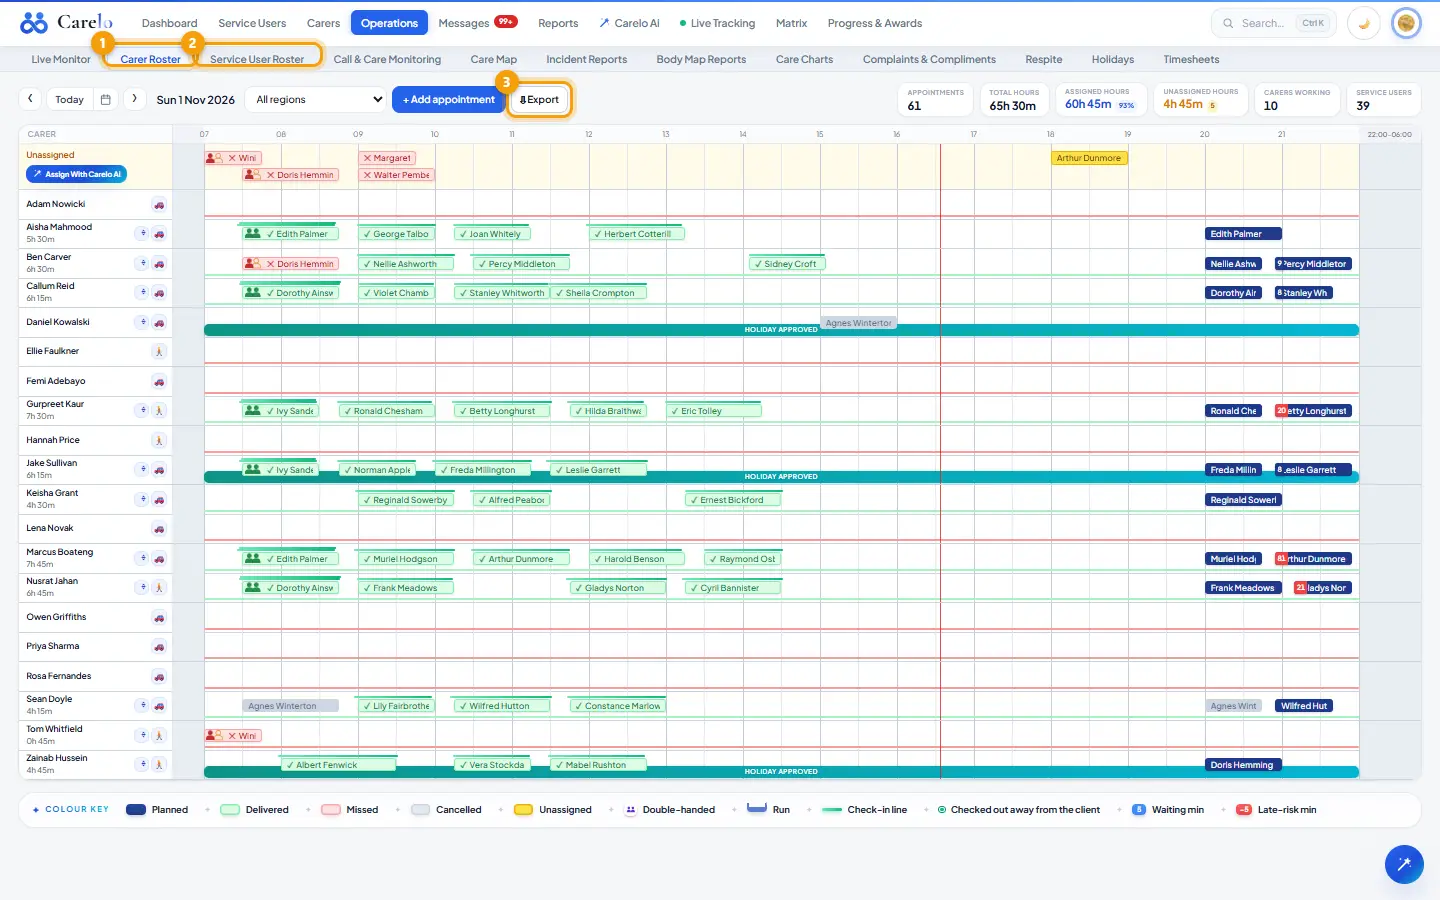
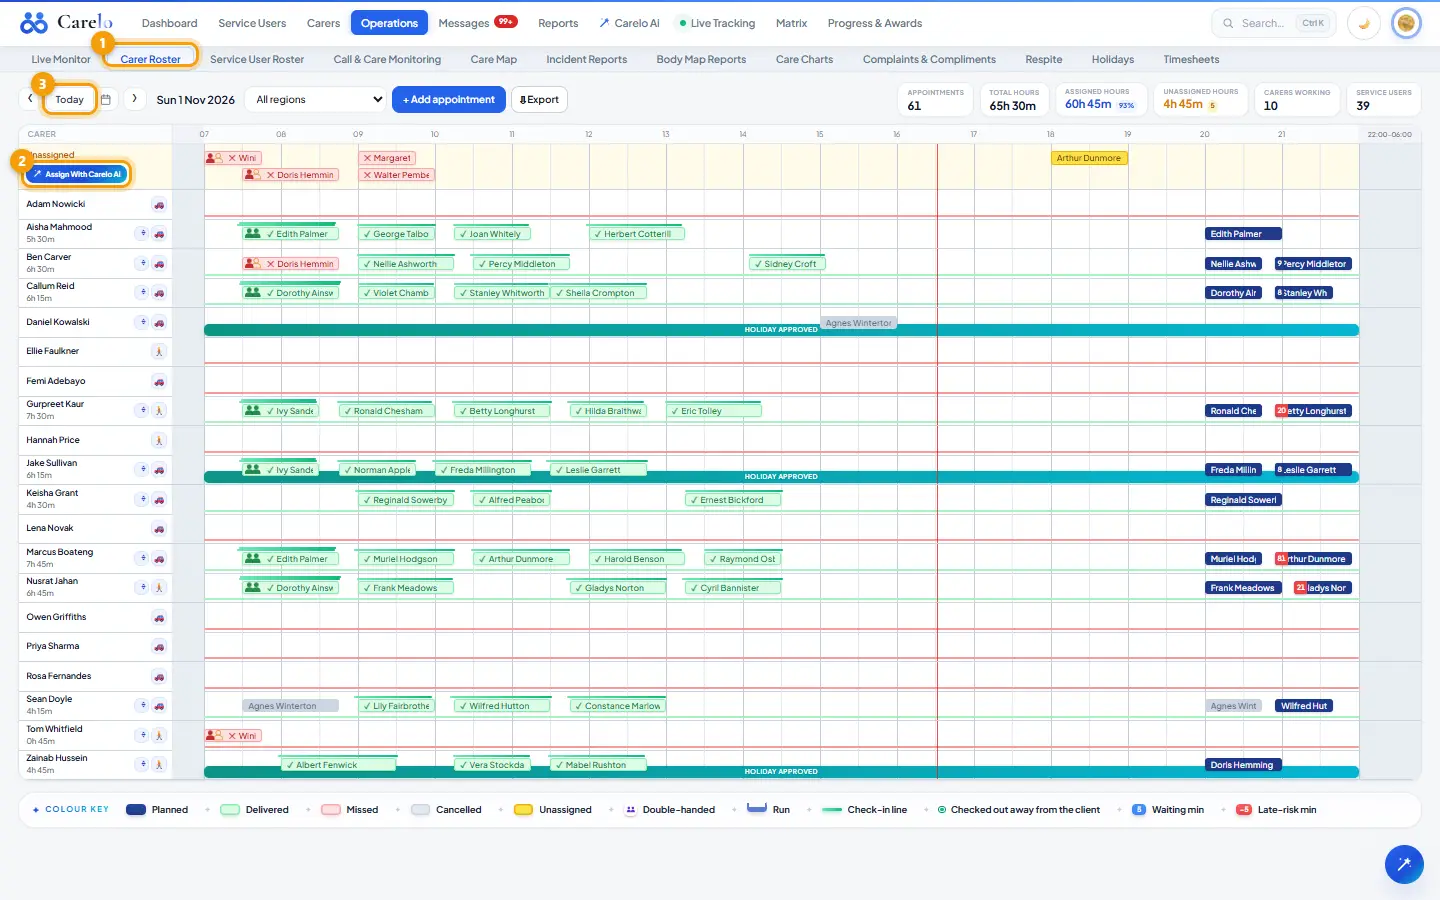
The rota is one day on one board, drawn two ways. Carer Roster has a row per carer plus an Unassigned row at the top; each chip names the service user. Service User Roster has a row per service user; each chip names the carer. Both views edit the same appointments, so a change in one shows in the other, in each person's weekly roster, in Live Monitor and in Reports.
Where to find it
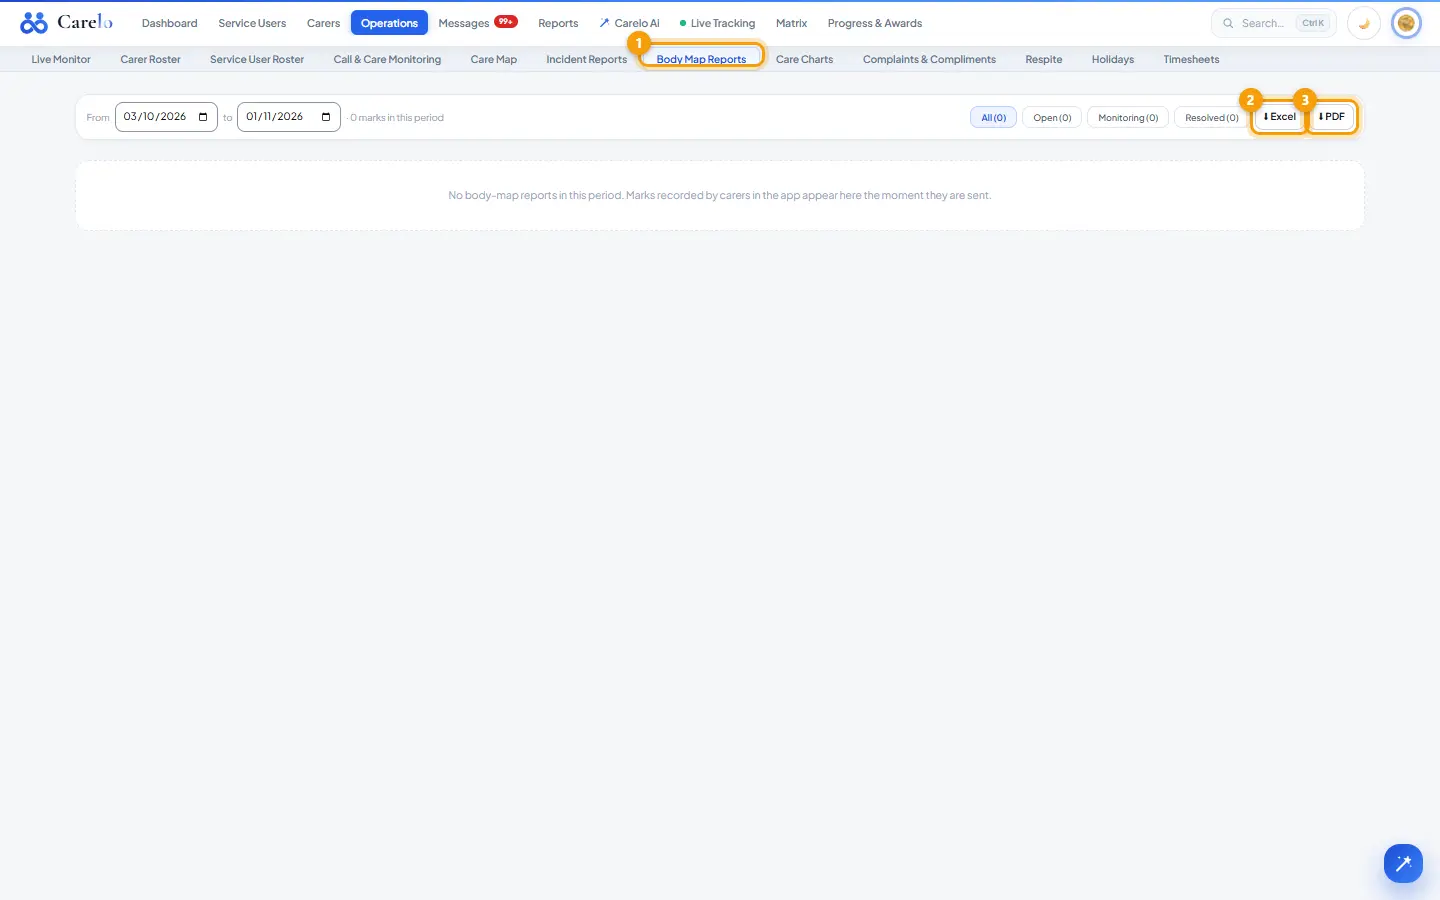
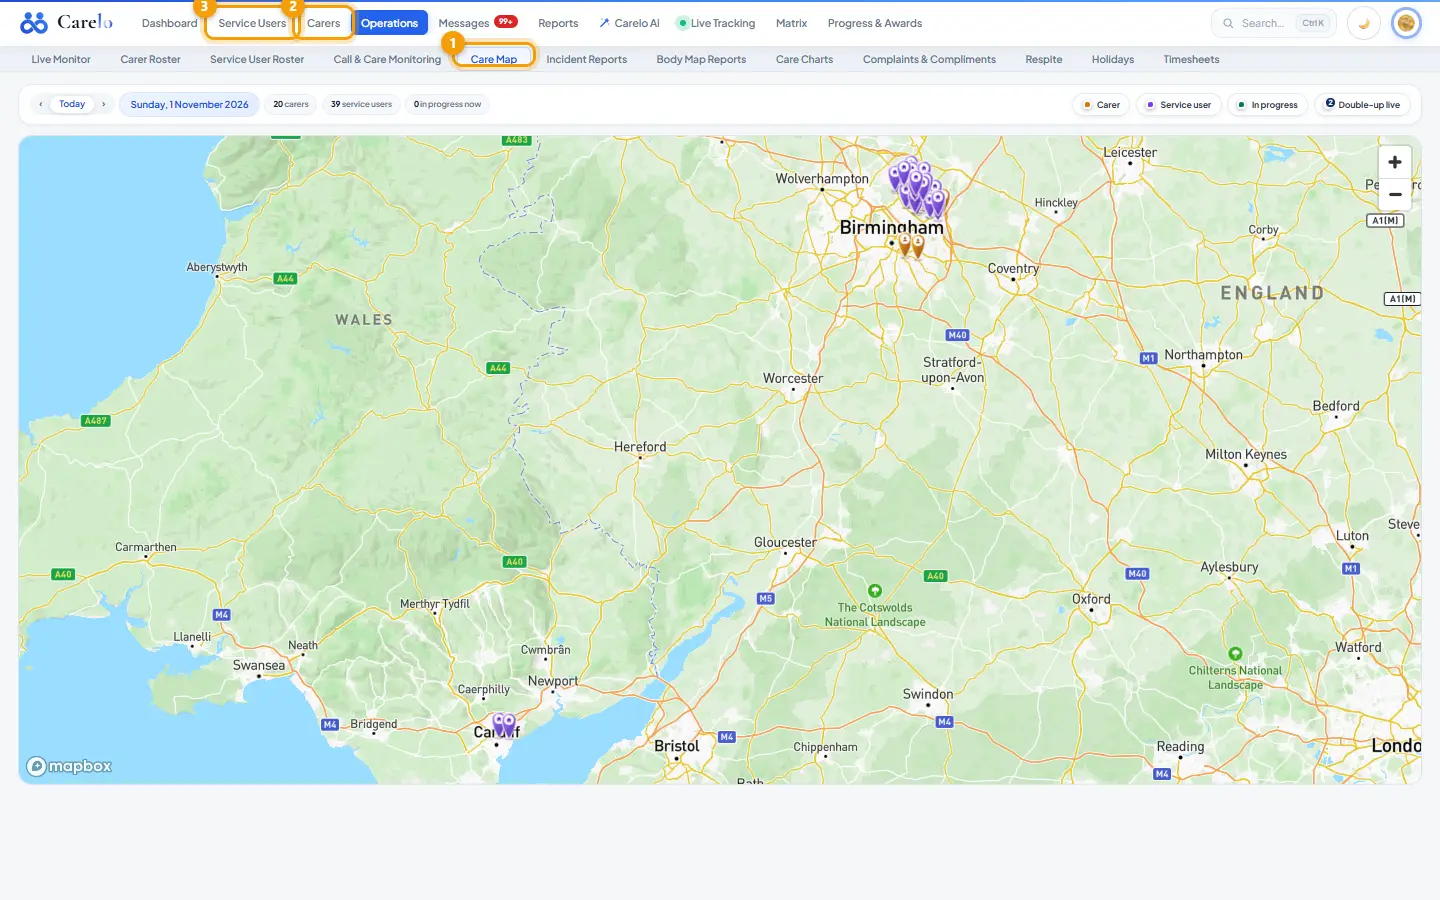
Main menu → Operations opens the Carer Roster. The Operations bar then holds: Live Monitor · Carer Roster · Service User Roster · Call & Care Monitoring · Care Map · Incident Reports · Body Map Reports · Care Charts · Complaints & Compliments · Respite · Holidays · Timesheets. /rota itself redirects to the Carer Roster.
How to
Move around the day
Use ‹ and › for the previous and next day, Today to return, or the date picker ("Pick a day").
With regions set up, the All regions dropdown is a lens: it filters which rows show, never who can be assigned. A carer outside the region who holds a call for a client inside it still shows, signed "Not in this region".
The stat strip shows Appointments, Total hours, Assigned hours (with cover %), Unassigned hours (with count), Carers working and Service users.
Move a call
Drag a chip to another row, or along its row to a new time (5-minute snapping).
A confirm box appears: Move <service user> to <carer>? or Reschedule <service user> to <time>?. Press Move to apply or Cancel. This box is part of the design and always appears.
Drag the chip's right edge to change duration; confirm with Change duration.
Dragging a run bar moves a whole run; the box says Move this run? or Unassign this run? On double-handed calls only that run's seat moves — the second carer stays.
Select several calls
Drag on empty board to lasso (on a phone, press Select first, then tap calls). The selection card offers: Earlier/Later nudges; a carer picker with Carer 1 / Carer 2 and — Unassign —; Repeat weekly; Edit, Cancel, Reinstate, Delete. The action button reads Assign, Unassign or Apply. When the company has runs, a Run box lets you pick a run (or — Not in run —); the same Assign button applies it, on its own or together with the carer you picked, and Repeat weekly applies to it the same way. On this board the selected calls must sit on one carer row. Dragging a call never changes its run.
Add or open a call
+ Add appointment creates a call (optionally as a weekly pattern in the same step). Click a chip for the appointment card; click a name for that person's weekly roster. On a carer row the map icon opens the day route and the run button opens the run card (Rostered, Travel, Waiting, Delivered; Run / Map tabs).
Rules worth knowing
Colour key: Planned (blue), Delivered (green), Missed (red), Cancelled (grey), Unassigned (yellow), Double-handed, Run, Check-in line, Checked out away from the client, Waiting min, Late-risk min.
A double-handed call sits on both carers' rows. One seat filled reads half navy, half yellow; nobody on it reads pale yellow. A missing second or shadow seat shows on the Unassigned row — uncovered work is never hidden.
Travel figures are quiet grid numbers: a waiting gap shows as a small number; travel that overruns the gap shows as a negative late-risk number only beyond 15 minutes — up to 15 minutes is normal slack (the hover card still shows the exact figure).
Night band 22:00–06:00 is shaded. A call may run up to 24 hours; an end earlier than its start lands on the next day, and yesterday's overnight tail is drawn from 00:00 today, not draggable there.
Common questions
Why did the call snap back after a drop? The server refused it and the notice says why: blocked carer, approved leave, or a delivered (locked) call. See the assigning rules page.
Every carer assignment — a drag, the appointment card, the selection card, Repeat weekly, holiday cover, Carelo AI's proposals — goes through one engine with one set of rules. The rules below are what that engine enforces; nothing on the rota bypasses them.
Where to find it
Operations → Carer Roster or Service User Roster; the same rules apply on a person's weekly roster and schedule.
How to
Assign a carer who already has a clashing call
Drag the call onto the carer (or pick them on the card).
Confirm Move.
The carer takes the new call. Their old overlapping call turns Unassigned and is reported back in the notice so you can cover it.
Repeat a change every week
Select the calls, tick Repeat weekly, choose a carer (or leave the carer as is) and press Assign / Apply.
Next week is written at once; the remaining weeks (about 13) fill in the background.
With — Unassign — and Repeat weekly ticked, the seat is released this week and every later week of the same call.
Change a delivered call
Open the appointment card.
Use the card's change of planned time with a reason — this is the only way a delivered call's duration changes; it is kept in History.
Rules worth knowing
Newest decision wins. Assigning a carer to a call that overlaps one they already hold moves the old call to Unassigned and reports it. The engine never double-books a carer and never blocks your change.
Delivered calls are locked. Any check-in makes the call a care record: no cancel, no delete, no carer swap, no unassign. The selection card shows "🔒 N completed — stays with the carer who delivered" and disables those actions. Moving a delivered call left or right keeps its minutes; a drag that would change its duration is refused.
Bulk operations skip and report. When a selection mixes locked and open calls, the open ones change and the locked ones are named in the notice.
Blocked carers are refused. A carer blocked for a service user (Care team on the profile) is never assigned. If nothing else in the selection could be assigned, the chip snaps back with the names; otherwise the rest land and the blocked ones are named.
Approved leave covers the day. A carer on approved holiday or sickness is not written onto a call that day.
One seat per person. A carer cannot hold two seats on the same call.
Same-time selections. If several selected calls run at the same time, one carer cannot take them all; the card warns and the button is disabled.
Double-handed calls keep their second carer when only one seat is moved; a single-handed call is left unchanged by a Carer 2 action — open it to make it double-handed first.
Every assignment is audited; the card's History tab shows each change.
Common questions
Why did a different call go yellow after my drag? That was the carer's old overlapping call. Newest decision wins; the notice lists it so you can cover it.
Can I move a checked-in call to another carer because the wrong person pressed check-in? No — once checked in, the carer is part of the record. Record what happened as an office note on Call & Care Monitoring.
Why did Repeat weekly skip a call? Calls already part of a schedule are not duplicated; cancelled and delivered calls are not repeated.
Body Map Reports — the skin-integrity record
1Body Map Reports2⬇ Excel3⬇ PDF
What it is
Body Map Reports is the company's skin-integrity record: one row per mark a carer placed on the body map in the app, exactly as submitted — the mark on the real figure (type, body part, view), every concern question and its answer, the carer's own words — with the office response worked in the row. It is kept separate from Incident Reports on purpose.
Where to find it
Operations → Body Map Reports. Dashboard tile Body-Map Concerns Open and the Body Map & Incidents card (Handle) open it.
How to
Find marks
Set From / To and apply; filter by status.
The KPI shows "N open".
Read a row
The mark: the miniature figure with the exact spot and colour (click it to Open large — with zoom), Where (body part and view), Carer, Time. Concern questions with answers. The report — carer's words. Office response. Status: Open → Monitoring → Resolved.
Respond and set the status
Press Respond & set status (or Update response).
Write the Outcome (e.g. district nurse referred), Actions taken, Future plan, and choose the status.
Press Save response. Cancel discards.
Export
⬇ Excel (Date, Time, Service user, Carer, Body part, Type, View, Concern questions, the report in the carer's words, Office response, Status) or ⬇ PDF.
Rules worth knowing
The picture travels with the report: the figure the carer marked is the figure the office sees.
A mark the office placed shows "Office" as the carer.
Past reports keep their people's names even after someone leaves.
The audit wand (bottom right) builds a Body Map Analysis as a Word file with the Carelo AI add-on.
Common questions
Should a fall with a bruise go here or on Incident Reports? The carer reports the incident on Incident Reports and marks the bruise on the body map; the two records stay separate and both are open until the office responds.
Call & Care Monitoring — every call, planned against delivered
1Call & Care Monitoring2Apply3Office note4⬇ Excel5⬇ PDF
What it is
Call & Care Monitoring is the audited record of every call in the company, one row per carer attendance (a double-handed call is two rows): planned and actual times, who attended, punctuality, medication outcomes and the case notes written at check-out. It is the same table each service user's own monitoring page shows.
Where to find it
Operations → Call & Care Monitoring. It opens on the last 7 days; a very large company opens on today.
How to
Find calls
Step a day with ‹ / Today / ›, or set From and To dates.
Filter by carer, service user and status (Any status, Completed, Late, Missed, Cancelled, Upcoming, Not recorded).
Group By date, By carer or By service user.
Press Apply. Nothing refetches until you do.
The KPI strip shows calls, attended, late and missed for the selection.
Read a row
Carer (with 2nd for the second seat), Planned time and duration, Check-in and check-out with "On time" or "N min late", Medication outcomes with Mandatory / Info / Optional levels, Status, and Case notes: Care note (written in the app at check-out), Handover — for the next carer, ⚠ Alert, and Office note. Family replies to a note appear beside it. Read more expands a long note; "Care given" lists the activities ticked.
Add an office note
Press + Office note on the row.
Type the note (a phone update, an observation) and press Save office note. It is saved under your name.
Export
⬇ Excel downloads the whole selection (Service user, Date, Planned time, Check-in / out, Punctuality, Carer attending, Role, Planned and Actual minutes, Medication, Status, Case notes). ⬇ PDF prints it. Hand-overs opens the hand-over record for the same dates.
Rules worth knowing
"On time" is a check-in within 5 minutes of the planned start.
Check-in missing marks a check-out with no check-in: the carer was there, the arrival never reached the server.
Closed windows with nobody checked in are written down as missed before this board reads, so it never says "not recorded" for a call the rota paints red.
The screen draws the first 120 rows then Show more; exports always cover the whole selection.
Hand-picked dates holding more calls than one request can safely read are shortened to the last week of the choice; the board shows the dates it really loaded.
The audit wand (bottom right) needs the Carelo AI add-on; see the Carelo AI on the rota page.
Common questions
Where are incidents? On Incident Reports — this page is calls only.
Can I change a check-in time here? No. Times come from the carer's phone or an accepted manual check request on Live Monitor; the office records context as an office note.
Care Charts — every chart entry across the company
1Care Charts2⬇ Excel3⬇ PDF
What it is
Care Charts is one ruled table of every chart entry carers record in the app (food and fluid, bowel, skin and the other charts), newest first: what was recorded, any problem, the carer's note, and the office review worked right in the row. It is the company-wide twin of each service user's Care Charts page.
Where to find it
Operations → Care Charts. Entries with an unreviewed problem also appear on the dashboard card From carers.
How to
Find entries
Set From / To (default: the last 7 days).
Filter All charts or one chart, and by status: All, Open, Monitoring, Resolved.
The summary strip shows Entries, Open (waiting for the office), With a problem, Not recorded (checked out without it), Service users.
Read a row
Service user with the chart's icon, Carer, Time and Call; What was recorded as label → value lines; Problems as red pills (or None); Carer's note; Office response; Status (Recorded when nothing needs the office, otherwise Open / Monitoring / Resolved).
Respond
Press Respond & set status (or Update response).
Write the response, choose the status and save. The entry's status changes here and on the service user's page.
Export
⬇ Excel (Date, Time, Service user, Chart, Carer, Call, What was recorded, Problems, Carer's note, Office response, Status) or ⬇ PDF — exactly what is shown.
Rules worth knowing
"Not recorded — the carer checked out without it" marks a chart the call required but the carer skipped.
An entry with a problem starts as Open; an entry without one is simply Recorded.
The table shows the latest 3,000 entries; narrow the dates to see older ones.
Branch walls apply: a branch login sees its own service users' entries.
Common questions
Can the office add a chart entry here? No — entries are recorded in the app at the call (or on the service user's own Care Charts page); this table is for review.
Care Map — the whole company on one map
1Care Map2Carer3Service user
What it is
The Care Map draws the day on a map: carers' homes, service users with calls that day, and calls in progress, each in Carelo's own pin language. Every pin comes from the addresses already stored on profiles, so the map never searches or spends anything to draw.
Where to find it
Operations → Care Map.
How to
Read the map
Step days with ‹ / Today / ›.
The KPI strip shows carers, service users and (today) "in progress now".
Legend: Carer (blue person pin), Service user (violet home pin), In progress (pulsing emerald), Double-up live (emerald with a "2" badge).
Hover a pin for its card; click to keep it open. One card at a time.
Read a card
Carer: name, appointments this day, hours, address, Weekly Roster link.
Service user: name, address, weekly hours, Weekly Roster link.
See a carer's route
On the Carer Roster the map icon on a carer's row opens that carer's day route with numbered stops. Solid lines are real road routes computed once and kept; dashed lines are straight-line estimates where routing was unavailable.
Rules worth knowing
The Care Map tab uses the full map engine; the rota, Live Monitor and Live Tracking use the free lookalike so busy screens never cost a view.
A home with no stored coordinates has no pin: add the address on the profile.
Above a few hundred pins, neighbours group into count bubbles; zoom in and every pin separates again.
A double-handed call counts twice in the hours shown.
Lite map. On a computer that cannot draw the full map (graphics acceleration off in the browser, remote desktop, an old graphics driver) the map switches itself to a plain 2D map with the same pins, cards and routes. On a slower computer anyone can press Lite map (top-left corner of the map) to use it by choice; the choice is remembered on that computer, and Full map switches back. The same applies to every map in the office app.
Common questions
Can I move a call from the map? No — the map is a picture. Use the rota to change calls.
Where are live positions? Live Tracking (paid add-on) shows carers' phone positions during visits; the Care Map shows planned calls and check-in states.
Complaints & Compliments — what families send from the app
1Complaints & Compliments
What it is
Every complaint and every compliment a family raises in the family app lands on this desk. A complaint moves Received → In review → Resolved and carries the office's written response, which appears straight back in the family's app. A compliment is the simple twin: read it and send a thank-you.
Where to find it
Operations → Complaints & Compliments.
How to
Handle a complaint
Choose the Complaints · N tab. Open · N shows unresolved ones; All · N shows everything.
Click a row: Raised, Service user, From, About (Medication, Safety or safeguarding, Communication with the office, Invoices or billing, Help using the app, Something else), Concerns, Urgency (Urgent, Needs attention, Feedback), Status.
Read the full text and what the family would like ("They would like:").
Press Mark as In review while you investigate.
Write Your response — shown in the family's app and press Resolve with this response.
Thank a family for a compliment
Choose Compliments · N.
Click the row (Sent, Service user, From, About, Their words, Thank-you).
Write the thank-you and press Send thank-you. One write: the compliment is done and the family sees it.
Close the panel
✕ Close.
Rules worth knowing
Open ones come first, urgency in colour.
A compliment is never "open work": the Open/All filter applies to complaints only.
The response text is exactly what the family reads in their app — write it for them.
Complaints about a carer show the carer's name; otherwise "The care team".
Common questions
Can a carer see a complaint? No — this desk is office-only; the family app shows the family their own complaint and your response.
Can I reply without resolving? Use Mark as In review to show progress; the response is sent when you resolve.
Rota — export and print (PDF and Excel)
1Carer Roster2Service User Roster3⇩ Export
What it is
A rota export is a dated record of calls for a period: a letterheaded PDF for printing or a locked Excel workbook. It can cover the whole company, one carer's round or one service user's visits, so a copy for a family never contains another person's care.
Where to find it
Operations → Carer Roster or Service User Roster → ⇩ Export (top bar). The same panel appears on a person's weekly roster, fixed to that person.
How to
Share a rota
Press ⇩ Export. The Share rota panel opens.
Pick a preset — Week, 2 weeks, 4 weeks, 8 weeks — or type the from and to dates.
Choose who it covers: All carers / a carer (Carer Roster) or All service users / a service user (Service User Roster).
Press PDF to open the print view in a new tab (use the browser's print dialog → Save as PDF), or Excel to download the workbook.
Read the PDF
The print view has the company header, a watermark on every page, a summary line (calls in period · delivered · missed · cancelled), then one table per day: Call time, Service user (carer view), Carer, 2nd carer, Run, Status, Check-in, Check-out. Past calls carry their check-in and check-out evidence.
Read the Excel
Columns: Date, Start, End, Service user (carer view), Carer, 2nd carer, Run, Status, Check-in, Check-out. Statuses: Planned, Delivered, Delivered (late), In progress, Missed, Cancelled. The worksheet is protected so the shared record cannot be quietly edited, and the footer carries a reference number.
Rules worth knowing
Every call in the period is included — a large month is read in pages, never cut short.
A scoped login's export contains only its regions and branch.
Timesheets, Call & Care Monitoring, Incident Reports, Body Map Reports, Care Charts, Respite and the Matrix pages each have their own ⬇ Excel / ⬇ PDF buttons; this page covers the rota export only.
Common questions
Can a family receive a rota? Yes — on the Service User Roster choose that service user and export; the file holds only their visits.
Why does the PDF open as a web page? It is a print view: use your browser's print dialog and choose Save as PDF.
Hand-overs — every hand-off in one place
1Call & Care Monitoring2Hand-overs3Apply
What it is
Hand-overs is one table of every hand-over written in a period, newest first: hand-offs carers wrote in the app for a specific call, hand-offs the office wrote, and the standing instructions carers wrote from the app before 18 Oct 2026. Each row links to where the office can edit or remove it.
Where to find it
Operations → Call & Care Monitoring → Hand-overs button (same dates carried across). The dashboard card From carers shows carer hand-offs from the last 7 days.
How to
Read the record
Set Written from / to and press Apply.
Columns: Written, By, Service user, For (the call date and time, or when a standing instruction applies), The hand-over.
The KPI shows how many came from carers.
Click a hand-off row to open the service user's Diary; a standing instruction opens their Requirements board.
Call & Care Monitoring returns to the calls for the same dates.
How a carer writes one (carer app)
On the client's page the carer opens the hand-off section and answers Which call is it for?
The only choices are Next call or Same call next week (the date and time are shown; "No call at …" if none exists).
They type the message and press Save hand-off.
The next carer sees it on their app before that call, and it appears on Call & Care Monitoring as "Handover — for the next carer".
Rules worth knowing
A carer hands off to ONE call only: the next call or the same call next week. There is no list of calls to choose from.
"Every time" standing instructions are office-only: the office writes them on the service user's Requirements board. Carers lost that choice in the app on 18 Oct 2026; the ones they wrote before are still listed here.
The office sees everything here, carer-to-carer included; office-written notes are not repeated on the dashboard card.
Common questions
Why is a hand-off missing from Call & Care Monitoring? It is there on the call's row, but a busy week hides it among the notes; this page lists them alone.
Can a carer hand off to a call three days away? No — only the next call or the same call next week. Anything longer-lived is a standing instruction the office writes.
Holidays — leave calendar, requests and approvals
1Holidays2Holiday requests3Approve4+ Add holiday5Off sick — waiting to decide
What it is
Holidays is a light three-section board: left, decision context (on leave today, this month, per-carer allowances for the year); middle, the leave calendar with traffic-light capacity and bookings drawn as blue lines; right, the request queue with call impact, then Upcoming and Past leave. The calendar follows the company's week start (Settings → Week starts on).
Where to find it
Operations → Holidays. Dashboard tiles Away Today and Holiday Requests Waiting also open it.
How to
Read the calendar
Step months with ‹ / ›.
Each day carries a sign: ✓ Available, ● 1 space left, 🚫 Full — blocked, and "N of max" when anyone is booked. Hover a booking line for names.
Under the calendar, Carers allowed on holiday the same day sets capacity (default 3); press Save.
Approve a request
In Holiday requests, read the dates, "N calls need cover" and any days already full.
Press Approve. A Move their calls to picker appears: type a cover carer and press Approve & move, or leave it empty and press Approve — Unassigned. Back cancels.
The carer's calls for those days are moved by the scheduling engine (same rules as any assignment) and the carer is told in the app.
Refuse a request
Press the refuse control, type the reason ("goes on the record and the carer's page") and press Confirm refusal. A reason is required.
Add leave the office already agreed
Press + Add holiday.
Carer, First day, Last day, and Move their calls to (empty → Unassigned).
Press Approve & add — recorded as approved in one step.
How the app books
Carers request leave from the carer app with dates and an optional document; the request lands in this queue with "Holiday · requested N ago". Sickness is reported the same way and shows under Off sick — waiting to decide; the Off sick tile (Open ›) opens the permanent sickness record.
Rules worth knowing
A full day (capacity reached) is marked 🚫 and named in the request ("already full") — the decision stays yours.
Approval frees or moves calls through the new-wins engine: delivered calls are never touched, blocked carers are never given the cover.
Allowance figures count working days for the year.
Decisions never disappear: approved, refused and past leave stay under Upcoming / Past, and sickness stays on Off Sick.
Common questions
Can I approve without choosing cover? Yes — Approve — Unassigned puts the calls on the Unassigned row for the rota to cover later.
Why can't I refuse with one click? A refusal is permanent and goes on the carer's record, so the reason box is required.
Incident Reports — the permanent incident record
1Incident Reports2Write response & acknowledge3⬇ Excel4⬇ PDF
What it is
Incident Reports is the permanent record of every incident a carer reports from the app: the carer's exact words, every initial question answered (including the detail behind each Yes), and the office's response written straight into the row — Outcome, Actions taken, Future plan — then acknowledged. The carer sees "Reviewed" in the app once acknowledged.
Where to find it
Operations → Incident Reports. Dashboard tile Incident Reports Open and the Attention tile open it too. Open incidents of the day also show on Live Monitor.
How to
Find incidents
Set From and To (default: the last 30 days) and apply.
The KPI shows "N awaiting acknowledgement".
Respond and acknowledge
On the row, press Write response & acknowledge (or Write response / Update response on an acknowledged one).
Fill in Outcome (e.g. spoke to the family, GP visit booked), Actions taken, Future plan.
Press Acknowledge & save (or Save response when already acknowledged). Cancel discards.
Export
⬇ Excel (Reported, Time, Type, Service user, Reported by, Initial questions, the incident in the carer's words, Outcome, Actions taken, Future plan, Status) or ⬇ PDF (letterheaded print).
Rules worth knowing
Columns: Incident (service user, carer, type, time) · Initial questions (yes/no) · The report — carer's words · Office response & action plan · Status (Open / Acknowledged).
Every word the carer typed is on the record; free-text detail gets its own full-width line.
Calls live on Call & Care Monitoring; body-map marks live on Body Map Reports — this page is incidents only.
The audit wand (bottom right) builds an incident audit as a Word file with the Carelo AI add-on.
Common questions
Can the carer edit a report after sending? No — the report is the carer's submitted record; the office adds its response.
An incident has no service user — why? The carer reported it without one (for example an incident on the road); the carer's name is shown instead.
Live Monitor is the command centre for one day: counters, check-ins by hour, punctuality, the live activity stream, carers mid-call, calls per carer, a needs-attention panel, the manual check request queue, incident reports, proposed medication and the day on a map. Today refreshes itself every 30 seconds; earlier days are complete records.
Where to find it
Operations → Live Monitor (first tab). The old /live-monitor link and wall-screen bookmarks redirect here, day included.
How to
Read the day
Use ‹ / › to step days; Back to today returns. Today shows LIVE.
Counters: Appointments, Carers working, On time, Late check-ins, Missed check-ins, Case notes missing, Incidents.
Day pulse shows planned against delivered check-ins by hour; Punctuality splits on time / late / missed / still to come.
Needs attention lists missed check-ins (first eight, then a count), automatic check-outs, missing case notes and medication waiting on the office.
The day on the map pins every appointment: Missed, In progress, Due, Delivered, Cancelled. A home with a carer in it right now shows In progress even if an earlier call there was missed.
Decide a manual check request
A carer who could not use one-tap check-in sends the times they claim, with their due-medication answers.
Under Manual check requests, read the scheduled times, the claimed times and the medication answers.
Press Accept — the claimed times become the record, marked manual everywhere.
Or press Refuse, type a reason (optional, sent to the carer) and press Confirm decline; Back cancels.
Decided requests appear under DECIDED THIS DAY as Accepted or Refused.
Acknowledge an incident
Press Acknowledge, write the Outcome / final decision, Actions taken and Future plan, then Acknowledge & close. The carer's app shows "Reviewed". The full record stays on Incident Reports.
Rules worth knowing
Late = checked in more than 5 minutes after the planned start.
Missed appears only once the one-tap check-in window has closed: the later of the call's end and the planned start plus the company's "One-tap allowed (minutes after start)" setting (default 60; early opening default 15). Until then the call is "still to come". Settings → App & check-in holds both numbers.
An overnight call ends on the next day and is never marked missed at midday.
Automatic check-out: a call checked in but never checked out is closed at its scheduled end once the company's auto-checkout minutes have passed, with a reason, so nobody gains worked time from forgetting. Due medicines with no recorded outcome show as a red dot.
Closed windows with nobody checked in are written down as missed before the board reads, so Live Monitor, the rota and Call & Care Monitoring agree.
This board never draws travel legs; the Care Map and the rota do.
Common questions
A carer is late but the call is not red — why? The call stays "to come" until the one-tap window has gone; only then is it missed.
Where is the full list of missed calls? Call & Care Monitoring, filtered by status Missed.
Operations — old links that moved
1Progress & Awards2Matrix
What it is
Several pages were promoted out of Operations or moved into it. Their old addresses keep working: each one redirects to the page's current home, with any day or record id carried across. Bookmarks and wall-screen links never break.
Where to find it
Old link
Goes to now
Since
/rota
Operations → Carer Roster
18 Jul 2026
/live-monitor (with ?d=)
Operations → Live Monitor, same day
18 Jul 2026
/rota/progress
Main menu → Progress & Awards
5 Aug 2026
/rota/progress/certificate/<id>
Progress & Awards → that certificate
5 Aug 2026
/rota/spot-checks
Main menu → Matrix → Spot Checks
5 Aug 2026
/rota/supervision, /rota/supervision/matrix
Main menu → Matrix → Supervision
5 Aug 2026
How to
Update a wall screen or bookmark
Open the old link once; it lands on the new page.
Copy the address bar and save that instead. Nothing else is needed — the old link keeps working regardless.
Rules worth knowing
The main menu order is: Dashboard · Service Users · Carers · Operations · Messages · Reports · Carelo Ai · Live Tracking · Matrix · Progress & Awards. Settings lives in the account menu (top right) and at /settings.
Operations' own bar: Live Monitor · Carer Roster · Service User Roster · Call & Care Monitoring · Care Map · Incident Reports · Body Map Reports · Care Charts · Complaints & Compliments · Respite · Holidays · Timesheets.
Off Sick and Hand-overs have no tab: Off Sick opens from the Holidays board, Hand-overs from Call & Care Monitoring.
Common questions
Where did Progress go in Operations? It is a main-menu item now, Progress & Awards; the dashboard's Podium and Company Pulse link there.
Off Sick — the permanent sickness record
1Holidays2Off sick3Waiting for your decision4Approve — free their calls5Off sick today
What it is
Off Sick is the company's permanent sickness record. Waiting requests are decided here; every past episode stays in one table with the reported time, dates, reason, sick note and decision. Nothing ever disappears. The right-hand side scores sickness per carer with the Bradford Factor.
Where to find it
Operations → Holidays → the Off sick tile → Open ›.
How to
Decide a request
Under Waiting for your decision, read the dates, "N calls need cover" and any attached document (📎 View sick note / proof).
Press Approve — free their calls. The carer's calls on those days go to Unassigned through the scheduling engine.
Or type a reason ("goes on the record and the carer's page") and press Confirm refusal. A reason is required.
Read the record
Off sick today — who is out right now.
The year's toll: approved episodes, days, and days per episode on average.
Sickness record — every episode, filterable by year (All or a year): Carer, Reported, Off sick, Days, Reason, Sick note, Decision (Approved, Refused, Withdrawn).
Recent decisions on the right.
Read the Bradford Factor
Score = episodes² × days this year. Frequent short absences score far higher than one long illness. Over 50 is worth a conversation; over 125 needs a review. The score sits beside each carer's name.
Rules worth knowing
A carer reports sickness from the carer app; the request shows "Off sick · requested N ago" here and on Holidays.
Approval frees calls to Unassigned only — cover is then chosen on the rota. Delivered calls are never touched.
Decisions, reasons and sick notes also show on the carer's own page.
Common questions
Can I delete an old episode? No — the record is permanent by design.
Where do I set a cover carer for sickness? On the rota after approval, or approve from Holidays, where Move their calls to is offered.
Respite — who is away, in hospital or paused
1Respite2Month3Week4Away now5+ Add respite
What it is
The Respite board shows every service user against time so the office can see at a glance who is away, in hospital or paused — one joining bar per period, dates written inside, coloured by respite type. It is the company-wide twin of each service user's own Respite page and writes the same record.
Where to find it
Operations → Respite.
How to
Read the matrix
Month shows all twelve months of a year; Week shows the last 8 weeks and the next 4. ‹ / › step a year or 12 weeks; Today returns.
Filter by service user (type a name) or All regions. Away now keeps only people away right now.
An open-ended period runs to the edge with › so it reads as "still away". Click a name to open that person's respite record.
Start a respite
Press + Add respite.
Fill in: Service user, Respite type (Hospital Admission, Care Home Temporary Stay, Respite Care, Away From Home, Care Package Paused, Other), Start date and Start time, Is the end date known? (No — open-ended / Yes with End date and End time).
Tick Remove from the carer roster and carer app if carers should not see the cancelled calls, and Remove from this person's weekly roster if the cancelled calls should drop off their week. Left unticked, the calls stay visible marked cancelled.
Add a reason or notes and press Start respite.
Export
⬇ Excel and ⬇ PDF carry every row, even when the screen draws a first batch.
Rules worth knowing
Calls inside the respite window are cancelled by the service; this board never bypasses that rule.
Only active service users can be given a new respite; archived people stay on the board for their history.
Respite types read as named categories everywhere (roster band, legend, exports).
Delivered calls inside the window are locked records and are not cancelled.
Common questions
Can I end an open-ended respite? Open the person's own Respite page (click their name); the period is managed there, not on this board.
Why does a cancelled call still show on the rota? The removal ticks were left off when the respite was started, so the call is shown as cancelled rather than hidden.
Spot Checks and Supervision — where they live now
1Matrix2Supervision3Spot Checks4+ New spot check5+ Manual record
What it is
Spot Checks and Supervision moved from Operations to the Matrix main menu on 5 Aug 2026. The old Operations links (/rota/spot-checks, /rota/supervision, /rota/supervision/matrix) still work and land on the Matrix pages. Both desks use the same matrix engine: a staff grid across quarters, a question bank form, manual backfills for paper records, and branded Word, Excel and PDF exports.
Where to find it
Main menu → Matrix → Supervision or Spot Checks. A carer's own Supervision page links straight into a new record for them.
How to
Record a supervision
Press + New supervision, pick the staff member, date and time, and the method (Face to face — office, Face to face — community, Video call).
Choose the questions to ask from the bank and record the answers as you talk, with the overall rating and agreed actions.
Press Save record. The green ✓ on the matrix opens the completed record.
Record a spot check
Press + New spot check, pick the carer and the call observed.
Answer the observation questions, then Save record.
Spot checks are unannounced: cells show ✓ or a dash, never "Due".
Add one done on paper
+ Manual record → date, method, questions, and optionally attach the paper record (PDF, Word or photo, up to 10 MB).
Export
⬇ Word (the inspection file per record), ⬇ Excel, ⬇ PDF. 🏅 Appraisals opens the Appraisal Matrix with its own due dates.
Rules worth knowing
These desks are never shown in the carer app; carers see only their own completed records where the office shares them.
Filter by Staff and All regions; Today returns the grid to the current quarter.
Common questions
I bookmarked Operations → Supervision — is it gone? No; the bookmark redirects to Matrix → Supervision.
Timesheets — worked hours, history and payroll exports
1Timesheets2Month3Week4Dates5Cancelled calls
What it is
Timesheets is every carer's hours on one grid, with a history (twelve months or the last 12 weeks) underneath. All figures come from one shared calculation, identical to each carer's own timesheet page to the minute. Only completed calls count — a call counts once it has a check-in; the future roster never does.
Where to find it
Operations → Timesheets. Dashboard tiles Delivered This Week and Delivered Hours open it.
How to
Choose the period and the rules
Month, Week or Dates (From / To). A very large company opens on the week; Month is one click away.
Tick what the hours should include:
Cancelled calls — adds cancelled calls at their rostered time.
Check-in / out hours — totals from actual check-in to check-out instead of the roster.
Travel time — payable travel between calls under your Travel & Pay policy (shown in a box, not added to the hours).
Press Apply. Nothing changes until you do.
Open one carer
Click the carer's row. Their own page (/rota/timesheets/<carer>) lists each day: Calls, First check-in, Last check-out, Hours, Travel, Status (On time / Late / Missed call), with totals for check-in/out or rostered hours, completed calls, days worked and payable travel. ← Company timesheets returns with the same ticks and dates.
Read the history
History & years: Months (one year, ‹ / › to change year) or Weeks (last 12). Cells show exact hours and minutes ("54h 30m"), never rounded. "—" marks periods before the company's first activity.
Export
⤓ PDF opens the letterheaded document view (/rota/timesheets/print) for Save as PDF — "Working hours record, Home Office compliance". ⤓ Excel downloads two sheets: the period and the history, hours as decimals so payroll can calculate on them.
Rules worth knowing
Default = rostered time of completed calls, cancelled excluded.
A double-handed call counts for both carers.
Two active carers sharing a name carry a short reference so the rows can be told apart.
The screen draws the first 50 carers then Show more; totals and exports always cover everyone.
Common questions
Why are today's later calls missing? They have no check-in yet; hours appear once the call is delivered.
Why does travel not change the total? Travel is payable separately under your policy and is shown beside the hours, not inside them.
Messages — office to carers and office to families
1Messages2Carers
What it is
The company's communication centre: one thread per carer and one per service user's family, in a WhatsApp-style layout, all kept and audited inside Carelo. The only channels are office ↔ carer and office ↔ family. There is no carer ↔ family channel.
Where to find it
Main menu → Messages. The unread count also shows in the browser tab.
How to
Find and open a conversation
Carers are listed on top, Families below; drag the divider to resize. Search with Find a carer… / Find a service user….
Unread threads carry a blue badge; the most recent conversation opens by itself.
Star a thread to pin it to the top. Mark as unread brings a read thread back.
A dot on the avatar means they are on the app now.
Write
Type in Message … and press Send (up to 2000 characters).
Hover a message for Reply (quotes it), Edit (your own, within 2 hours) or Delete (your own, within 24 hours; readers see "This message was deleted").
The bell mutes the new-message chime.
Carer and family side
Carers see the thread in the carer app and get a push notification for each office message; families see it in the family app. A carer's holiday request or sickness report also posts a line into their thread.
Rules worth knowing
Office ↔ carer and office ↔ family only. Carers never message families through Carelo.
Edit and delete windows are enforced by the database, not just the screen.
A thread with nothing from the other side cannot be marked unread.
Everything is kept for audit.
Common questions
Can I message all carers at once? No — one thread per person.
Chapter 6
Matrix
Compliance at a glance: training, supervision, spot checks, reviews and more.
Matrix is the compliance-evidence hub: a bar of grids generated from real records, each exportable for an inspection. The tabs are Staff Matrix, Trainings, Supervision, Reviews, Quality Assurance, Spot Checks, Welfare Calls, Holiday Matrix and Worked Hours. /matrix opens the Staff Matrix.
The Staff Matrix is the staff register: every active carer's key employment facts in one grid, filled from their profiles, plus up to ten columns the company adds itself.
Where to find it
Main menu → Matrix. Every matrix page starts with a "What is this?" card; × hides it and ⓘ What is this? brings it back.
How to
Read the register
Columns: Name, Start date, Date of birth, Mobile number, Email, NI number, Travel type, DBS number, Address, then the company's own columns. Filter with All staff and All regions. A name opens the carer's dashboard; the pencil beside a profile fact opens their profile to edit it.
Add the company's own columns
Press + Add column (or the + in the header row).
Type a title (or pick a suggestion) and confirm.
Type values straight into the cells; they save as you leave the cell. Click a column title to rename it; × removes it.
See everyone's availability
Press 📅 Carer Availability: carers down the side, weekdays across, each cell the carer's available hours. A name opens their Availability page. ‹ Back to Staff Matrix returns.
Export
⬇ Excel downloads the grid; ⬇ PDF prints it with every row. There is no Word export of the register.
Rules worth knowing
Profile facts are never edited on the grid — only on the carer's profile, where the change is audited. Only the company's own columns are typed here.
Maximum 10 extra columns; remove one before adding another.
The viewer role (demonstration company) cannot save anything on any matrix.
Matrices show active carers only.
Common questions
Which trainings and periods appear on the other matrices? Chosen in Settings (Training Matrix, Matrix view, Worked hours).
Matrix — Holiday Matrix and Worked Hours
1Holiday Matrix2Approved3Worked Hours4Month5Week
What it is
Holiday Matrix — every carer's holidays in one grid: carers × January–December (Month view) or the next twelve weeks (Week view), each entry Applied, Approved or Refused, with an Approved total per carer.
Worked Hours — every carer's delivered hours across the year (Month view, ‹ › walks years) or the last twelve weeks (Week view), using the same maths as Timesheets.
Where to find it
Matrix → Holiday Matrix and Matrix → Worked Hours.
How to
Holiday Matrix
Choose Month or Week; ‹ › move earlier or later; Today returns. Filter All regions.
Hover a chip for the dates, day count and reason.
A carer's name opens Operations → Holidays, where requests are decided.
⬇ Excel, ⬇ PDF.
Worked Hours
Choose Month or Week; ‹ › change year; Today returns.
Each cell is that carer's hours for the column; Total sums the period on screen.
A name opens the carer's Timesheets — the same numbers, call by call.
The counting basis link opens Settings → Worked hours. ⬇ Excel, ⬇ PDF.
Rules worth knowing
The Holiday Matrix is a view: nothing is approved or refused here. Cancelled requests are hidden; holidays only (sickness and other leave are on the carer's Time Off).
Worked Hours default: a call counts its rostered minutes only once the carer has checked in — no check-in, no hours. Settings can switch to exact check-in → check-out minutes and can include cancelled calls at rostered minutes.
Worked Hours and Timesheets share one calculation and cannot disagree.
Common questions
Why is a week's total lower than the roster? Calls without a check-in do not count under the default basis.
Matrix — Reviews, Quality Assurance and Welfare Calls
1Reviews2Quality Assurance3Welfare Calls4+ New review5Service user
What it is
Three service-user grids built on the same engine:
Reviews — the formal care-package review: the manager at the home or on the phone assessing mood, health, medication, the calls and their times, risks and how the person and family feel.
Quality Assurance — the service user's or family's own feedback on the service, the carers, visit times and the office.
Welfare Calls — the manager's check-in call between reviews, shown January to December.
Where to find it
Matrix → Reviews, Matrix → Quality Assurance, Matrix → Welfare Calls. A service user's Care Plans page deep-links to their reviews and quality checks.
How to
Carry out a review
+ New review → choose the Service user. Date of birth, address, client ref and the live call pattern (last 7 days) fill in automatically.
Method: Home visit — with the client, Home visit — family present, Phone review, Video call. Review date and time.
Work through the sections, add outcome, equipment and risk rows, and any heading of your own.
Fill the summary, Your position (goes on the document), Next review due, and tick Agreed with the client / representative.
Save. The finished record reads like a review document and exports to Word.
Record a quality check or welfare call
+ New quality check / + New welfare call → service user, method (welfare: Phone call — with the client, Phone call — with family, Home visit, Video call), date & time, tap Ask on the questions you want, record answers in their words, add your own questions, optional Next check due, acknowledgement, save.
Backfill from paper
+ Manual record → service user, Date it was completed, Who carried it out, optional paper attachment (PDF, Word or photo, up to 10 MB).
Browse and export
‹ › move the window (reviews and QA by period, welfare by year); Today returns; All regions filters. A name lists all their records; a green ✓ opens one. ⬇ Excel, ⬇ PDF, ⬇ Word.
Rules worth knowing
Reviews: the first review is due 7 days after care starts (the first visit — the 7-day review column), then 88 days after the last review; an earlier manager-set date wins.
Quality checks and welfare calls have no due cycle — gather them whenever it is right.
Record dates cannot be in the future; at least one question must be answered.
Active service users only; the viewer role cannot save.
Common questions
Can I attach the paper copy later? Yes — a manually added record offers an attach option in its viewer.
Matrix — Supervision, Appraisals and Spot Checks
1🏅 Appraisals2+ New supervision3+ Manual record4⬇ Excel5⬇ PDF
What it is
Staff × period grids of supervision 1:1s, appraisals and spot checks, every cell drawn from a real record. A green ✓ is a completed record you can open; supervision and appraisal cells also show when the next one is due. Records are made with a tap-through question bank or backfilled from paper.
Where to find it
Matrix → Supervision (with 🏅 Appraisals inside it) and Matrix → Spot Checks. A carer's own Supervision page deep-links here with the carer preselected.
How to
Record a supervision, appraisal or spot check
Press + New supervision, + New appraisal (after 🏅 Appraisals) or + New spot check.
Choose the Staff member and Method; a spot check also asks Client / call observed.
Date & time — leave the time empty to stamp the moment you save, or set when it really happened (never in the future).
Tap questions to ask them, mark the answer, add notes; + Type any question and add it… adds your own.
Set Next … due and tick the acknowledgement (Carer acknowledged, Employee acknowledged or Discussed with the carer).
Save. The record is stamped with the recording manager's name.
Backfill from paper
+ Manual record → Staff member, Date it was completed, Who carried it out, optional Attach the paper record (PDF, Word or photo, up to 10 MB) → save.
Browse and open
‹ › slide the period window (2020–2030); Today returns. Filter All regions.
Click a name for all their records (date & time, method, call observed, recorded by, questions, summary or score). Click a green ✓ to open that record. Each appraisal offers ⬇ Word — this appraisal.
⬇ Excel, ⬇ PDF and ⬇ Word export the grid.
Rules worth knowing
Supervision next due = 89 days after the last; appraisal = 360 days (12-month cycle); an earlier manager-set date wins. Spot checks never show "Due" — they are unannounced.
Columns are months or quarters as chosen in Settings → Matrix view.
Record dates cannot be in the future; a record needs at least one answered question.
The viewer role (demonstration company) cannot save records.
The same record appears on the carer's Supervision page — one record, two doors.
Common questions
Where are the questions from? A built-in bank per record type; you pick any subset and add your own.
Matrix — Trainings
1In person2Online3⚙ Settings4⬇ Excel5⬇ PDF
What it is
Staff × trainings in two groups, In person and Online. Each cell is a recorded training: completed with its next-due date, or booked for a date. Four colours tell the story at a glance.
Where to find it
Matrix → Trainings. Which trainings appear is chosen in Settings → Training Matrix (⚙ Settings on the toolbar).
How to
Record a training
Click the cell for the carer and training.
Choose completed or booked.
Pick the date; for a completed training set Next due (usually a year on — change if different).
Save. Remove record clears the cell.
Add the company's own trainings
Press + at the end of the In person or Online group, type Training name…, save. Click a title to rename; × removes it. Up to 10 added trainings per group.
Read the colours
✓ Completed (or → Next due when Settings shows next-due dates instead), ⏱ Booked, Due soon (within 60 days), ✕ Expired.
Filter and export
All staff, All regions; ⬇ Excel, ⬇ PDF.
Rules worth knowing
The catalogue holds 14 in-person courses and 50+ online modules; a new company starts with 4 in-person and 8 online ticked. Unticking a training hides its column but keeps its records.
A date is required; a next-due date must be a valid date.
The viewer role cannot record.
Common questions
Where do training certificates go? On the carer's Profile → Documents (type Training certificate). The matrix records dates; the vault holds the file.
Progress & Awards — scores, certificates and birthdays
1Details →2Week3Month4Year
What it is
The company's growth and quality picture week by week, honest indications, and the automatic awards: Carer of the Week, Month and Year with a scored leaderboard, printable certificates and birthday cards.
Where to find it
Main menu → Progress. Certificates open from the award history; birthday cards from the Birthdays panel.
How to
Read the business side
Range chips: 12, 26 or 52 weeks, or everything.
Company pulse — one score built from Hours delivered vs planned (30%), Calls attended (25%), On-time check-ins (25%) and Medication compliance (20%). A part with no data shows — and is left out.
Panels: Hours delivered, Service users, Carers working, Hours per carer, Service users joined, Carers joined, Delivery vs plan, Calls attended, On-time check-ins, Medication compliance, Cancelled calls, Missed / not recorded, Incidents, Concerns raised. Each has Details → to the screen behind it.
Indications are written only from completed weeks.
Run the awards
Toggle Week, Month and Year on or off.
Choose the scope: one Carer of the Week for the company, or one per branch (shown when that branch is open in the header).
Carer Care Scores lists this award week (Saturday to Friday); click a carer to see the breakdown. Winners are crowned automatically when the period ends.
The history table (Award, Period, Carer, Score, Certificate) opens each certificate.
Print a certificate or birthday card
Open it and press ⬇ PNG, ⬇ JPG or ⬇ Print / PDF. The certificate carries the company logo, the Registered Manager's name and the carer's photo when they exist. The Birthdays panel shows this week and next with Open card → (or Download the card → on the day).
Rules worth knowing
How the score is made (out of 100): Check-in & Check-out Time 22, Full Care Duration 13, Zero Missed Calls 10, Case Note Discipline 18 (a missing note counts against), Evening Care 6, Full-Day Commitment 6, Workload 15 (calls attended and hours delivered, half each, measured against the busiest carer of the same period — so 75 calls beats 26 by about ten points before anything else); bonuses Incident Reporting +3, Body-Map Vigilance +3, Off-Day Cover +4.
Cancellations are never a carer's score problem.
A birthday card needs a date of birth on the profile; the panel says how many carers have none.
The certificate uses the carer's job role, or Care Worker when none is set.
Common questions
The leaderboard shows last week. A brand-new week has nothing to score yet, so last week's completed card shows until calls start.
One page of reports in four families. Pick a family, pick a report, set the dates and filters, run it, and export exactly what is on screen. Every figure comes from the same services as the live screens.
Where to find it
Main menu → Reports.
How to
Run a report
Choose a family card, then a report.
Set From / To (default: the last 7 days). Where offered, pick a carer (All carers) or a service user (All service users).
The report opens with its figures for those dates straight away — the first 120 rows, then Show more. After changing the dates or a filter press Apply.
⬇ Excel or ⬇ PDF — always every row of the current selection. ‹ All reports returns.
The catalogue
General — Activity Log; Punctuality & Missed Calls; Medication Compliance; Incident Reports; Deleted & Corrected Calls; Records Edit History (every manual entry, edit, delete and restore on a Supervision, Appraisal, Spot Check, Review, Quality Assurance or Welfare Call record, with Restore while a delete stands); Unassigned Calls (looks two weeks ahead, including seats released by approved leave).
Service Users — Call & Care Record; Client Activity Log; Planned vs Delivered Hours; Medication (MAR) Record; Case Notes History.
Carers — Call & Care Record; Carer Activity Log; Worked Hours & Payroll; Carer Punctuality; Holiday & Leave; Availability & Off Days.
Carelo AI — the add-on, buying it and using Carelo 5
1Carelo Ai2+ New chat
What it is
Carelo AI is a paid add-on: a co-worker, "Carelo 5", that has read your company's own records and answers from them — rota questions, case notes, incidents, medication — and drafts care paperwork as Word files. It reads your company only, read-only, and never trains on your data. It proposes; a person approves. Without the add-on every AI surface in the app is locked.
Where to find it
Main menu → Carelo Ai (the item with the sparkle). On the rota, the Assign With Carelo Ai button and the Carelo 5 panel; on three Operations desks, the audit wand — see the "Carelo AI on the rota" page.
How to
Buy it (owner or manager)
Open Carelo Ai. The activation page shows one price card: Your band · follows your subscription.
Press Activate by card. Stripe opens; on return the add-on is active at once.
Card only — it starts instantly. The tier must match your carer band or above (never a smaller one); see the price table under the band labels. Billed from today on the company's cycle (monthly, or yearly for a yearly company); the price changes only if your carer band does. No trial. Disabled for the demonstration company.
Ask a question
Type in How can I help you today? and press the ↑ send button (Enter sends; Shift+Enter is a new line).
+ attaches an image (JPG/PNG) or a PDF, under 5 MB.
Replies stream in; tables render; ⬇ Download as Word saves any reply as a Word file.
+ New chat starts again; Recents lists past chats per company.
Draft paperwork
Under Paperwork I can do for you choose a launcher: Care Planner, Risk Assessment, Quarterly Review, Appraisal, Quarterly Report, Business Plan, Business Continuity Plan, Case Note Audit, Medication Care Planner, MAR Chart, Incident Audit Report, Body Map Analysis — and anything else in UK care management.
Tailor it
Right-hand cards: Instructions (how Carelo 5 works for your company — e.g. first names, formal council reports), Memory (facts it remembers between chats; Add / remove), Work Template (document formatting; the Carelo template is body size 11, headings size 12, or your own). Save each.
Rules worth knowing
Who can use it: office logins only — owners, managers, coordinators. Carers and families never see it. Every question is logged to the person who asked.
What it cannot do: book, change or send anything on its own; see another company, ever.
Your data: records stay in your Carelo, hosted in London; only the records needed for a question are sent to the model, for that request; never used to train any model; you are the controller and Carelo the processor under the Data Processing Agreement.
Allowance: the left column shows "AI allowance · N% used · Resets on the 1st of the month". When it is used up the answer is: "This month's AI allowance is used up. It resets on the 1st — or ask us about a bigger package." Each reply is also capped so a document of 800–1,200 words with tables fits.
"Carelo 5 can make mistakes — always read and check before using."
A failed renewal pauses the add-on; update the card under Settings → Billing and it returns. Never a second purchase.
Common questions
Does the AI see my carers' personal data? Only what a question needs, inside your company, for that request — and nothing is retained for training.
Can a coordinator buy it? No — the server allows only an owner or manager to commit the company to the add-on.
Carelo AI on the rota — assign proposals, rota checks and audits
1Carer Roster2Assign With Carelo Ai3To
What it is
With the Carelo AI add-on, three AI tools sit inside Operations: a planner that proposes carers for every unassigned call, a rota co-worker that answers questions about the day, and an audit wand that writes a Word report for Call & Care Monitoring, Incident Reports or Body Map Reports. None of them writes to the rota on its own; the only path that assigns anything is your Approve & Apply, and it goes through the same new-wins engine as a drag.
Where to find it
Operations → Carer Roster: Assign With Carelo Ai on the Unassigned row (shown when there are unassigned calls) and the floating ✦ Carelo 5 panel. The audit wand is bottom-right on Call & Care Monitoring, Incident Reports and Body Map Reports.
How to
Assign every unassigned call
Press Assign With Carelo Ai.
Set From / To, optional Instructions (e.g. keep walkers inside their region, give a carer at most 4 hours), Max hours per carer, Max calls per carer.
Carelo Ai plans; "Nothing is saved until you approve." The result shows unfilled seats, placed as whole runs, placed confidently, more on a second pass, and how many stay unassigned, with a Worth knowing list.
Review the mini-roster: drag a proposed chip to another carer or back to Stays Unassigned (confirm with Move; the server re-checks every hard rule).
Press Approve & Apply, or Discard. Then Done.
Ask about the day
Open the Carelo 5 panel ("Your rota co-worker — ask me anything about today").
Pick a starter — Check for any wrong bookings, Any double-booked carers?, Who is free this afternoon?, Anything outside availability? — or type a question and press Ask.
The answer is a report only; nothing changes on the rota. Nothing is spent until a question is asked.
Create an audit
Press the wand. Choose Audit period: Last 7, Last 30, Last 90 days, or Choose dates (From / To).
Press Create audit. "One report, one Word file — nothing is changed in your records."
Press ⬇ Download Word file. The audit is also saved to Carelo AI → Recents as the compliance trail. Run another audit or Change dates.
Rules worth knowing
Proposals respect every hard rule: blocked carers, approved leave, one seat per person, delivered-call locks, travel fit. Applying them follows newest-decision-wins — a carer's old overlapping call turns unassigned and is reported.
Existing calls in the review are fixed; only proposed chips move.
An empty audit period costs nothing: the server answers with a plain message before the AI is called.
All three tools draw on the company's monthly AI allowance.
Common questions
Why did the planner leave calls unassigned? No carer fitted the hard rules within the limits you set; the "Worth knowing" list names the reasons. Loosen the limits or assign by hand.
Can a carer see any of this? No — AI tools are office-only.
The carer's location record under the Live Tracking add-on: every visit they checked in to over 30 days, 90 days or 1 year, what the phone reported, every out-of-zone or no-signal spell, whether a manager reviewed it, and a week-by-week in-zone trend.
Where to find it
Carers → open a carer → Location. Without the add-on the page says Live Tracking is not active and links to See what it does and activate it.
How to
Read the record
Pick 30 days, 90 days or 1 year.
Tiles: Visits tracked, Positions in zone, Visits with no issue, Out-of-zone spells, No-signal spells, Visits with no positions, Reviewed by a manager.
In zone, week by week shows the share of positions inside the home zone.
The table lists each visit: checked in – out and check-in distance, positions, in-zone share, furthest point and lowest battery, What happened, Dealt with, and Live (open visit) or Replay, which opens Live Tracking on that visit.
Act on a spell
Spells are acknowledged with a note on Live Tracking; this page shows Acknowledged with the note and who wrote it, or Open, plus any alert sent.
Rules worth knowing
Spells are pinned: never edited or deleted, only acknowledged.
Flagged appears automatically when out-of-zone spells in 30 days reach the threshold in Live Tracking settings; it clears as spells age out.
The positions interval, the home-zone radius and the minutes before a spell is written are company settings, printed at the foot of the page.
A visit with no positions means the phone sent nothing (internet off, location off, battery, or an older app) — not that the carer was elsewhere.
Carer side: the carer agrees to tracking once in the app; there is no per-visit banner.
Common questions
Can I switch tracking off for one carer? Not here; Live Tracking is a company setting.
Live Tracking — the add-on, buying it and the live board
1Live Tracking2Carers3Alerts4History
What it is
Live Tracking is a paid add-on that shows where each carer's phone is during a visit — from check-in to check-out and never in between — on a live map with alerts, replay of any visit and a permanent trail on the visit record. Without the add-on the menu item opens the buy page; with it, the live board.
Where to find it
Main menu → Live Tracking. Once switched on, the menu item carries a live dot.
How to
Buy it (owner or manager)
Read the pack: open the Carer Location Monitoring Policy and the Data Protection Impact Assessment (both open in a new tab).
Sign for your company: Signed by, Role, Data protection lead · name and email, Visit records are kept for, DPO or adviser consulted, Carers consulted — how and when, Concerns raised and your response. Tick We adopt the Carer Location Monitoring Policy as our company policy and We have read the Data Protection Impact Assessment and accept its measures and residual risks.
Activate by card: choose a tier and press Sign & activate by card. Stripe opens; on return the add-on is active and switched on.
The tier must match your carer band or above: the tier marked Your band is the floor and smaller tiers are not offered. Card only, instant, no per-carer charge, cancel any month. Prices: see the price table under the band labels (Up To 15 Carers … Unlimited Carers).
Read the live board
Top: ‹ / › for days, LIVE with the clock and "every phone reports every N minutes"; Back to today.
Tiles today: On a visit now, At the home, Out of zone, No signal, Finished out of zone. A past day: Visits, At the home throughout, Out-of-zone spells, No-signal spells, Finished out of zone.
Map chips: At the home, Out of zone, No signal, Waiting for first position, Home circle.
Act on an alert
Click the alert row — the map shows it; the tick Acknowledge records who dealt with it. Select a carer for their card (Checked in, Now, Phone, Last position, Trail) and the buttons Locate now (asks the phone for a fresh position; you are told if its internet is off), Call, History, Close.
Replay a visit
History → pick a carer and a day → Replay. Every reported pin is shown; ‹ Prev / Next › step pins, 1× / 4× play, click the bar to jump.
What the carer agrees to (carer app)
Each carer reads one sheet once — "Location during visits": only while checked in, shared with the office only, kept with the visit record — and presses I agree — continue. A carer is tracked only after that; no per-visit banner is shown.
Rules worth knowing
Fixed by Carelo for every company: only during a visit; a position every 5 or 10 minutes; "while using the app" permission only; kept with the visit; carers see their own trail; no automatic flag or action — pay, visits and records are never changed by tracking.
A failed renewal pauses the add-on; update the card under Settings → Billing and it returns by itself. Never a second purchase.
Common questions
Paid but the map only shows check-in points? It is paid for but switched off: an owner or manager switches it on under Live Tracking → Settings after the policy and DPIA are signed.
Live Tracking — settings, the switch and the legal pack
1Live Tracking2‹ Back to the live map3Open the policy template4Open the DPIA template5Lawful use
What it is
The settings page holds the on/off switch, the lawful-use checklist, the alert rules and who is told. The legal pack is two documents pre-filled with your company's name, thresholds and the details you type: the Carer Location Monitoring Policy (/live-tracking/legal/monitoring-policy) carers read in the app, and the Data Protection Impact Assessment (/live-tracking/legal/dpia) the ICO expects for staff monitoring. They are templates, not legal advice. Owner or manager only.
Where to find it
Main menu → Live Tracking → Settings (‹ Back to the live map returns). The documents open from the buy page, from Settings (Open the policy template, Open the DPIA template) or by their addresses.
How to
Switch Live Tracking on
Under Lawful use, complete Monitoring policy adopted (press We have adopted it) and Data Protection Impact Assessment completed (press It is complete), or sign both documents on their own pages. A company that bought the add-on in-app arrives already signed.
Press the Live Tracking switch. Phones start reporting from the next check-in. The row shows "Since <date> · turned on by <name>".
Carers told in the app counts how many active carers have read the notice; a carer is tracked only after they have seen it.
Set the rules
Home circle — any position inside counts as "at the home". 500 m is the rule (the same circle as check-in); 250 m or 100 m only if you want it stricter.
Position every — 5 min or 10 min.
Out of zone — minutes beyond the circle before a carer counts as out of zone (at least two reports in a row). Amber on the visit; red and pushed only from 1 km away.
No signal — minutes with nothing from the phone before "no signal"; until then the carer shows "last seen".
Rules can be changed only while tracking is on; − / + step each value.
Choose who sees alerts
Under Who sees alerts, tick office logins for Alerted (they see the day's spells on the Live Tracking page) and Push (a phone push when a carer is 1 km or more from the home).
Fill and sign a document
Open the document. At the top, type the details once: Signed by (name), Role, Data protection lead (name · email), Visit records are kept for, DPO / adviser consulted, Carers consulted — how and when, Concerns raised and the response.
Press Save details to print them into both documents, then Sign and adopt this policy or Sign off the DPIA as complete. The document then carries "Signed electronically in Carelo by <name> on <date>" and a yearly review date.
Print / save as PDF for your records.
Rules worth knowing
Fixed by Carelo, unchangeable by any company: only during a visit; a position every 5 or 10 minutes; "while using the app" is enough — the phone is never asked for "always" location; kept with the visit; carers see their own trail; no automatic flag, no automatic action.
Lawful basis in the policy is legitimate interests (lone-worker safety and safeguarding), not consent; the DPIA is reviewed yearly.
The billing line shows the add-on at your band; cancel any month under Settings → Billing.
Common questions
The switch is greyed out. Adopt the policy and complete the DPIA first (right-hand column), or sign in as an owner or manager.
Can a coordinator change the rules? No — only an owner or manager; the page says so at the bottom.
Chapter 11
Settings
How your company works: logins, branches, check-in rules, pay and training.
Settings is one page that lists every live company setting in category cards. Only what exists is shown — there are no "coming soon" placeholders. A search box at the top filters across every card.
Settings is for the owner and managers. Coordinators and viewers do not see the Settings link in the account menu.
Where to find it
Open the round account button at the top right of the header → Settings. Every individual setting page also carries a horizontal sub-menu (All Settings, Office Logins, Billing, Regions, Branches, Compliance Cycles, Runs, App & Check-In, Timesheets, Week Starts On, Travel & Mileage Pay, Training Matrix, Worked Hours, Matrix Columns, Award Cadence) so you can jump straight between them.
How to
Find a setting
Open Settings.
Type into the search box ("Find any setting — travel, check-in, regions…"). Cards narrow to matching rows. If nothing matches, the page says so.
Click the row to open that setting.
The categories and what each row does
Company
Office Logins & Permissions — who signs in, what they may do, one device each. See *Office logins and permissions*.
Regions — working areas that group carers and clients on the rota.
Branches — separate parts of the company, each with its own carers and clients.
Billing — the plan and any branch logins, priced live from active carers.
Service Users
Compliance Cycles — how often each care document falls due for review.
Scheduling
Runs — named rounds that keep a carer's calls flowing in order, and the gap that splits them.
Carelo App
App & Check-In — check-in zone, time windows, auto check-out, case-note rule, roster visibility.
Live Tracking — the paid add-on's switch, monitoring policy and DPIA, out-of-zone and no-signal alert rules (opens /live-tracking/settings).
Pay & Finance
Timesheets — how paid hours are counted on every carer's timesheet.
Week Starts On — the first day of the working week.
Travel & Mileage Pay — what counts as payable travel, waiting and mileage.
Matrix
Training Matrix — tick which trainings the company delivers and which date the grid shows.
Worked Hours — how the Worked Hours matrix counts an hour.
Matrix Columns — monthly or quarterly columns on the compliance matrices.
Help & Support
Contact Carelo Support — opens the Carelo support chat.
Progress & Awards
Award Cadence — Carer of the Week, Month and Year on or off (opens /progress).
Rules worth knowing
Settings are company-wide. One choice applies to every carer, service user and office login in the company.
Each setting page has its own Save button; nothing changes until you press it.
Common questions
A coordinator cannot see Settings — why? Settings is restricted to the owner and managers. The link is hidden for coordinators and viewers, and the server refuses changes from them.
Where is Live Tracking set up? Under the Carelo App card → Live Tracking, which opens the add-on's own settings page.
App & Check-In — the check-in policy
1Save policy
What it is
How the Carelo carer app behaves at the doorstep. Inside the zone a carer checks in with one tap. Outside it the app asks them to go to the home or ask the office to record it. Late, or with no GPS fix, the check-in is recorded and flagged — never blocked. This page tunes the zone, the windows, the warnings and whether a case note is compulsory.
Location check at check-in — Off — check in from anywhere (the default for every company; the distance from the home is still recorded and shown to the office) or On — must be at the home (a carer must be inside the check-in zone to check in with one tap). Switch it either way here at any time.
Check-in zone (meters) — the company default, 50–500 m. Each service user's profile can override it.
Case note at check-out — Required — cannot check out without one or Optional.
Case note minimum length — Off — no minimum, or 200 / 400 / 600 / 800 / 1000 characters. Below the minimum the app shows a quiet counter and holds the Save button.
Late check-in — Warn the carer (still allowed) or Silent — just recorded.
Early check-out — Warn the carer (still allowed) or Silent — just recorded.
Check-in opens (minutes before) — 10, 15 (default), 20, 30, 45 or 60 minutes before the call. One-tap check-in opens this long before the call; the page shows the worked example (a 16:00 call opens at 15:45 on the default).
One-tap allowed (minutes after start) — 15, 30, 45, 60 (default), 90 or 120 minutes after the start. A 16:00 call can still be checked into with one tap until 16:59 on the default. After that the carer must use manual check-in with a reason (the app's "Request manual check"). A call nobody checked into shows as missed only once this window has closed, or at the call's end if that is later.
Carer sees rota ahead — 2 weeks (default) or 4 weeks — weeks 3–4 marked provisional.
Auto check-out (no check-out) — Off, or 30 / 60 (default) / 90 minutes or 2 hours after the call end. The call is closed at its scheduled end and flagged to the office in Live Monitor.
How to
Change the policy
Change any of the fields above.
Click Save policy. "✓ Saved — the app follows this policy" confirms it. The button stays disabled until something has changed.
Rules worth knowing
The check-in law is platform-wide: outside the zone, late, or without GPS a carer can always still check in — it is recorded and flagged, never blocked. Only the location check switch changes what the app asks at the door.
Values are chosen from lists, not typed, so every window is one the check-in code defends.
A manual check-in request only applies once a manager accepts it.
Common questions
When does a call become "missed"? Only when the one-tap window has closed with no check-in (or at the call's end, if that is later). Before that it is simply not yet checked in.
A carer says the app refused them at the door. Check the service user's pin and zone first. If the pin is wrong and carers are stuck now, set Location check at check-in to Off, fix the pin, then switch it back On.
Branches and regions
1Regions2Branches3+ Add branch
What it is
Regions are working areas that group carers and clients. The rota's region lens filters by them; they never block assigning anyone anywhere. An office login can be limited to chosen regions (see *Office logins and permissions*).
Branches are separate parts of the company, each with its own carers and clients. A branch is a filter over the whole company: people are tagged into a branch on their profiles and the add forms, and the branch switcher in the account menu narrows the whole app to one branch. A branch becomes its own billing line once an office login is locked to it.
A branch is a hard wall one level below the company; a region is only a grouping. They are not the same thing.
Where to find it
Settings → Regions (/settings/regions)
Settings → Branches (/settings/branches)
The branch choice: account button (top right) → Branch → All branches or a branch name. On phones it sits in the menu sheet.
How to
Add a region or branch
Type the name in the box ("New region name — e.g. Cardiff East" / "New branch name — e.g. Cardiff").
Then pick the region or branch on carer and service-user profiles.
Rename
Click Rename on the row, edit the name, click Save (Escape cancels).
Delete a region
Click Delete. The box says what stays: every carer, client, appointment and run keeps every record; they simply stop being grouped by this region, so the rota's region lens no longer offers it.
Tick I understand — delete the region … and keep all its people, appointments and runs.
Click Delete region.
Delete a branch
Click Delete. Nothing is lost: carers and clients stay in the company with every appointment, note, document and record; they stop being tagged with the branch and show under the whole company. Any login locked to it will see the whole company instead, and its separate billing line ends.
Tick I understand — delete the branch … and keep all its people and their data in the company.
Click Delete branch.
Add a branch login
On the branch row, click + Add branch login. The Office Logins page opens with the new-login form already locked to that branch.
What each row shows
Branch row: name · active carers · clients · billing state (Free until a login is locked to it; otherwise its band and monthly figure) · Branch logins: the office logins locked to it, or "none — this branch is not billed separately until a login is locked to it".
Region row: name · carers · clients.
Rules worth knowing
Deleting a region or branch never deletes a person or a record. Both need a ticked confirmation.
A branch's carer count is the company's active carers tagged to that branch — the billing meter. View Branches in the "All branches" switcher state to see the whole company.
A branch-locked login only ever sees its branch and the switcher offers only that branch. "All branches" on a login means not locked.
Common questions
Do regions stop me assigning a carer outside their area? No. Regions are a lens for viewing; the rota never blocks on them.
When does a branch cost extra? Only once an office login is locked to it. Until then it shows Free. The figures are in the price table and on Settings → Billing.
Matrix Columns — monthly or quarterly
1Monthly2Quarterly3Matrix Columns4Save settings5Open a matrix
What it is
One company-wide choice for how the Supervision, Reviews, Quality Assurance and Spot Check matrices lay out their columns: Monthly (the default — a whole year, Jan–Dec, with ‹ › walking the years) or Quarterly (six rolling quarters). Welfare Calls always show the year.
Where to find it
Settings → Matrix Columns (/settings/matrix-view), or the Matrix Columns tab on any settings page.
How to
Change the column view
Under Column view, click Monthly or Quarterly.
Click Save settings. "Saved — every matrix now uses monthly/quarterly columns." confirms it. Open a matrix goes to the Supervision matrix.
Rules worth knowing
The setting applies to the whole company and every matrix listed above at once.
Changing the view only changes the columns; no record moves or is lost.
Common questions
Why does the Welfare Calls matrix not change? It always shows the year, whatever this setting says.
Office logins and permissions
1+ Add login2Name3Permission4Areas they cover5Reset password
What it is
The page where the owner and managers create office logins, set what each person may do, choose which areas (regions) and branches each login sees, reset passwords, disable logins and — owner only — delete a login for good. Office logins are unlimited on every plan. Every change is recorded in the audit trail.
Where to find it
Settings → Office Logins & Permissions (/settings/staff). Only an owner or manager can open it; anyone else sees "Only a manager can manage office logins and permissions."
How to
Add a login
Click + Add login.
Fill in Name, Email and Permission (Manager, Coordinator or View only — only the owner can choose Manager).
Under "Which areas can this login see & manage?" leave All areas or tick regions. If the company has branches, a second picker asks "Lock this login to a branch?" — leave All branches for a normal login.
Click Create login.
A "Login ready" box shows the email and a temporary password once. Click Copy details to copy them. When email sending is connected, the password is also emailed to the person automatically.
Change what a login may do
Permission: use the drop-down in the Permission column.
Areas they cover: click the area text → tick regions or All areas → Save areas.
Branch lock: click the branch text → tick a branch or All branches → Save branch lock.
Reset a password
Click Reset password on the row and confirm. Their current session is signed out and a new temporary password is shown once (and emailed when email is connected).
Disable or enable a login
Click Disable (confirm) or Enable. A disabled login is signed out instantly and cannot sign in until re-enabled. Only active logins count in the login total at the top.
Delete a login for good (owner only)
Click Delete on the row.
Read the box: the person is signed out at once and can never sign in again; everything they recorded stays exactly as it is, it just no longer shows their name. This cannot be undone.
Tick I am sure — delete …'s login permanently. The Delete login button only works once the box is ticked.
Roles
Capability
Manager
Coordinator
View only
See everything in their areas
✓
✓
✓
Build and change the rota
✓
✓
✕
Record care (supervision, spot checks, reviews, incidents, body maps, medication, notes)
✓
✓
✕
Message carers and families
✓
✓
✕
Manage holidays, off-sick and timesheets
✓
✓
✕
Approve payroll
✓
✕
✕
Change company settings
✓
✕
✕
Manage office logins and permissions
✓
✕
✕
The owner (shown as "Director (owner)") has full authority and always sees all areas and all branches.
Rules worth knowing
One email = one office login. A second login with the same email is refused: "That email already has a login."
One device at a time. Every login can be signed in anywhere, but a single login works on one device at a time — a new sign-in signs the old one out.
The owner login can never be removed, disabled or changed by anyone else. A manager can only manage coordinators and viewers; only the owner manages managers.
You cannot change your own permission level or disable your own login. The owner cannot delete their own login.
A login scoped to chosen areas only sees and manages clients, carers and rosters in those areas. A branch-locked login only sees that branch and cannot switch out.
Locking a login to a branch makes that branch its own billing line (see *Branches and regions*).
Common questions
The temporary password has gone — can I see it again? No. Use Reset password to issue a new one.
Why can't I choose Manager when adding a login? Only the owner can create or set a Manager.
Runs — named rounds
1Runs2Save3+ Add run4Rename5Delete
What it is
A run is a named round a manager hands to one carer. Calls join a run from the appointment card; the rota underlines them with the run line, and clicking the line opens the run card (swap the whole run, see hours, travel and the route map). This settings page is the governance end: create, rename and delete runs, and set the grouping rule that decides where the run line breaks.
Where to find it
Settings → Runs (/settings/runs), or the Runs tab on any settings page.
How to
Set the grouping rule
In Maximum time between run appointments (minutes), enter a value from 10 to 720.
Click Save. "✓ Saved" confirms it.
Calls further apart than this stop counting as one round — the run line breaks into separate segments.
Add a run
Type the name ("New run name — e.g. Erdington Morning Round").
Click + Add run (or press Enter).
Pick the run on any appointment card to put calls in it.
Rename a run
Click Rename on the row, edit, click Save.
Delete a run
Click Delete.
The box says how many appointments are in it: they stay exactly as scheduled and just leave the run.
Click Delete run.
Rules worth knowing
Deleting a run never deletes or moves an appointment.
Each button only reports its own work (Adding…, Saving…, Deleting…); one operation runs at a time.
Common questions
Where do I put a call into a run? On the appointment card on the rota, not on this page. This page only manages the list of runs and the gap rule.
Timesheets & payroll settings, and Worked Hours counting
1Timesheets & payroll2Worked Hours3Payroll month4How hours are counted5Night calls
What it is
Two company-wide counting rules:
Timesheets & payroll (/settings/timesheets) — the payroll month, how paid hours are counted, pay rates and night-call rates. Every carer's timesheet obeys it and states it in plain words.
Worked Hours (/settings/worked-hours) — how the Worked Hours matrix counts an hour: the compliance figure used for contract and sponsorship tracking. Every export states the counting rule on it.
Where to find it
Settings → Timesheets and Settings → Worked Hours, or the tabs on any settings page.
Timesheets & payroll
Payroll month — "The payroll month starts on the" 1st (calendar month) to 28th. Timesheets group into months running from that day to the day before it in the next month; the Month view and Approve for payroll follow it exactly. To pay weekly, use the Week view on any timesheet — every week can be approved for payroll on its own.
How hours are counted
Count hours from: Rostered call times, once checked in (default), Check-in / check-out (exact minutes worked), or Schedule (rostered time paid regardless).
Cancelled calls: Not paid (default) or Paid at their scheduled time.
Pay rates
Pay carers: Per hour (default) with an Hourly rate (£), or Per appointment (by call length) with rates for 15 min, 30 min, 45 min and 1 hour plus an optional Over 1 hour — hourly (£).
Night calls
Separate night charges: Off — night calls pay like any other call or On — night calls have their own rates.
When on: Night starts, Night ends, Waking night (£ / hour), Sleeping night (£ / night) and Sleep-in from (hours) (4 to 10 hours or longer). A call that starts inside the night window is a night call; night calls at or over the sleep-in length are sleeping nights at one flat rate per night; shorter night calls are waking nights paid per hour.
Save the timesheet rules
Change the fields.
Click Save settings. "✓ Saved — timesheets now follow these rules" confirms it.
Worked Hours
What an hour is — Rostered hours of checked-in calls (the call counts its planned length once the carer checked in: a 1-hour call is 1 hour) or Check-in → check-out hours (the exact minutes between check-in and check-out).
Cancelled calls — Not counted (default) or Counted at rostered time, for companies that pay or credit cancelled visits.
Save the Worked Hours rule
Pick the options.
Click Save settings. "Saved — the Worked Hours matrix now counts this way." confirms it. Open Worked Hours goes to the matrix.
Rules worth knowing
Whichever Worked Hours basis is chosen, a call never counts without a check-in — the check-in is the proof the visit happened.
Timesheet rates are typed in pounds; blank means not set.
Timesheets and the Worked Hours matrix are two separate rules. Pay and compliance evidence can be counted differently on purpose.
Common questions
We pay by the visit, not the hour. Set Pay carers to Per appointment (by call length) and fill in the four call-length rates.
Why does a cancelled call show on the timesheet but pay nothing?Cancelled calls is set to Not paid (default). Change it to Paid at their scheduled time if your contracts pay cancellations.
Training Matrix settings and Compliance Cycles
1Training Matrix2Compliance Cycles3Completed date4Next due date5Save settings
What it is
Training Matrix (/settings/trainings) — tick the trainings the company delivers; only ticked ones appear as columns on the Training Matrix. Choose which date the green ✓ chip shows on a completed training.
Compliance Cycles (/settings/compliance-cycles) — how often each care document falls due for review, decided once for the whole company. Every service user's Care Plans & Assessments board derives its due dates from this.
Where to find it
Settings → Training Matrix and Settings → Compliance Cycles, or the tabs on any settings page.
Training Matrix
Two groups of tickable trainings:
In person — courses delivered face to face, practical, assessed on the day.
Online — e-learning modules from UK care-training providers.
Each group's heading shows how many are ticked ("3 of 14 ticked").
Date shown on completed trainings — Completed date or Next due date.
Change the trainings shown
Tap a training to tick or untick it.
Choose Completed date or Next due date.
Click Save settings. "Saved — the Training Matrix now shows your selection." confirms it. Open the Training Matrix goes to the grid.
Unticking hides a column but keeps every record; ticking it again brings the history back.
Compliance Cycles
One drop-down per document type: Initial Assessment, Care Plan, Risk Assessment, 7-Day Review, 3-Monthly Review, Quality Assurance, Consent & Capacity, Other document — plus Your own documents (custom types).
Choices: one-time only, or every 1, 2, 3, 6, 12 or 24 months (custom types cannot be one-time only).
Defaults: 7-Day Review one-time only; Quality Assurance every 6 months; everything else, including custom documents, every 3 months.
Change a cycle
Pick the cycle for each document type.
Click Save cycles. "✓ Saved — every document board now follows these cycles" confirms it. The button is disabled until something has changed.
Rules worth knowing
Due dates recompute the moment you save — every service user's document board changes at once.
There is no per-upload choice of cycle; the company rule applies to every document of that type.
Training records are never deleted by changing the ticks.
Common questions
Can one service user have a different review cycle? No. Cycles are company-wide by design.
We stopped delivering a course — will its history vanish? No. Untick it to hide the column; the records stay and return if you tick it again.
Travel & Mileage Pay
1Save policy
What it is
The company decides what counts as payable travel time, mileage and waiting time. Real figures are always shown honestly on rosters — this policy only controls the paid figures.
Pay travel time — Yes — paid (capped at the gap) or No — not paid.
Pay mileage — Yes — paid or No — not paid.
Pay waiting time — Yes — paid or No — not paid (default).
Treat as a break from (minutes) — 0 to 480 in steps of 5. Gaps this long or longer are a break: no paid travel or waiting for that gap.
Double-handed mileage — First carer only (default) or Both carers.
Home / office journeys (commute) — Counted or Not counted (default).
How to
Change the policy
Change any field.
Click Save policy. "✓ Saved — rosters now follow this policy" confirms it. The button is disabled until something has changed.
Rules worth knowing
Paid travel time is capped at the gap between calls, so a long drive never pays more than the free time it falls in.
Travel and distance figures themselves are computed from real routes and shown on rosters whatever the pay policy says.
Common questions
A carer had a two-hour gap and drove 20 minutes — why no travel pay? If Treat as a break from is set at or below the gap's length, the gap is a break and pays no travel or waiting.
Week starts on
1First day of the week2Save
What it is
The first day of the company's working week. Monday unless changed; any day of the week can be chosen. Rosters, weekly hours, timesheets by week, the holiday calendar, the Care Map week, the weekly reports and the dashboard's weekly charts all run from this day. The carer app shows the same order.
Where to find it
Settings → Week Starts On (/settings/week-start). Only an owner or manager can change it; others see "Only an owner or manager can change this."
How to
Change the first day
In First day of the week, choose Monday (default), Tuesday, Wednesday, Thursday, Friday, Saturday or Sunday.
Click Save.
The page confirms, e.g. "Saved — your week now runs Sunday to Saturday."
Rules worth knowing
The stored schedule is untouched: no appointment moves. Only the weekly views and totals re-cut around the new day.
The awards' weeks (Carer of the Week) use ISO weeks and are not affected.
Date pickers stay Monday-first.
Common questions
We migrated from a system that ran Sunday to Saturday — can we keep that? Yes. Choose Sunday and every weekly view follows.
Billing — plan, card, invoices and switching to yearly
1Billing2Payment & plan
What it is
Settings → Billing shows what Stripe actually charges the company, when the next payment is, the card or Direct Debit on file, and the live view of active carers against the band. Only an owner or manager can open it.
Where to find it
Account menu (top right) → Settings → Billing. Direct path: Settings → Billing.
How to
Change the card or Direct Debit
Open Settings → Billing.
Under Payment & plan, press Change card or Direct Debit.
Stripe's secure page opens. Add the new card or Direct Debit, make it the default, remove the old one if wanted, then return to Carelo.
There is no limit on saved cards; the default one is charged. The Stripe page cannot cancel or change the plan.
See invoices and receipts
Settings → Billing → Invoices and receipts.
Stripe's page lists every invoice with a download. Receipts also arrive by email from Stripe.
Switch from monthly to yearly billing
Settings → Billing → Switch to yearly billing. The box shows every item (plan and add-ons) at its monthly and yearly price and the saving.
Press Switch to yearly billing, then Yes, switch to yearly.
What happens: during a 30-day evaluation nothing is charged today and the first collection at the end is the yearly amount. On a paid monthly plan the year is charged to the card now, less a credit for the unused part of the month; a Direct Debit collects over the next few days. A declined card changes nothing. A year is a year: it does not switch back to monthly.
See the main plan and active carers
The Billing table lists the main plan and any branch with a login locked to it, each priced by its current active carers, and shows when the company is within three carers of the next band. Nothing on this table is charged automatically; it is the live view of what applies.
Rules worth knowing
A company with no Stripe account sees one line: billing is handled directly with Carelo. Email help@carelo.co.uk for changes.
If a Carelo AI or Live Tracking payment fails, that add-on is paused until the invoice is paid: Billing shows a "paused" notice, the Carelo AI and Live Tracking pages say "paused — update your card", and the add-on switches back on by itself when the payment clears. The main plan is not affected.
If the main plan's payment fails, service continues and the company gets written notice with at least 7 days to fix it, with a one-click Pay now button to the invoice. Only after that can Carelo place the company on hold: a notice on day 0, the office read-only from day 3, the carer and family apps read-only from day 14. Paying the open invoice lifts the hold immediately.
The price of every band and add-on is in the price table; yearly is 12 months upfront with the band's discount.
Common questions
Can we add a second card? Yes, through Change card or Direct Debit. The default card is charged.
Can we switch back to monthly after going yearly? No. The yearly period runs its course; you can choose again at renewal by contacting help@carelo.co.uk.
Who can see Billing? Owners and managers. Coordinators and viewers see a notice that only an owner or manager can see billing.
Funding and invoicing live on each service user's profile under Funding & Invoices: who pays for this person's care, the agreed hourly rate, and the invoices raised against each funder. Invoices are immutable snapshots — the calls are copied in when the invoice is created, so a later rota change never alters a raised invoice.
The /finance page in the main menu is currently a placeholder with no content; the real finance work is on the service user's page. Pay and travel policy sit in Settings → Pay & Finance.
Where to find it
Service Users → open a person → Funding & Invoices (/service-users/[id]/funding). Coordinators and managers can use it.
How to
Add a funder
Click + Add a funder.
Choose the kind: Local Authority, NHS / CHC, Private (self-funded), Direct Payment or Other.
Enter the name (e.g. "Birmingham City Council"), an optional reference, and the hourly rate in pounds (e.g. "22.50").
Click Add funder. An existing funder row offers Save, Cancel and Remove.
Raise an invoice
Under Raise an invoice, choose Bill to (a funder — the drop-down shows its hourly rate).
Set From and To.
Click Create draft invoice. Every non-cancelled care call in the period is charged at the funder's hourly rate, and the calls are snapshotted.
If no funder exists yet the page says "Add a funder first — an invoice needs someone to bill."
Move an invoice through its statuses
Draft → Sent → Paid. On the row: Mark sent on a draft, Mark paid on a sent invoice. A draft can be deleted with Delete (confirm). Open an invoice for the letterheaded document — print it or save as PDF.
Rules worth knowing
Only drafts can be deleted. Sent and paid invoices stay.
An invoice covers one service user and one funder for one period.
Finance is open to coordinators as well as managers; it is not gated to the owner.
Common questions
The rota changed after I raised the invoice — does the invoice change? No. The calls were snapshotted when the draft was created. Delete the draft and create a new one if it should reflect the change.
Where are the pay rates for carers? Those are payroll, not invoicing: Settings → Timesheets.
The account menu — theme, logo, branch, support, sign out
What it is
The round button at the top right of the header. It shows the company logo when one is uploaded, otherwise the signed-in person's initials. It opens a small panel: who you are, the branch choice, Company logo, Carelo support, Settings and Sign out. Next to it sits the theme button.
Where to find it
Top right of every office page. On phones the branch choice also sits in the ☰ menu sheet.
How to
Switch between light and dark
Click the round theme button next to the account button (🌙 "Switch to dark mode" / ☀ "Switch to light mode"). Light is the default. The choice is remembered per browser and the right theme loads on arrival, with no flash.
Upload the company logo
Open the account menu → Company logo (owner and managers only).
Pick an image. It is resized and saved at once, and replaces the initials in the header.
Choose a branch
Open the account menu → under Branch, click All branches (or All my branches for a login limited to some branches) or a branch name. The app reloads narrowed to that branch; a tick marks the active one. The group only appears when the company has branches.
Contact Carelo support
Open the account menu → Carelo support. The support chat opens with instant answers; ask for a person to be handed to the team.
Sign out
Open the account menu → Sign out.
Rules worth knowing
The panel header shows your name, the company name and your permission level.
Settings appears only for the owner and managers.
A branch-locked login sees only its own branches in the list.
Common questions
I uploaded a logo but a colleague still sees initials. They need to reload; the logo is company-wide once saved.
Does dark mode apply to my colleagues? No. The theme is per browser, not per company.
Questions at any point? Inside Carelo, open Carelo support from the account menu, or write to help@carelo.co.uk.
 Carelo